 Triumph Scrambler 1200 XC - Service manual > Clutch Cover
Clutch Cover - Removal
WARNING
Before starting work, ensure the motorcycle is stabilised and adequately supported. This will help prevent it from falling and causing injury to the operator or damage to the motorcycle.
Perform the following operations:
- Seat - Removal
- Battery - Removal
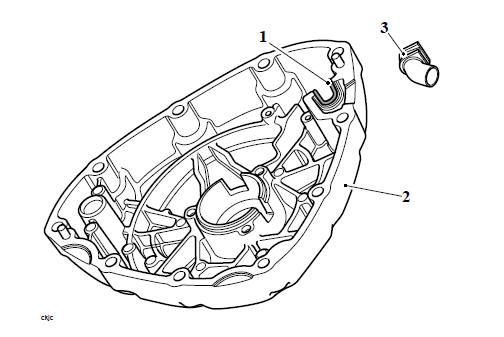
1. Disconnect the clutch cable at the clutch cover (see Clutch Cable - Removal).
2. Release the fixing and disconnect the gear change actuator arm at the clutch cover.
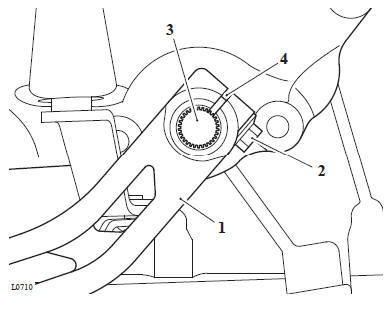
- Gear change actuator arm
- Fixing
- Actuator arm alignment mark
- Gear change actuator arm split line
Note
- Note the position of the clutch cable brackets prior to removal.
3. Release the fixings securing the clutch cover to the crankcases. Note the position of the encapsulated fixings and discard.
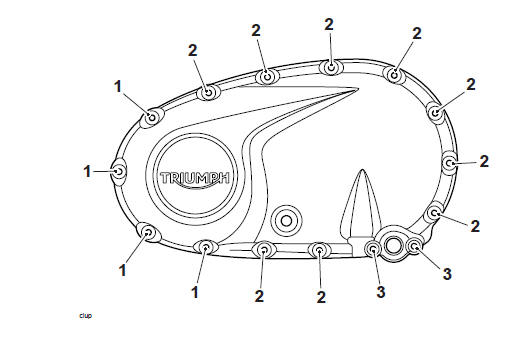
- Fixings M6 x 50 mm
- Fixings M6 x 40 mm
- Encapsulated fixings M6 x 35 mm
4. Place an oil catch tray beneath the clutch cover to collect any oil that may spill out on removal.
5. Carefully withdraw the cover.
6. Remove the gasket and clean the surfaces of the crankcase and the clutch cover using a lint free cloth.
7. Note the position of the washer on the 7. gear change shaft.
- Gear change shaft
- Washer
Clutch Cover - Installation
WARNING
Before starting work, ensure the motorcycle is stabilised and adequately supported. This will help prevent it from falling and causing injury to the operator or damage to the motorcycle.
Note
- The sound suppression assembly has been removed from the clutch cover from VIN 803544. The clutch cover without the sound suppression assembly is retrofittable to models from the start of production.
- If you install a new clutch cover to an engine before VIN 803544, do not try to install the sound suppression assembly.
CAUTION
Do not drill or tap the latest condition clutch cover to fit the sound suppression assembly.
Attempting to drill or tap the latest condition clutch cover may crack the boss.
A cracked boss will cause oil to leak from the clutch cover.
1. Ensure the washer is correctly positioned on the gear change shaft.
- Gear change shaft
- Washer
2. Thoroughly clean the cover and crankcase mating faces.
3. Position a new gasket to the crankcase.
4. Refit the cover ensuring that the gasket does not become dislodged.
Note
- Ensure that the lifter piece claw engages correctly with the pull rod during assembly. It may be necessary to rotate the lifter piece rack to allow assembly to take place.
- Fixings 4 and 10 are encapsulated and must be replaced during fitment.
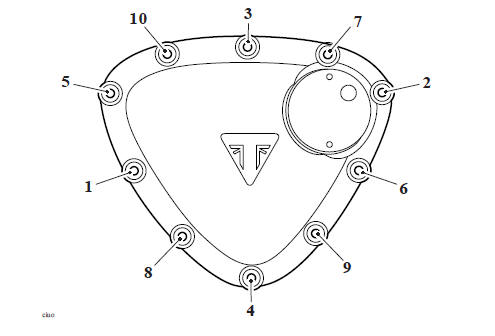
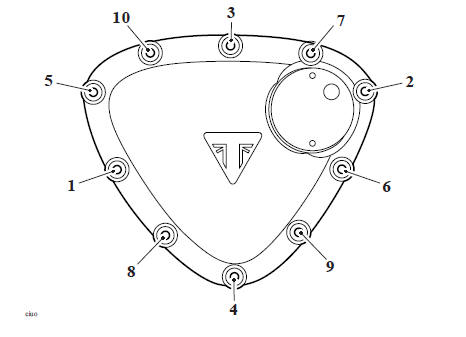
5. Refit the two brackets for the clutch cable and fixings as noted during removal, tighten the fixings as described below:
- Tighten fixings 1 to 13 in the sequence shown below to 10 Nm.
6. Fit the clutch cable bracket and tighten fixings 14 and 15 to 10 Nm.
- Retighten fixings one, two and six to 10 Nm.
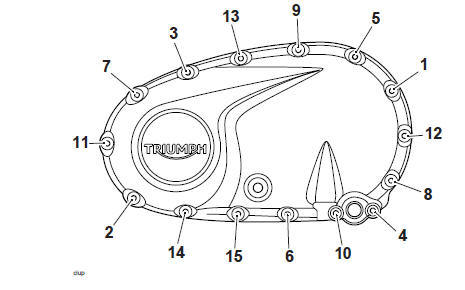
Tightening Sequence
- Align the split line on the gear change actuator arm with the alignment mark on the gear change shaft and fit the actuator arm to the spline. Fit the fixing and tighten to 8 Nm.
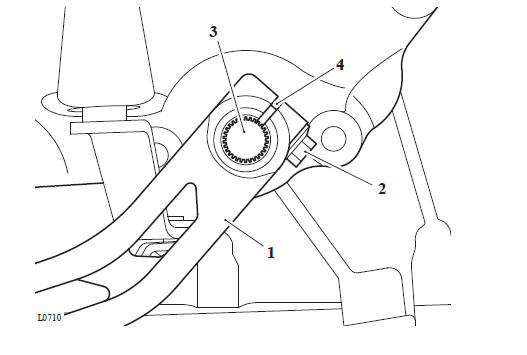
- Gear change actuator arm
- Fixing
- Actuator arm alignment mark
- Gear change actuator arm split line
- Refit and adjust the clutch cable (see Clutch Cable - Installation).
Perform the following operations:
- Battery - Installation
- Seat - Installation
Alternator Cover - Removal
WARNING
The rotor magnets are very strong. When handling the alternator cover the magnets may 'grab' the stator, causing injury to the hands or fingers. When handling the alternator cover wear suitable gloves and only grip the alternator cover by the outside surfaces; always keep hands and fingers clear when handling the alternator cover.
Note
- The alternator and crankshaft position sensor share the same harness.
- Note that the white tape on the harnesses within the harness guide aligns with the upper gap for installation.
- Note the routing of the alternator harness for installation.
Perform the following operations:
- Seat - Removal
- Battery - Removal
- Front Sprocket Cover - Removal
- Rear Mudguard - Removal
1. Route the alternator harness from the alternator regulator/rectifier to the harness guide on the crankcase.
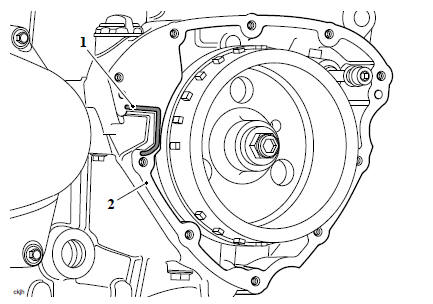
2. Remove and discard the fixings and detach the harness guide from the crankcase.
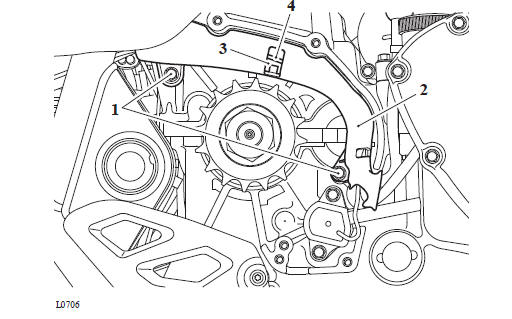
- Fixings
- Harness guide
- Upper gap
- White tape
3. Carefully remove the alternator harness from the harness guide.
- Harness guide
- Harness
4. Place an oil catch tray beneath the alternator cover to collect any oil that may spill out on removal.
5. Release the fixings securing the alternator cover to the crankcases.
Removal Sequence
6. Carefully withdraw the cover.
7. Remove the gasket and clean the surfaces of the crankcase and the alternator cover using a lint free cloth.
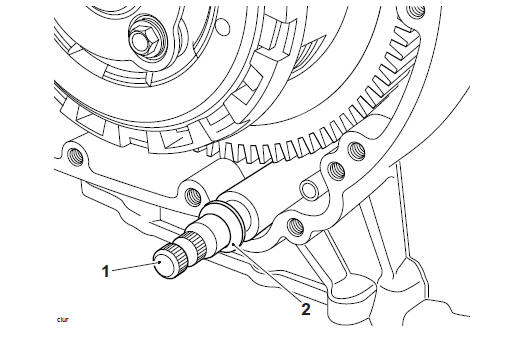
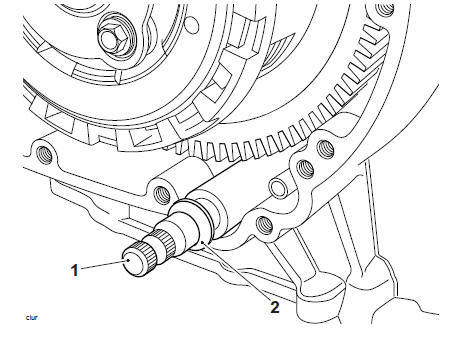
8. Remove and discard the O-rings from the balancer dead shaft.
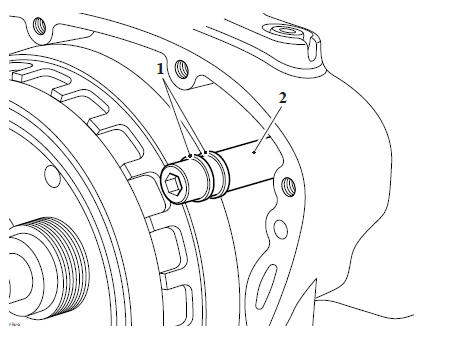
- O-ring
- Balancer dead shaft
Alternator Cover - Installation
WARNING
The rotor magnets are very strong. When handling the alternator cover the magnets may 'grab' the stator, causing injury to the hands or fingers. When handling the alternator cover wear suitable gloves and only grip the alternator cover by the outside surfaces; always keep hands and fingers clear when handling the alternator cover.
- Thoroughly clean the crankcase, harness grommet and alternator cover mating faces.
- Fit new O-rings to the balancer dead shaft.
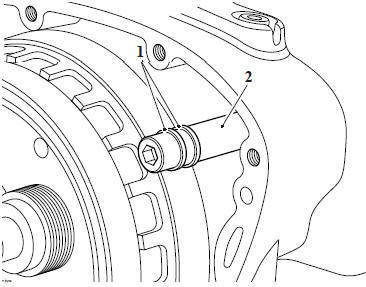
- O-rings
- Balancer dead shaft
3. Position a new gasket to the crankcase dowels.
Note
When using ThreeBond 1216E the mating faces must come into contact with each other within five minutes of application.
4. Apply a 2 mm (+/-0.5 mm) bead of silicone sealant to the outer surface of the gasket in the area shown in the diagram below, during manufacture, ThreeBond 1216E is used.
- Sealant area
- Gasket
5. Apply a 2 mm (+/-0.5 mm) bead of silicone sealant to the area of the alternator cover at the location of the harness rubber grommet as shown in the diagram below, during manufacture, ThreeBond 1216E is used.
- Sealant area
- Alternator cover
- Rubber grommet (harness removed for clarity)
6. Fit the alternator cover and tighten the fixings to 10 Nm, in the sequence shown below.
Tightening Sequence
7. Re-tighten fixings one and two to 10 Nm.
8. Route the alternator harness to the alternator regulator/rectifier securing it to its clips as noted for removal. Connect it to the alternator regulator/rectifier.
9. Carefully fit the alternator harness into the harness guide as noted for removal.
10. Secure the harness guide to the crankcase and tighten the new fixings to 4 Nm.
- Fixings
- Harness guide
- Upper gap
- White tape
Perform the following operations:
- Rear Mudguard - Installation
- Front Sprocket Cover - Installation
- Battery - Installation
- Seat - Installation
See also:
 Triumph Scrambler 1200 XC - Service manual > Engine Covers
Exploded View - Sump Exploded View - Clutch Cover
Triumph Scrambler 1200 XC - Service manual > Camshaft Cover
Camshaft Cover - Removal WARNING Before starting work, ensure the motorcycle is stabilised and adequately supported. This will help prevent it from falling and causing injury to the operator or damage to the motorcycle.
 Ducati Scrambler
 Fantic Caballero 500
 Indian FTR 1200
 Moto Guzzi V85 TT
 Royal Enfield Bullet Trials Works Replica
 Triumph Scrambler 1200 XE
 Triumph Street Scrambler
 Yamaha XSR700
 Ducati Scrambler 800
 Moto Guzzi V85 TT
 Triumph Scrambler 1200 XC