 Triumph Scrambler 1200 XC - Service manual > Piston
Piston - Removal
WARNING
Before starting work, ensure the motorcycle is stabilised and adequately supported. This will help prevent it from falling and causing injury to the operator or damage to the motorcycle.
Perform the following operations:
- Seat - Removal
- Battery - Removal
- Fuel Tank - Removal
- Barrels - Removal
Note
If both pistons are being removed, mark each piston to ensure it is refitted in its original location.
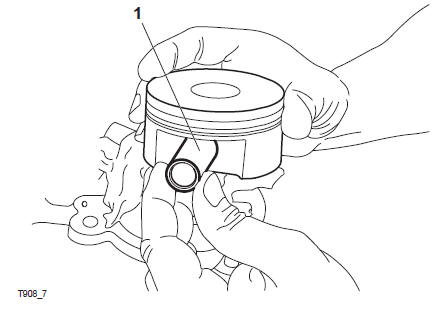
1, Remove and discard the gudgeon pin circlip from one side of the piston.
CAUTION
If a circlip is dropped into the crankcase, it must be recovered before the crankshaft is rotated. Failure to do so will result in serious engine damage.
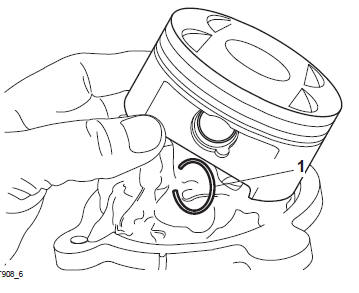
- Circlip
2. Remove the gudgeon pin by pushing the pin through the piston and connecting rod toward the side from which the circlip was removed.
CAUTION
Never force the gudgeon pin through the piston. This may cause damage to the piston which may also damage the cylinder barrel when assembled.
Note
If the gudgeon pin is found to be tight in the piston, check the piston for a witness mark caused by the circlip. Carefully remove the mark to allow the pin to be removed.
3. Remove the remaining circlip from the piston and discard it.
4. Remove the piston rings.
Note
- The rings may be removed using a proprietary piston ring expander tool or, if a tool is not available, carefully spread the ring opening using thumb pressure then push up on the opposite side of the ring to remove it from the piston.
Piston - Wear Check
- Remove any carbon build-up from the piston crown. Inspect the piston crown for signs of pitting and check the piston skirt and ring grooves for signs of wear or scuffing. If any sign of damage is found, renew the piston.
- Measure the piston outside diameter 10 mm +/- 3 mm from the bottom of the piston and at 90º to the direction of the gudgeon pin.
- Piston outside diameter
- Measurement point
3. Always refer to the specifications table (see Piston).
4. Replace the piston and rings if outside the specified limit.
Piston - Installation
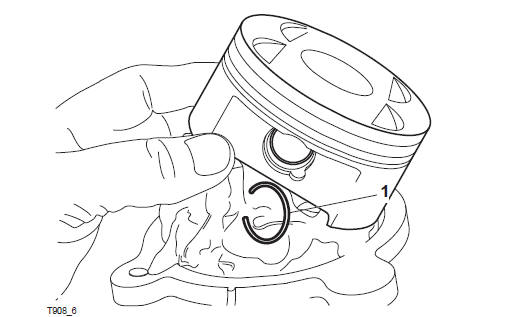
1. Fit a new circlip to the inside of the piston. Ensure the circlip is correctly located in the piston groove.
WARNING
Failure to use new gudgeon pin circlips could allow the pin to detach from the piston. This could seize the engine resulting in loss of motorcycle control and an accident.
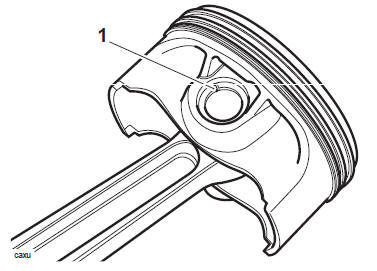
- Circlip Fitment
2. Lubricate the connecting rod small-end and gudgeon pin with clean engine oil.
3. Align the piston with the connecting rod, ensuring the triangular mark on the piston crown is facing towards the front of the engine.
Note
If the original pistons are being refitted, ensure they are fitted in their original locations.
4. Insert the gudgeon pin into the piston and push it fully into position.
Gudgeon Pin
5. Secure the gudgeon pin in position with the remaining new circlip. Ensure the circlip is correctly located in the piston groove.
CAUTION
If a circlip is dropped into the crankcase, it must be recovered before the crankshaft is rotated. Failure to do so will result in serious engine damage.
- Circlip
CAUTION
Do not allow the pistons to fall against the crankcase when turning the engine.
Piston and/or crankcase damage could occur if the pistons are not supported while turning the engine.
6. Install the remaining piston.
Perform the following operations:
- Barrels - Installation
- Fuel Tank - Installation
- Battery - Installation
- Seat - Installation
Piston Ring to Groove - Clearance
Note
Prior to removing the rings, check the ring-to-groove clearance of each compression ring.
- With the piston rings correctly installed on the piston, check the ring-to-groove clearance of each compression ring, using a feeler gauge.
Piston Ring-to-Groove Clearance Check
2. When checking the piston ring to groove clearance, always refer to the specifications table (see Piston).
Note
- If the ring-to-groove clearance is too large, replace the piston rings with a new set.
- If the gap remains too large with new piston rings, the piston must also be replaced.
- If the gap is too small, check the piston ring grooves closely for distortion, replacing the piston as necessary. Do not file the ring grooves.
Piston Rings - Removal
CAUTION
Do not expand the piston rings any more than is necessary to allow them to be removed from the piston. The rings are brittle and will break if expanded too much.
1. Ease the top compression ring out of its groove and remove it from the top of the piston.
2. Remove the second compression ring 2. in the same way.
Note
- The top and second compression rings are different and are not interchangeable (see Piston Rings - Assembly).
- Piston rings must be removed from the piston using hand pressure only. Do not overextend the piston rings during removal.
- If the piston rings are to be reused, note the orientation of the oil control rings prior to removal.
3. Remove the oil control 3. rings and expanders.
Note
If the piston rings are to be reused, keep them with their respective piston to ensure they are refitted in their original locations.
Piston Ring - End Gap
1. Check each piston ring end gap as follows.
Note
- The piston ring end gap must be measured in the cylinder bore to which the piston ring will be fitted to on installation.
- Ensure all piston rings are fitted in their original locations (if original rings are being reused) or to the piston/bore which the end gaps were checked (if new rings are being installed).
2.
- Position the piston ring into the top of the cylinder bore.
- Using the piston crown, push the piston ring down into the bore (the piston will keep the piston ring square) until the third groove of the piston is level with the top of the bore.
- Remove the piston and measure the gap between the ends of the piston ring, using a feeler gauge.
- Checking piston ring end gap
3. When checking the piston ring end gap, always refer to the specifications table (see Piston).
Note
- If the end gap is too large, replace the piston rings with a new set.
- If the gap remains too large with new piston rings, both the pistons and barrels must be replaced.
- If the gap is too small, check the cylinder bore for distortion, replacing as necessary.
- Do not file the piston rings.
4. Repeat the procedure for the remaining piston rings.
Piston Rings - Assembly
1. Ensure the piston ring grooves are clean.
Note
- Ensure all piston rings are fitted in their original locations (if original rings are being reused) or to the piston/bore which the end gaps were checked (if new rings are being fitted).
CAUTION
Do not expand the piston rings any more than is necessary to allow them to be installed on the piston. The rings are brittle and will break if expanded too much.
2. Fit the oil control ring expander to the piston then install the upper and lower control rings (the oil control rings are both the same and can be fitted either way up).
3. Fit the second compression ring carefully to the piston, ensuring its 2T mark is facing upwards.
4. Fit the top compression ring to the piston ensuring its 1T mark is facing upwards.
Note
- Ensure the second and top compression rings are correctly installed.
- The second and top compression rings are different and are not interchangeable.
- The top ring can be identified by the chamfer on its upper inside edge.
- The second ring has no chamfer.
Piston Ring Identification
5. Ensure all piston rings move freely in their grooves.
6. Position the piston ring end gaps as follows (piston viewed from above, triangular mark facing forwards).
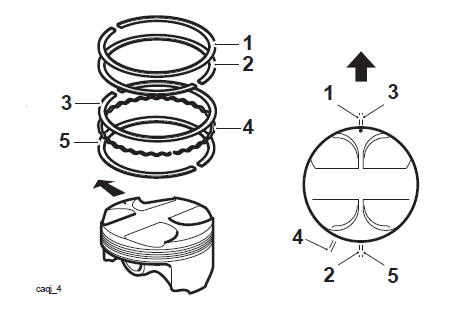
Piston Ring End Gap Locations
- Top ring
- Second ring
- First steel oil control ring
- Oil control ring expander
- Second steel 5. oil control ring
Note
- The top compression ring gap should be in the 12 o'clock position.
- The second compression ring gap should be in the 6 o'clock position.
- The first oil control ring gap should be in the 12 o'clock position.
- The second oil control ring gap should be in the 6 o'clock position.
- The oil control ring expander gap should be in the 7 o'clock position.
See also:
 Triumph Scrambler 1200 XC - Service manual > Barrels
Exploded View - Barrels and Pistons Barrels - Removal
 Ducati Scrambler
 Fantic Caballero 500
 Indian FTR 1200
 Moto Guzzi V85 TT
 Royal Enfield Bullet Trials Works Replica
 Triumph Scrambler 1200 XE
 Triumph Street Scrambler
 Yamaha XSR700
 Ducati Scrambler 800
 Moto Guzzi V85 TT
 Triumph Scrambler 1200 XC