 Moto Guzzi V85 TT - Owner's Manual > Advanced functions
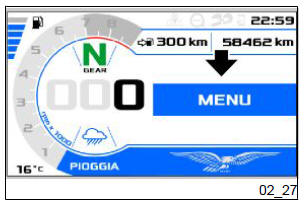
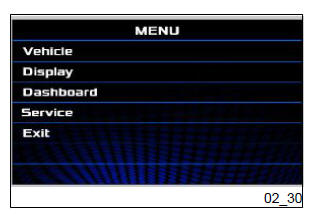
MENU
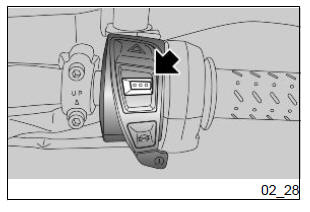
After having been selected, the configuration menu can be immediately accessed by pressing and quickly releasing the centre of the MODE selector directly from the main screen.
The flow chart below shows the menu structure.
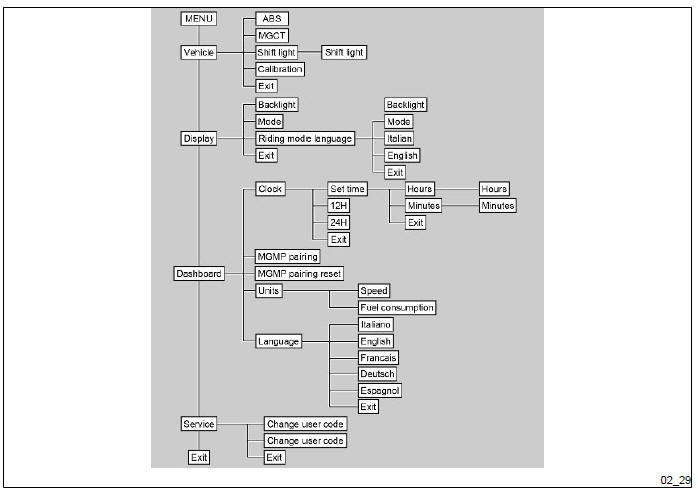
The menu is composed of the following entries:
- Vehicle
- Display
- Dashboard
- Service
- Exit
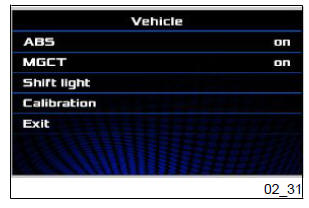
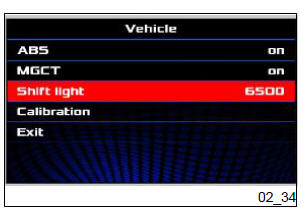
1) Vehicle
The "Vehicle" menu consists of the following items:
- ABS
- MGCT (Moto Guzzi Traction Control)
- Shift light
- Calibration
- Exit
The functions of the "Vehicle" menu are shown in the paragraphs below.
To go back to the main "MENU", briefly press the centre of the MODE selector.
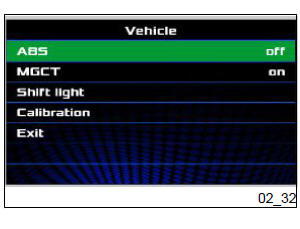
1.1) ABS
This function allows you to deactivate the ABS system that is normally active ("On").
briefly press the centre of the MODE selector to deactivate the function ("Off") and press again to "reactivate".
The function can only be deactivated when the vehicle is in "OFF ROAD" mode. If the driving mode is changed, the ABS system is reactivated.
To go back to the "MENU", briefly press the centre of the MODE selector when on "Exit".
CAUTION
IT IS DISABLED ONLY TEMPORARILY, WHEN THE KEY IS INSERTED THE SYSTEM IS ALWAYS ACTIVE.
CAUTION
DISABLING IS POSSIBLE ONLY WHEN THE VEHICLE IS IN "OFF ROAD" MODE.
IF THE RIDING MODE IS CHANGED, ABS REACTIVATES.
IF DISABLED, THE ABS INDICATOR LIGHT STAYS ON STEADY.
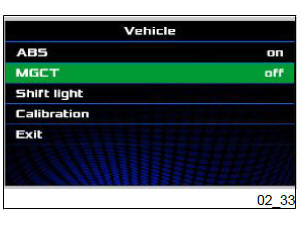
1.2) MGCT (Moto Guzzi Traction Control)
This function allows you to deactivate the MGCT system that is normally active "On".
briefly press the centre of the MODE selector to deactivate the function ("Off") and press again to "reactivate".
To go back to the "MENU", briefly press the centre of the MODE selector when on "Exit".
CAUTION
IT IS DISABLED ONLY TEMPORARILY, WHEN THE KEY IS INSERTED THE SYSTEM IS ALWAYS ACTIVE.
1.3) Shift light
This function allows you to set the rpm threshold that lights up the relative warning lights when exceeded.
briefly press the centre of the MODE selector to highlight the function in red and move up or down to modify the threshold.
To exit the modification function, briefly press the centre of the MODE selector.
To go back to the main "MENU", briefly press the centre of the MODE selector when on "Exit".
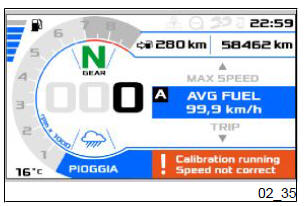
1.4) Calibration
When the Calibration function is selected (with the vehicle at a standstill), a screen appears with the following description in the bottom right of the display: Calibration running Speed not correct
CAUTION
THE MGCT INDICATOR LIGHT COMES ON TO INDICATE THE SYSTEM HAS BEEN DEACTIVATED
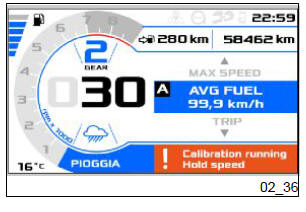
To calibrate the MGCT (Moto Guzzi Control Traction) system, ride along a flat straight road in second gear at a speed of 30 +/- 2 km/h (18.64 +/- 1.24 mph) for about 10 seconds until the message "Calibration running Hold speed" appears on the digital display.
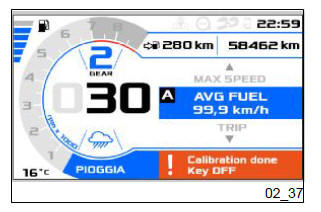
If calibration is completed correctly, the message "Calibration done Key OFF" is displayed.
NOTE
WHEN THE MESSAGE "Calibration done Key OFF" DISAPPEARS FROM THE DISPLAY, STOP THE VEHICLE AND SWITCH OFF THE IGNITION FOR AT LEAST 60 SECONDS TO COMPLETE THE CALIBRATION PROCEDURE .
THIS ALLOWS THE CALIBRATION TO BE STORED IN THE MEMORY.
NOTE
THE CALIBRATION OPERATION IS USED TO OPTIMISE THE MGCT SYSTEM IN CASE OF A CHANGE IN TYRE TYPE.
NOTE
TURN THE IGNITION SWITCH OFF TO ABORT THE CALIBRATION PROCEDURE.
DURING CALIBRATION, THE MGCT SYSTEM IS AUTOMATICALLY REACTIVATED (IF PREVIOUSLY DEACTIVATED).
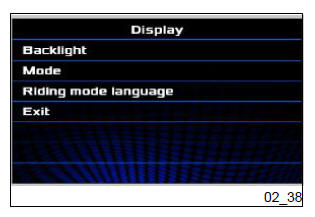
2) Display
The "Display" menu consists of the following:
- Backlight
- Mode
- Riding mode language
- Exit
The functions of the "Display" menu are shown in the paragraphs below.
To go back to the main "MENU", briefly press the centre of the MODE selector.
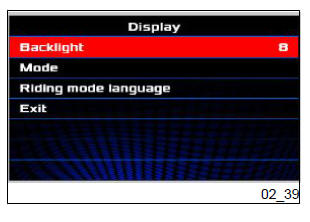
2.1) Backlight
This function allows you to change the backlight of the digital display, from a minimum value of 1 to a maximum value of 10.
If you briefly press the centre of the MODE selector, the "Backlight" function turns red.
Briefly moving the MODE selector up or down, the intensity of the backlight increase or decreases.
Pressing the MODE selector again confirms the value selected and exits the modification function.
To return to the "Display" menu, select "EXIT" on the menu and briefly press the centre of the MODE selector.
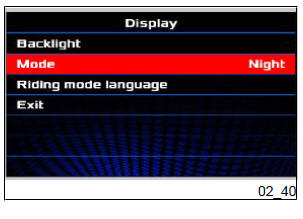
2.2) Mode
This function allows you to change the display mode of the digital display.
- AUTO.
- DAY.
- NIGHT.
If you briefly press the centre of the MODE selector, the "Mode" function turns red.
Briefly shifting the MODE selector to the left or right, it is possible to select the preferred mode.
Pressing the MODE selector again confirms the selection and exits the modification function.
To return to the "Display" menu, select "EXIT" on the menu and briefly press the centre of the MODE selector.
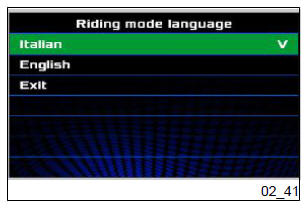
2.3) Riding mode language
This function allows you to change the language of the riding mode on the digital display.
- Italian.
- English
- Exit.
By moving the MODE selector up and down, you can select the preferred language which is confirmed by the check mark "V".
To return to the "Display" menu, select "EXIT" on the menu and briefly press the centre of the MODE selector.
3) Dashboard
The "Dashboard" menu consists of the following items:
- Clock.
- MGMP pairing.
- MGMP pairing reset.
- Units.
- Languages.
- Exit.
The functions of the "Dashboard" menu are shown in the paragraphs below.
To go back to the main "MENU", briefly press the centre of the MODE selector.

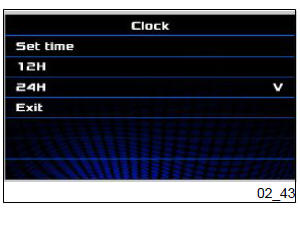
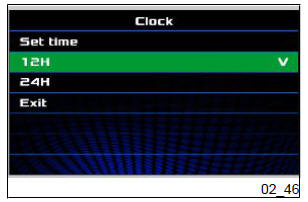
3.1) Clock
The "Clock" menu is composed of the following:
- Set time
- 12H
- 24H
- Exit
The functions of the "Clock" menu are shown in the paragraphs below.
To go back to the main "MENU", briefly press the centre of the MODE selector.
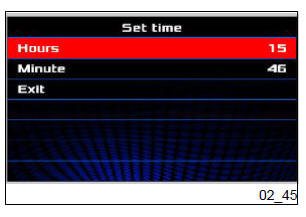
3.1.1) Set time
This menu allows you to set the clock and is divided in turn into the following entries:
- Hours
- Minutes
- Exit
The functions of the "Set time" menu are shown in the paragraphs below.
To go back to the "Clock" menu, briefly press the centre of the MODE selector on "Exit".
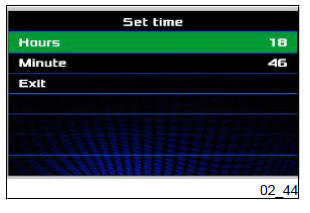
3.1.1.1) Hours / 3.1.1.2) Minutes
To edit and as a result modify the value of one of the two selected functions, briefly press the centre of the MODE selector. The background of the selected function will be red.
By briefly moving the MODE selector up or down, you can change its value.
To exit the modification function, briefly press the MODE selector.
To go back to the "Clock" menu, briefly press the centre of the MODE selector on "Exit".
3.1.2) 12H / 3.1.3) 24H
To activate the time display format, 12H or 24H, press and quickly release the centre of the MODE selector at the format desired. The selection is confirmed by the check mark "V".
To go back to the "Dashboard" menu, briefly press the centre of the MODE selector on "Exit".
3.2) MGMP pairing
This function allows an external device to be connected to the MGMP (Moto Guzzi Multimedia Platform) control unit on the motorcycle.
Select MGMP pairing and press and quickly release the centre of the MODE selector to activate the function.
At this point the digital display will return to the standard screen, which will contain a box with the message "PAIRING ENABLED".
For more details, see the specific MGMP Infotainment booklet.
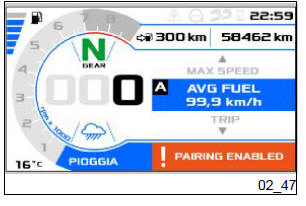
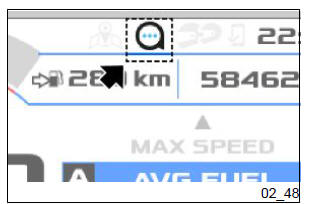
When the MGMP system is connected to the smartphone via Bluetooth Low Energy, the specific icon on the digital display is highlighted.
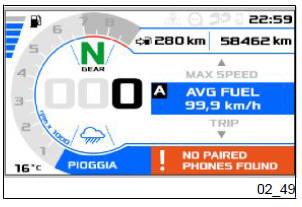
3.3) MGMP pairing reset
This function resets the pairing function and can therefore be used to remove all previously paired devices.
NOTE
TURN THE IGNITION OFF AND THEN ON AGAIN TO COMPLETE THE OPERATION.
THE MESSAGE "NO PAIRED PHONES FOUND" WILL APPEAR WHEN YOU TURN THE IGNITION ON.
3.4) Units
This menu allows you to change the settings for displaying the units of measurement and is divided as follows:
- Speed
- Fuel consumption
- Temperature
- Exit

To return to the "Dashboard" menu, select "EXIT" on the menu and briefly press the centre of the MODE selector.
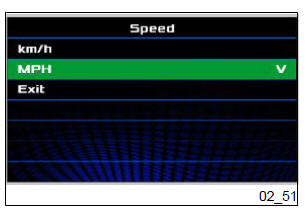
3.4.1) Speed
To activate the desired units, expressed in km/h or in MPH, select the unit and press and quickly release the centre of the MODE selector. The selection is confirmed by the check mark "V".
To go back to the "Units" menu, briefly press the centre of the MODE selector on "Exit".
NOTE
IF THE UNIT OF MEASURE SET AT THE FACTORY HAS BEEN CHANGED, THE SPEED'S UNIT OF MEASURE WILL FLASH FOR 30 SECONDS EACH TIME THE KEY IS ENGAGED.
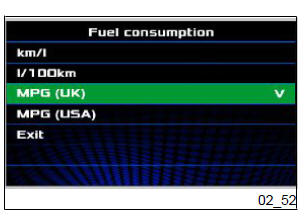
3.4.2) Fuel consumption
To activate the desired units for fuel consumption, select the unit and press and quickly release the centre of the MODE selector. The selection is confirmed by the check mark "V".
To go back to the "Units" menu, briefly press the centre of the MODE selector on "Exit".
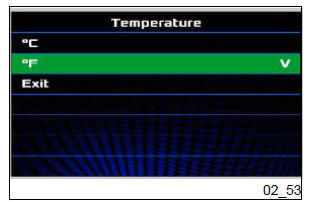
3.4.3) Temperature
To activate the desired units for ambient temperature, press and quickly release the centre of the MODE selector on the desired value. The selection is confirmed by the check mark "V".
To go back to the "Units" menu, briefly press the centre of the MODE selector on "Exit".
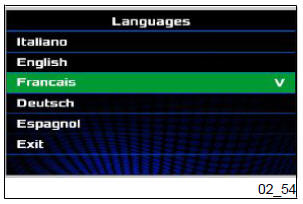
3.5) Languages
This menu allows you to set the display language of the dashboard.
To activate the desired language, press and quickly release the centre of the MODE selector on the desired language. The selection is confirmed by the check mark "V".
To go back to the "Units" menu, briefly press the centre of the MODE selector on "Exit".
4) Service
The "Service" menu consists of the following:
- Change user code
- Code recovery
- EXIT
The functions of the "Service" menu are shown in the paragraphs below.
To go back to the main "MENU", briefly press the centre of the MODE selector.
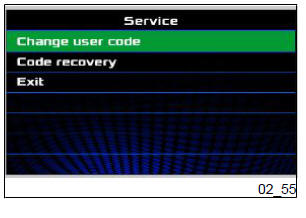
4.1) Change user code
This function is used to modify an old code. The user code enables engine start even in the event of an immobilizer system fault. The user code is set by default as five zeros (00000) on a new vehicle, and the message "INSERT CODE" is shown on the display for ten seconds.
This function allows you to change the code and remove this message.
The far left of the display shows a value that varies from 0 to 9 (it can be changed by moving the MODE selector up or down). Press and quickly release the centre of the "MODE" selector to confirm the selected value. Repeat for all the numbers. Once the code is confirmed, the new code is shown steadily on the display to let the user verify that the code has been entered correctly. Turn the ignition off and then on again to unlock the dashboard. The last code set may be modified again in future. Access the setting mode again, enter the last user code used (OLD CODE), then enter a new user code (NEW CODE) as described previously.
Ignition switch
The ignition switch is on the front of the fuel tank where the steering headstock is.
The vehicle is supplied with two keys (one is the spare key).
The lights can only be switched off with the ignition switch turned to OFF.
NOTE
THE KEY ACTIVATES THE IGNITION SWITCH/ STEERING LOCK, THE FUEL TANK CAP LOCK AND THE SADDLE LOCK.
NOTE
THE LIGHTS COME ON AUTOMATICALLY AFTER THE ENGINE STARTS.
NOTE
KEEP THE SPARE KEY IN DIFFERENT PLACE, NOT WITH THE VEHICLE.
LOCK (1): The steering is locked. It is not possible to start the engine or switch on the lights. The key can be extracted.
OFF (2): The engine and lights cannot be set to work. The key can be extracted.
ON (3): The engine can be started. The key cannot be extracted.
Locking the steering wheel
TO AVOID LOSING CONTROL OF THE VEHICLE, NEVER TURN THE KEY TO "LOCK" WHILE RIDING.
To lock the steering:
- Turn the handlebar fully to the left.
- Turn the key to "OFF".
- Push in the key and turn it anticlockwise (to the left), steer the handlebar slowly until the key is set to "LOCK".
- Extract the key.
See also:
 Moto Guzzi V85 TT - Owner's Manual > Mapping selection
The engine control unit has 3 different "riding modes" for managing the electronic accelerator, displayed as follows in the lower middle part of the digital display: ROAD RAIN OFF ROAD
Moto Guzzi V85 TT - Owner's Manual > Horn button
Press it to activate the horn. Switch direction indicators Move the switch to the left to indicate a left turn; move the switch to the right to indicate a right turn. Pressing the switch deactivates the turn indicator.
 Ducati Scrambler
 Fantic Caballero 500
 Indian FTR 1200
 Moto Guzzi V85 TT
 Royal Enfield Bullet Trials Works Replica
 Triumph Scrambler 1200 XE
 Triumph Street Scrambler
 Yamaha XSR700
 Ducati Scrambler 800
 Moto Guzzi V85 TT
 Triumph Scrambler 1200 XC