 Triumph Street Scrambler - Owner's Manual > Brakes
- Brake pads
- Minimum thickness line
Brake pads must be inspected in accordance with scheduled maintenance requirements and replaced if worn to, or beyond the minimum service thickness.
Street Cup, Street Twin, Street Scrambler, Thruxton, Bonneville T100 and Bonneville T120
If the lining thickness of any pad (front or rear brakes) is less than 1.5 mm (0.06 in), that is, if the pad has worn down to the bottom of the grooves, replace all the pads on the wheel.
Thruxton R
If the lining thickness of any pad is less than 1.0 mm (0.04 in) (front) or 1.5 mm (0.06 in) (rear), replace all the pads on the wheel.
Breaking-in New Brake Pads and Discs
Warning
Brake pads must always be replaced as a wheel set. At the front, where two calipers are fitted on the same wheel, replace all the brake pads in both calipers.
Replacing individual pads will reduce braking efficiency and may cause an accident.
After replacement brake pads have been fitted, ride with extreme caution until the new pads have 'broken in'.
New brake discs and pads require a period of careful breaking-in that will optimise the performance and longevity of the discs and pads. The recommended distance for breaking-in new pads and discs is 200 miles (300 km).
During this period, avoid extreme braking, ride with caution and allow for greater braking distances.
Brake Pad Wear Compensation
Warning
If the brake lever or pedal feels soft when it is applied, or if the lever/pedal travel becomes excessive, there may be air in the brake pipes and hoses or the brakes may be defective.
It is dangerous to operate the motorcycle under such conditions and your authorised Triumph dealer must rectify the fault before riding.
Riding with defective brakes may lead to loss of motorcycle control and an accident.
Disc and brake pad wear is automatically compensated for and has no effect on the brake lever or pedal action. There are no parts that require adjustment on the front and rear brakes.
Disc Brake Fluid
Warning
Brake fluid is hygroscopic which means it will absorb moisture from the air.
Any absorbed moisture will greatly reduce the boiling point of the brake fluid causing a reduction in braking efficiency.
Because of this, always replace brake fluid in accordance with scheduled maintenance requirements.
Always use new brake fluid from a sealed container and never use fluid from an unsealed container or from one which has been previously opened.
Do not mix different brands or grades of brake fluid.
Check for fluid leakage around brake fittings, seals and joints and also check the brake hoses for splits, deterioration and damage.
Always rectify any faults before riding.
Failure to observe and act upon any of these items may cause a dangerous riding condition leading to loss of control and an accident.
Warning
If the ABS is not functioning, the brake system will continue to function as a standard non-ABS braking system. In this situation, braking too hard will cause the wheels to lock resulting in loss of control and an accident.
Reduce speed and do not continue to ride for longer than is necessary with the indicator light illuminated. Contact an authorised Triumph dealer as soon as possible to have the fault checked and rectified.
Inspect the level of brake fluid in both reservoirs and change the brake fluid in accordance with scheduled maintenance requirements. Use only DOT 4 fluid as recommended in the Specification section. The brake fluid must also be changed if it becomes, or is suspected of having become contaminated with moisture or any other contaminants.
Note:
A special tool is required to bleed the ABS braking system. Contact your authorised Triumph dealer when the brake fluid needs renewing or the hydraulic system requires maintenance.
Front Brake Fluid Level Inspection and Adjustment
Inspect and adjust the brake fluid level as described below.
Street Cup, Street Twin and Street Scrambler
- Cap screws
- Upper level line, front brake
- Lower level line, front brake
The brake fluid level in the reservoirs must be kept between the upper and lower level lines (reservoir held horizontal).
To adjust the brake fluid level, release the cap screws and remove the reservoir cap and the diaphragm seal.
Fill the reservoir to the upper level line using new DOT 4 from a sealed container.
Refit the reservoir cap making sure that the diaphragm seal is correctly positioned between the cap and the reservoir body.
Tighten the cap retaining screws to 1 Nm.
Thruxton R
- Cap screws
- MAX level line, front brake
- MIN level line, front brake
The brake fluid level in the reservoirs must be kept between the MAX and MIN level lines (reservoir held horizontal).
To adjust the brake fluid level, release the cap screws and remove the reservoir cap and the diaphragm seal.
Fill the reservoir to the upper level line using new DOT 4 fluid from a sealed container.
Refit the reservoir cap making sure that the diaphragm seal is correctly positioned between the cap and reservoir body.
Tighten the cap retaining screws to 1 Nm.
Thruxton, Bonneville T100 and Bonneville T120
- Upper level line
- Lower level line
To inspect the front brake fluid level: Check the level of fluid visible in the window at the front of the reservoir body.
The brake fluid level must be kept between the upper and lower level lines (reservoir held horizontal).
To adjust the brake fluid level: Release the cap screws and remove the reservoir cap and the diaphragm seal.
Fill the reservoir to the upper level line using new DOT 4 brake fluid from a sealed container.
Refit the reservoir cap making sure that the diaphragm seal is correctly positioned between the cap and reservoir body.
Tighten the cap retaining screws to 1 Nm.
Rear Brake Fluid Level Inspection and Adjustment
Warning
If there has been an appreciable drop in the level of the fluid in either fluid reservoir, consult your authorised Triumph dealer for advice before riding.
Riding with depleted brake fluid levels, or with a brake fluid leak is dangerous and will cause reduced brake performance potentially leading to loss of motorcycle control and an accident.
Street Twin, Street Cup, Thruxton, Thruxton R, Bonneville T100 and Bonneville T120

- Upper level line, rear brake
- Lower level line, rear brake
To inspect the rear brake fluid level
The brake fluid level in the rear reservoir must be kept between the upper and lower level lines.
To adjust the rear brake fluid level: Release the reservoir from the airbox without detaching the connecting hose.
Release the cap screws and remove the cap noting the position of the sealing diaphragm.
Fill the reservoir to the upper level line using new DOT 4 from a sealed container.
Refit the reservoir cap making sure that the diaphragm seal is correctly positioned between the cap and the reservoir body. Tighten the cap retaining screws to 1.5 Nm.
Refit the reservoir to the airbox by tightening the original fixing to 5 Nm.
Refit the right hand side panel.
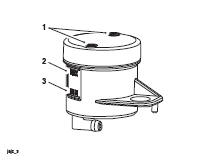
Street Scrambler

- Upper level line, rear brake
- Lower level line, rear brake
To inspect the rear brake fluid level
The brake fluid level in the rear reservoir must be kept between the upper and lower level lines.
To adjust the rear brake fluid level: Release the reservoir from the frame without detaching the connecting hose.
Remove the cap noting the position of the sealing diaphragm.
Fill the reservoir to the upper level line using new DOT 4 from a sealed container.
Refit the reservoir cap making sure that the diaphragm seal is correctly positioned between the cap and the reservoir body.
Refit the reservoir to the frame by tightening the original fixing to 5 Nm.
Refit the right hand side panel.
Brake Light Switches
Warning
Riding the motorcycle with defective brake lights is illegal and dangerous.
An accident causing injury to the rider and other road users may result from use of a motorcycle with defective brake lights.
The brake light is activated independently by either the front or rear brake. If, with the ignition in the ON position, the brake light does not work when the front brake lever is pulled or the rear brake pedal is pressed, have your authorised Triumph dealer investigate and rectify the fault.
Mirrors
Warning
Operation of the motorcycle with incorrectly adjusted mirrors is dangerous.
Operation of the motorcycle with incorrectly adjusted mirrors will result in loss of vision to the rear of the motorcycle. It is dangerous to ride a motorcycle without sufficient rearward vision.
Always adjust the mirrors to provide sufficient rearward vision before riding the motorcycle.
Warning
Never attempt to clean or adjust mirrors while riding the motorcycle.
Removal of the rider's hands from the handlebars while riding the motorcycle will diminish the ability of the rider to maintain control of the motorcycle.
Attempting to clean or adjust mirrors while riding the motorcycle may result in loss of control of the motorcycle and an accident.
Only attempt to clean or adjust the mirrors while stationary.
Models with Bar End Mirrors
Warning
Incorrect adjustment of the bar end mirrors may cause the mirror arm to contact the fuel tank, brake or clutch levers or other parts of the motorcycle.
This will restrict brake or clutch lever operation or restrict steering movement, resulting in loss of motorcycle control and an accident.
Adjust the mirrors as required to make sure they do not contact any part of the motorcycle. After adjustment, move the handlebar to the left and right full lock while checking that the mirrors do not contact the fuel tank, brake or clutch levers or other parts of the motorcycle.
Caution
Incorrect adjustment of the bar end mirrors may cause the mirror arm to contact the fuel tank, brake or clutch levers or other parts of the motorcycle.
This will result in damage to the fuel tank, brake or clutch levers or other parts of the motorcycle.
Adjust the mirrors as required to make sure they do not contact any part of the motorcycle. After adjustment, move the handlebar to the left and right full lock while checking that the mirrors do not contact the fuel tank, brake or clutch levers or other parts of the motorcycle.
The bar end mirrors will be set by your authorised Triumph dealer and will not normally require any adjustment. Should adjustment be necessary, do not rotate the mirror beyond 75º, measured from the vertical section of the mirror arm.
- Mirror arm vertical section
See also:
 Triumph Street Scrambler - Owner's Manual > Clutch
Clutch lever 2 - 3 mm The motorcycle is equipped with a cable-operated clutch.
Triumph Street Scrambler - Owner's Manual > Steering/Wheel Bearings
Warning To prevent risk of injury from the motorcycle falling during the inspection, make sure that the motorcycle is stabilised and secured on a suitable support.
 Ducati Scrambler
 Fantic Caballero 500
 Indian FTR 1200
 Moto Guzzi V85 TT
 Royal Enfield Bullet Trials Works Replica
 Triumph Scrambler 1200 XE
 Triumph Street Scrambler
 Yamaha XSR700
 Ducati Scrambler 800
 Moto Guzzi V85 TT
 Triumph Scrambler 1200 XC