 Triumph Street Scrambler - Owner's Manual > Clutch
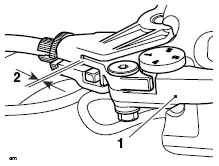
- Clutch lever
- 2 - 3 mm
The motorcycle is equipped with a cable-operated clutch.
If the clutch lever has excessive free play, the clutch may not disengage fully.
This will cause difficulty in changing gear and selecting neutral. This may cause the engine to stall and make the motorcycle difficult to control.
Conversely, if the clutch lever has insufficient free play the clutch may not engage fully, causing the clutch to slip, which will reduce performance and cause premature clutch wear.
Clutch lever free play must be checked in accordance with scheduled maintenance requirements.
Clutch Inspection
Check that there is 2 - 3 mm clutch lever free play at the lever.
If there is an incorrect amount of free play, adjustments must be made.
Clutch Adjustment
Turn the adjuster sleeve until the correct amount of clutch lever free play is achieved.
If correct adjustment cannot be made using the lever adjuster, use the cable adjuster at the lower end of the cable.
Loosen the adjuster lock nut.
Turn the outer cable adjuster to give 2 - 3 mm of free play at the clutch lever.
Tighten the lock nut to 3.5 Nm.
Drive Chain
 Warning
A loose or worn chain, or a chain that breaks or jumps off the sprockets could catch on the engine sprocket or lock the rear wheel.
A chain that snags on the engine sprocket will injure the rider and lead to loss of motorcycle control and an accident.
Similarly, locking the rear wheel will lead to loss of motorcycle control and an accident.
For safety and to prevent excessive wear the drive chain must be checked, adjusted and lubricated in accordance with scheduled maintenance requirements. Checking, adjustment and lubrication must be carried out more frequently for extreme conditions such as salty or heavily gritted roads.
If the chain is badly worn or incorrectly adjusted (either too loose or too tight) the chain could jump off the sprockets or break. Therefore, always replace worn or damaged chains using genuine Triumph parts supplied by an authorised Triumph dealer.
Drive Chain Lubrication
Lubrication is necessary every 200 miles (300 km) and also after riding in wet weather, on wet roads, or any time that the chain appears dry.
Use the special chain lubricant as recommended in the Specifications section.
Apply lubricant to the sides of the rollers then allow the motorcycle to stand unused for at least eight hours (overnight is ideal). This will allow the oil to penetrate to the chain O-rings etc.
Before riding, wipe off any excess oil.
If the chain is especially dirty, clean first and then apply oil as mentioned above.
Caution
Do not use a pressure washer to clean the chain as this may cause damage to the chain components.
Chain Free Movement Inspection
Warning
Before starting work, make sure the motorcycle is stabilised and adequately supported. This will help prevent injury to the operator or damage to the motorcycle.
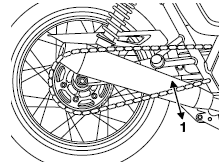
- Maximum movement position
Place the motorcycle on a level surface and hold it in an upright position with no weight on it.
Rotate the rear wheel by pushing the motorcycle to find the position where the chain is tightest, and measure the vertical movement of the chain midway between the sprockets.
Chain Free Movement Adjustment
The vertical movement of the drive chain must be in the range 20 - 30 mm.
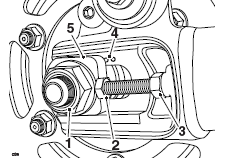
- Rear wheel spindle nut
- Adjuster bolt
- Adjuster bolt lock nut
- Adjuster markings
- Spindle adjuster
If the chain free movement measurement is incorrect, adjustments must be made as follows: Loosen the wheel spindle nut.
Loosen the lock nuts on both the left hand and right hand chain adjuster bolts.
Move both adjusters by an equal amount using the adjuster markings as a guideline.
Turn the adjuster bolts clockwise to increase chain free movement and anticlockwise to reduce chain free movement.
When the correct amount of chain free movement has been set, push the wheel into firm contact with the adjusters.
Make sure the same adjuster marking is aligned with the spindle adjuster on both sides of the swinging arm.
Tighten both adjuster lock nuts to 20 Nm and the rear wheel spindle nut to 110 Nm.
Repeat the chain adjustment check.
Readjust if necessary.
Warning
Operation of the motorcycle with insecure adjuster lock nuts or a loose wheel spindle may result in impaired stability and handling of the motorcycle. This impaired stability and handling may lead to loss of control or an accident.
Check the rear brake effectiveness.
Rectify if necessary.
Warning
It is dangerous to operate the motorcycle with defective brakes; you must have your authorised Triumph dealer take remedial action before you attempt to ride the motorcycle again.
Failure to take remedial action may reduce braking efficiency leading to loss of motorcycle control or an accident.
Chain Free Movement Adjustment
Warning
Never neglect chain maintenance and always have chains installed by an authorised Triumph dealer. Use a genuine Triumph supplied chain as specified in the Triumph Parts Catalogue.
The use of non-approved chains may result in a broken chain or may cause the chain to jump off the sprockets leading to loss of motorcycle control or an accident.
Caution
If the sprockets are found to be worn, always replace the sprockets and drive chain together.
Replacing worn sprockets without also replacing the chain will lead to premature wear of the new sprockets.
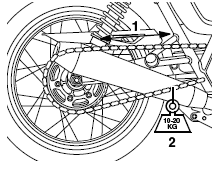
- Measure across 20 links
- Weight
To inspect the chain and sprocket wear: Remove the chain guard.
Stretch the chain taut by hanging a 10 - 20 kg (20 - 40 lb) weight on the chain.
Measure the length of 20 links on the straight part of the chain from pin centre of the 1st pin to the pin centre of the 21st pin. Since the chain may wear unevenly, take measurements in several places.
If the length exceeds the maximum service limit of 320 mm, the chain must be replaced.
Rotate the rear wheel and inspect the drive chain for damaged rollers, and loose pins and links.
Also inspect the sprockets for unevenly or excessively worn or damaged teeth.
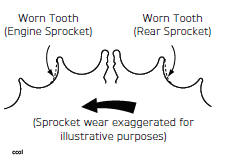
Note:
Illustration shows wear on sprockets mounted on the left hand side of the motorcycle. For sprockets mounted on the right hand side of the motorcycle, the wear is on the opposite side of the tooth.
If there is any irregularity, have the drive chain and/or the sprockets replaced by an authorised Triumph dealer.
Refit the chain guard, tightening the fixings to 9 Nm.
See also:
 Triumph Street Scrambler - Owner's Manual > Cooling System
To ensure efficient engine cooling, check the coolant level each day before riding the motorcycle, and top up the coolant if the level is low.
Triumph Street Scrambler - Owner's Manual > Brakes
Brake pads Minimum thickness line Brake pads must be inspected in accordance with scheduled maintenance requirements and replaced if worn to, or beyond the minimum service thickness.
 Ducati Scrambler
 Fantic Caballero 500
 Indian FTR 1200
 Moto Guzzi V85 TT
 Royal Enfield Bullet Trials Works Replica
 Triumph Scrambler 1200 XE
 Triumph Street Scrambler
 Yamaha XSR700
 Ducati Scrambler 800
 Moto Guzzi V85 TT
 Triumph Scrambler 1200 XC