 Yamaha XSR700 - Owner's Manual > Cast wheels
To maximize the performance, durability, and safe operation of your vehicle, note the following points regarding the specified wheels.
- The wheel rims should be checked for cracks, bends, warpage or other damage before each ride. If any damage is found, have a Yamaha dealer replace the wheel. Do not attempt even the smallest repair to the wheel. A deformed or cracked wheel must be replaced.
- The wheel should be balanced whenever either the tire or wheel has been changed or replaced. An unbalanced wheel can result in poor performance, adverse handling characteristics, and a shortened tire life.
Adjusting the clutch lever free play
Measure the clutch lever free play as shown.
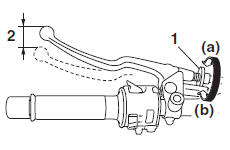
- Clutch lever free play adjusting bolt
- Clutch lever free play
Clutch lever free play:
5.0-10.0 mm (0.20-0.39 in)
Periodically check the clutch lever free play and, if necessary, adjust it as follows.
To increase the clutch lever free play, turn the clutch lever free play adjusting bolt at the clutch lever in direction (a).
To decrease the clutch lever free play, turn the adjusting bolt in direction (b).
TIP
If the specified clutch lever free play cannot be obtained as described above, proceed as follows.
1. Fully turn the adjusting bolt at the clutch lever in direction (a) to loosen the clutch cable.
2. Loosen the locknut at the crankcase.

- Locknut
- Clutch lever free play adjusting nut
3. To increase the clutch lever free play, turn the clutch lever free play adjusting nut in direction (a). To decrease the clutch lever free play, turn the adjusting nut in direction (b).
4. Tighten the locknut.
Checking the brake lever free play
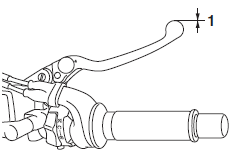
- No brake lever free play
There should be no free play at the brake lever end. If there is free play, have a Yamaha dealer inspect the brake system.
WARNING
A soft or spongy feeling in the brake lever can indicate the presence of air in the hydraulic system. If there is air in the hydraulic system, have a Yamaha dealer bleed the system before operating the vehicle. Air in the hydraulic system will diminish the braking performance, which may result in loss of control and an accident.
Brake light switches
The brake light should come on just before braking takes effect. The brake light is activated by switches connected to the brake lever and brake pedal.
Since the brake light switches are components of the anti-lock brake system, they should only be serviced by a Yamaha dealer.
Checking the front and rear brake pads
The front and rear brake pads must be checked for wear at the intervals specified in the periodic maintenance and lubrication chart.
Front brake pads
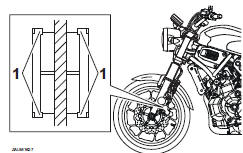
- Brake pad wear indicator
Each front brake pad is provided with wear indicators, which allows you to check the brake pad wear without having to disassemble the brake. To check the brake pad wear, check the position of the wear indicators while applying the brake. If a brake pad has worn to the point that a wear indicator almost touches the brake disc, have a Yamaha dealer replace the brake pads as a set.
Rear brake pads
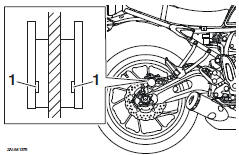
- Brake pad wear indicator groove
Each rear brake pad is provided with wear indicator grooves, which allow you to check the brake pad wear without having to disassemble the brake.
To check the brake pad wear, check the wear indicator grooves. If a brake pad has worn to the point that a wear indicator groove almost appears, have a Yamaha dealer replace the brake pads as a set.
See also:
 Yamaha XSR700 - Owner's Manual > Tire air pressure
The tire air pressure should be checked and, if necessary, adjusted before each ride. WARNING Operation of this vehicle with improper tire pressure may cause severe injury or death from loss of control. The tire air pressure must be checked and adjusted on cold tires (i.e., when the temperature of the tires equals the ambient temperature). The tire air pressure must be adjusted in accordance with the riding speed and with the total weight of rider, passenger, cargo, and accessories approved for this model.
Yamaha XSR700 - Owner's Manual > Checking the brake fluid level
Before riding, check that the brake fluid is above the minimum level mark. Check the brake fluid level with the top of the reservoir level. Replenish the brake fluid if necessary. Front brake
 Ducati Scrambler
 Fantic Caballero 500
 Indian FTR 1200
 Moto Guzzi V85 TT
 Royal Enfield Bullet Trials Works Replica
 Triumph Scrambler 1200 XE
 Triumph Street Scrambler
 Yamaha XSR700
 Ducati Scrambler 800
 Moto Guzzi V85 TT
 Triumph Scrambler 1200 XC