 Ducati Scrambler - Owner's Manual > Check brake fluid level
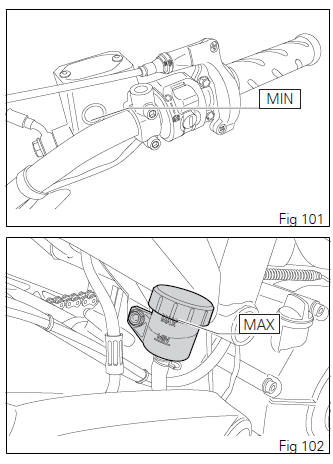
The level must not go below the MIN mark shown on the respective reservoirs ((Fig 101) shows the front brake fluid reservoir, while (Fig 102) shows the rear brake fluid reservoir).
If level drops below the limit, air might get into the circuit and affect the operation of the system involved.
Brake and clutch fluid must be topped up and changed at the intervals specified in the scheduled maintenance table contained in the Warranty Booklet; please contact a Ducati Dealer or Authorized Service Center.
Important All brake and clutch lines should be changed every four years.
Brake system
If you note too much play on brake lever or pedal and brake pads are still in good condition, contact your Ducati Dealer or Authorized Service Center to have the system inspected and any air drained out of the circuit.
Attention Brake fluid can damage paintwork and plastic parts, so avoid contact.
Hydraulic oil is corrosive; it may cause damage and lead to severe injuries. Never mix fluids of different qualities. Check seals for proper sealing.
Changing the air filter
Important Have the air filter maintenance performed at a Ducati Dealer or Authorized Service Center.
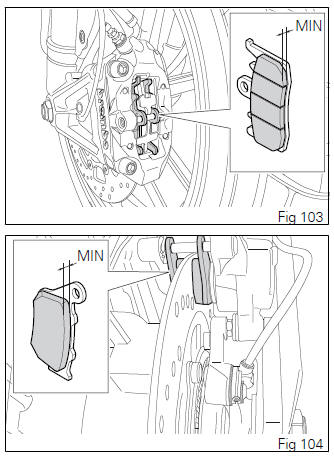
Checking brake pads for wear
Check brake pads wear through the inspection hole in the calipers.
If the thickness of the friction material, even in just one pad, is about 0.04 in (1 mm) replace both pads.
Attention Friction material wear beyond this limit would lead to metal support contact with the brake disc thus compromising braking efficiency, disc integrity and rider safety.
Important Have the brake pads replaced at a Ducati Dealer or Authorized Service Center.
Charging the battery
Attention Have the battery removed at a Ducati Dealer or Authorized Service Center.
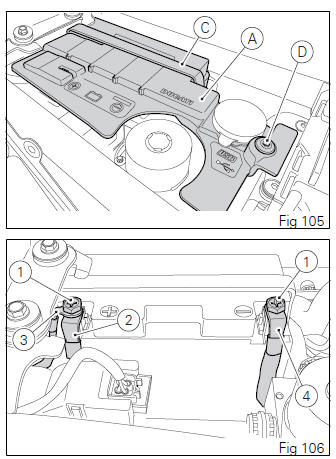
To reach the battery, remove the seat and remove battery cover (A), after disengaging rubber band (C) and loosening screw (D). Loosen the screws (1), remove the positive cable (2) and (ABS) positive cable (3) from the positive terminal and the negative cable (4) from the negative terminal always starting from the negative one (-) and remove the battery by sliding it out of its housing.
Attention The battery gives off explosive gases; keep it away from any source of ignition such as sparks, flames. Charge the battery in a well-ventilated area.
Charge the battery in a ventilated room.
Connect the battery charger leads to the battery terminals: the red one to the positive terminal (+), the black one to the negative terminal (-).
Important Make sure the charger is off when you connect the battery to it, or you might get sparks at the battery terminals that could ignite the gases inside the cells.
Always connect the red positive (+) terminal first.
Grease screws (1, Fig 106).
Refit the battery, connect the positive cable (2, Fig 106) and ABS positive cable (3, Fig 106) to the positive terminal, and the negative cable (4, Fig 106) to the negative terminal of the battery, always starting from the positive one (+), and start the screws (1, Fig 106). Refit the battery cover (A, Fig 105), engage rubber band (C, Fig 105) and tighten screw (D, Fig 105) to 5 Nm +- 10%.
Attention Keep the battery out of the reach of children.
Charge the battery at 0.9 A for 5Ă·10 hours.
If the motorcycle must be jump-started in an emergency with an external starting device, it is possible to connect the external device to the battery without removing it from the vehicle. Connect the external device positive pole to the battery positive pole and the external device negative pole to the battery negative pole.
Attention When connecting the external device to the poles of the battery fitted on the vehicle, pay attention not to touch other metallic parts of the vehicle.
Charging and maintenance of the battery during winter storage
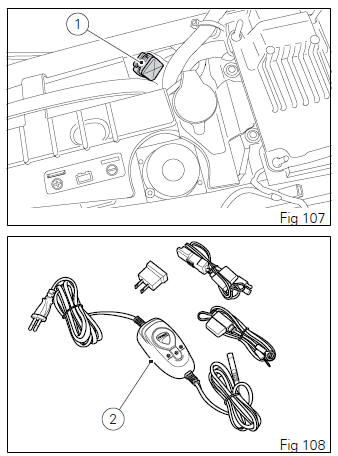
Your motorcycle is equipped with a connector (1), located under the seat, to which you can connect a special battery charger (2) (Battery maintenance kit part no. 69924601A - various countries; Battery maintainer kit part no. 69924601AX - for Japan, China and Australia only) available from our sales network.
Note The electric system of this model is designed so as to ensure there is a very low power drain when the motorcycle is off. Nevertheless, the battery features a certain self-discharge rate that is normal and depends on ambient conditions as well as on "non-use" time.
Important If battery minimum voltage is not ensured by a suitable battery charge maintainer, sulfation may occur. This is irreversible and will lead to decreasing battery performance.
Note When the motorcycle is left unused (approximately for more than 30 days) we recommend owners to use the Ducati battery charge maintainer (Battery maintainer kit part no. 69924601A - various countries; Battery maintainer kit part no.
69924601AX - for Japan, China and Australia only) since its electronics monitors the battery voltage and features a maximum charge current of 1.5 Ah.
Connect the maintainer to the diagnostics socket located in the rear end of the bike.
Note Using charge maintainers not approved by Ducati could damage the electric system; vehicle warranty does not cover the battery if damaged due to failure to comply with the above indications, since it is considered incorrect maintenance.
See also:
 Ducati Scrambler - Owner's Manual > Lubricating cables and joints
It is necessary to periodically check the throttle control cable and cold start cable external sheath for wear. Their external plastic sheath should be free of cracking or flattening. Operate the control to make sure cable slides smoothly: have it replaced by a Ducati Dealer or Authorized Service Center if you find friction or hard spots.
 Ducati Scrambler
 Fantic Caballero 500
 Indian FTR 1200
 Moto Guzzi V85 TT
 Royal Enfield Bullet Trials Works Replica
 Triumph Scrambler 1200 XE
 Triumph Street Scrambler
 Yamaha XSR700
 Ducati Scrambler 800
 Moto Guzzi V85 TT
 Triumph Scrambler 1200 XC