 Ducati Scrambler - Owner's Manual > Lubricating cables and joints
It is necessary to periodically check the throttle control cable and cold start cable external sheath for wear. Their external plastic sheath should be free of cracking or flattening. Operate the control to make sure cable slides smoothly: have it replaced by a Ducati Dealer or Authorized Service Center if you find friction or hard spots.
For trouble-free operation, periodically lubricate the ends of all Bowden cables with SHELL Advance Grease or Retinax LX2.
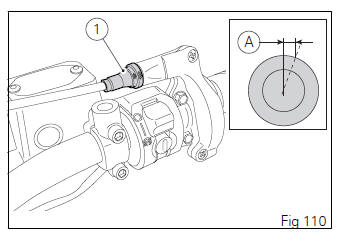
As far as the throttle cable is concerned, it is recommended to undo the two screws (1) and open the control, then grease the cable end and the pulley.
Attention Carefully close the control after engaging the cable in the pulley.
Refit the cover and tighten the screws (1) to a torque of 1.8 Nm.
To ensure trouble-free operation of the side stand joint, thoroughly clean it and then use SHELL Alvania R3 grease to lubricate all friction points.

Adjusting the throttle cable
The throttle grip must have a free play of 0.08Ă·0.16 in (2Ă·4 mm) in all steering positions, measured on the outer edge of the twistgrip; this value is indicated in the figure as reference (A).
To adjust, work the relevant adjuster (1) located on the control itself.
Checking drive chain tension
Important Have chain tension adjusted by a Ducati Dealer or Authorized Service Center.
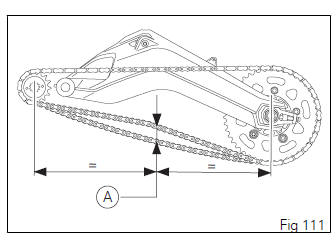
Turn the rear wheel until you find the position where chain is tightest. Set the vehicle on the side stand.
With just a finger, push down the chain at the point of measurement and release. Measure the distance (A) between the center of the chain pins and the aluminum section of the swinging arm. It must be: A = 1.06 Ă· 1.14 in (27 Ă· 29 mm).
Important If the drive chain is too tight or too slack, adjust it so that tension reading will fall within specified range.
Attention Correct tightening of swinging arm screws (1) is critical to rider and passenger safety.
Important Improper chain tension will lead to rapid wear of transmission parts.
Check the correspondence of the positioning marks on both sides of the swinging arm to ensure a perfect wheel alignment. Grease the wheel shaft nut thread (2) with SHELL Retinax HDX2 and tighten it to a torque of 145 Nm. Grease the adjuster screws (1) thread with SHELL Alvania R3 and tighten them to a torque of 10 Nm.

Lubricating the drive chain
The chain fitted on your motorcycle has O-rings to protect its moving parts from dirt and to hold the lubricant inside.
The seals might be irreparably damaged if the chain is cleaned using any solvent other than those specific for O-ring chains or washed using steam or water cleaners.
After cleaning, blow the chain dry or dry it using absorbent material and apply SHELL Advance Chain or Advance Teflon Chain on each link.
Important Using non-specific lubricants may lead to severe damage to chain, front and rear sprocket.
Replacing the headlight bulbs
Important Have the bulbs replaced at a Ducati Dealer or Authorized Service Center.
Attention The headlight might fog up if the vehicle is used under the rain or after washing. Switch headlight on for a short time to dry up any condensate.
Before replacing a blown bulb, make sure that the replacement bulb has the same voltage and power as that specified in the paragraph "Electrical System". Always check that the bulb functions before reassembling removed parts.
Loosen screws (1) and collect headlight support U-bolts (2).
Loosen screw (3).
Tilt headlight towards the front mudguard and duly support it while loosening screws (4) on light cover (5) and remove cover.

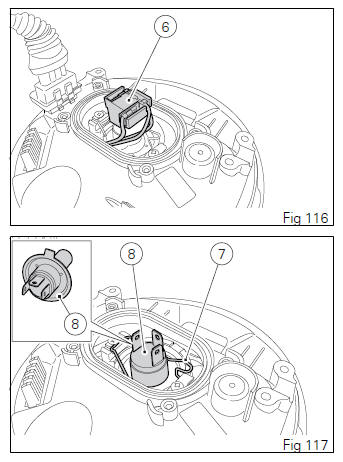
Disconnect connector (6).
Release the clip (7).
The bulb (8) is the banjo-type: press and rotate counterclockwise to remove. Fit the spare bulb by pressing and turning clockwise until it clicks.
Note Do not touch the transparent part of the new bulb with the hands. This would cause it to blacken thereby reducing bulb brilliancy.
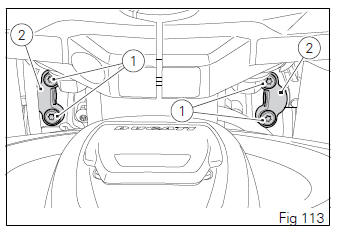
To reassemble, refit any previously removed parts following the removal procedure in reverse order and tighten screws (1, Fig 113) to 5 Nm.
See also:
 Ducati Scrambler - Owner's Manual > Check brake fluid level
The level must not go below the MIN mark shown on the respective reservoirs ((Fig 101) shows the front brake fluid reservoir, while (Fig 102) shows the rear brake fluid reservoir). If level drops below the limit, air might get into the circuit and affect the operation of the system involved.
Ducati Scrambler - Owner's Manual > Changing the turn indicator bulbs
To change the front/rear turn indicator bulbs, loosen the screw (1) and remove the lens (2).
 Ducati Scrambler
 Fantic Caballero 500
 Indian FTR 1200
 Moto Guzzi V85 TT
 Royal Enfield Bullet Trials Works Replica
 Triumph Scrambler 1200 XE
 Triumph Street Scrambler
 Yamaha XSR700
 Ducati Scrambler 800
 Moto Guzzi V85 TT
 Triumph Scrambler 1200 XC