 Ducati Scrambler 800 - Service manual > Clutch assembly: clutch
Refitting the clutch
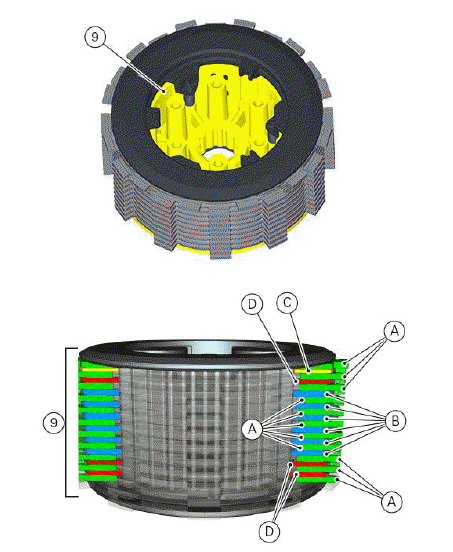
If the hub - plates - drum assy (9) was disassembled, take special care to clutch plate positioning upon reassembling.
Insert the clutch plate pack on hub:
The plate pack (9) consists of:
- 11 driving plates (A) with 2.8 mm thickness;
- 6 driven plates (B) with 2 mm thickness;
- 1 convex driven plate (C) with 1.5 mm thickness;
- 3 driven plates (D) with 2.5 mm thickness.
Fit the clutch plate pack with hub inside drum.
Fit the two service pins.
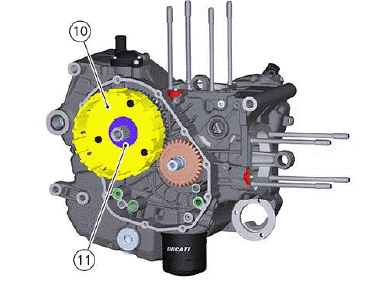
Fit the spacer (11) to the clutch housing (10).
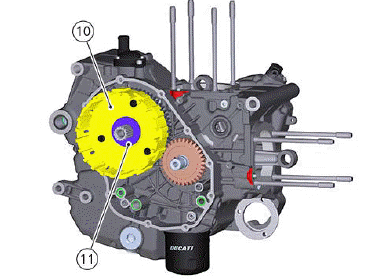
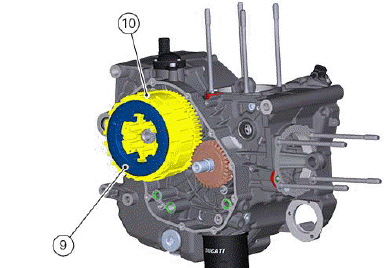
Fit the hub-plates-drum assy (9) to the clutch housing (10).
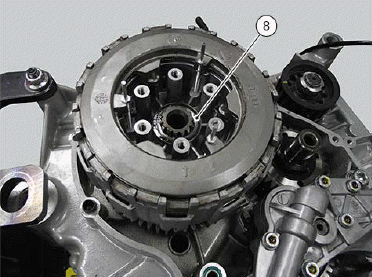
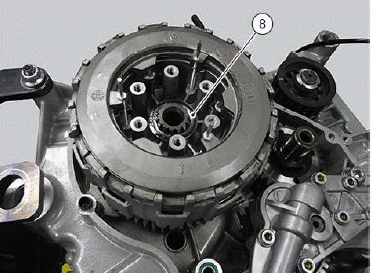
Fit lock washer (8) on primary shaft, driving it fully home inside clutch unit.
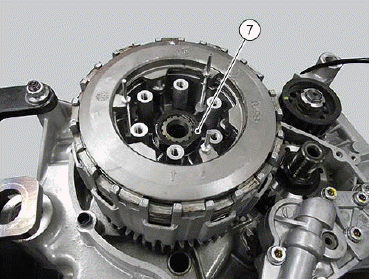
Apply the specified grease on nut (7) mating surface and on primary shaft thread, then insert nut driving it fully home by hand inside primary shaft.
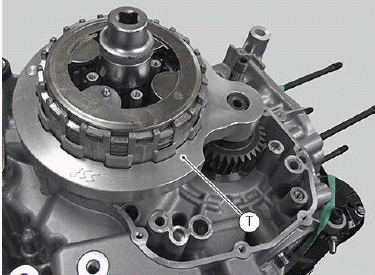
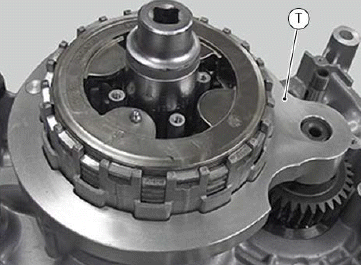
Lock clutch housing with tool (T) no. 88713.2556, so as to hold it when tightening nut (7).
Tighten nut (7) to a torque of 190 Nm (Min. 180 Nm - Max. 200 Nm).
Remove tool (T) no. 88713.2556.

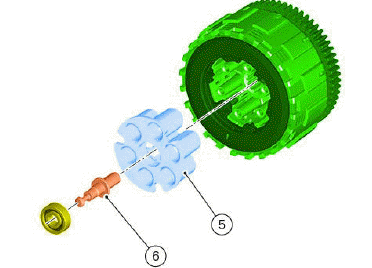
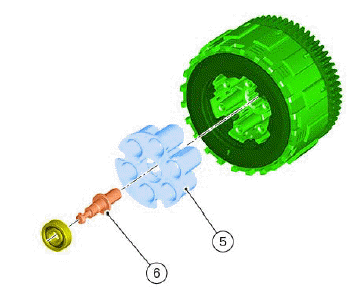
Position pusher plate (5) with the clutch control pin (6).
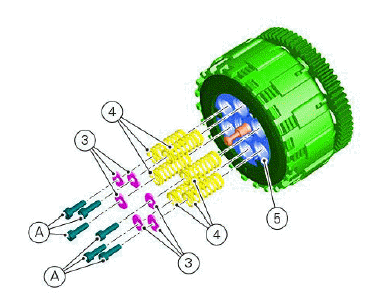
Fit springs (4) and ring (3) on pusher plate (5). Start screws (2) and tighten them to a torque of 5 Nm (Min. 4.5 Nm - Max. 5.5 Nm).
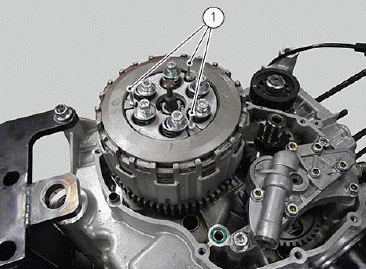
Remove the two service pins (1).
Refit the clutch cover (Refitting the clutch cover).
Fill the engine with oil (Changing the engine oil and filter cartridge).
Checking and overhauling the components
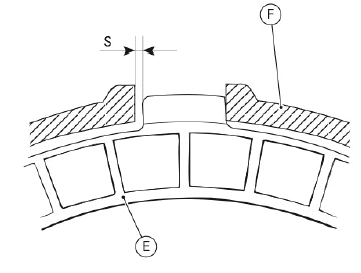
Clearance between the clutch housing and friction plate
Insert a friction plate (E) in the clutch housing (F) and measure the clearance (S) with a feeler gauge.
Clearance "S" must not exceed 0.6 mm.
If it does, replace the plates and, if necessary, the clutch housing.
Overhauling the clutch plates
The clutch plates must not show any signs of blackening, grooves or deformation.
Measure the thickness of the friction plates; it should not be less than 2.6 mm.
Important The total thickness of the plates pack must not be less than 46.1 mm.
Place the plate on a flat surface and check the amount of deformation with a feeler gauge.
Max. flatness error: 0.2 mm.
Overhauling the pressure plate
Check bearing (12) conditions: replace the bearing if the play is excessive.
Check the contact surface of the last friction plate; if extremely scored, polish it in the same manner as described previously for the cylinder head surface (Overhauling the cylinder head components).
Check the condition of the spring guide seats (13) of pusher plate (5).

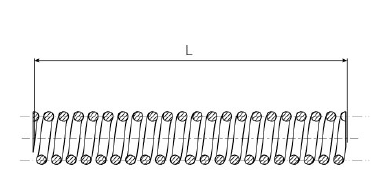
Pusher plate springs
(L) can indicate two lengths:
- uncompressed length = 56.19;
- working length = 42.6.
Removing the clutch
Drain the engine oil (Changing the engine oil and filter cartridge).
Remove the clutch cover (Removing the clutch cover).
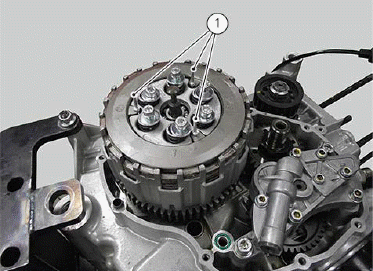
Fit the two service pins (1) inside their seats on hub.
Undo the fixing screws (2) and remove the ring (3) and the springs (4) from the pusher plate (5).

Slide out the pusher plate (5) with the clutch control pin (6).
Lock clutch housing with tool (T) no. 88713.2556 and loosen retaining nut (7).
Remove the lock washer (8).
Slide the hub-plates-drum assy (9) out of clutch housing (10), marking them so as to refit them in the same position in which they were removed.
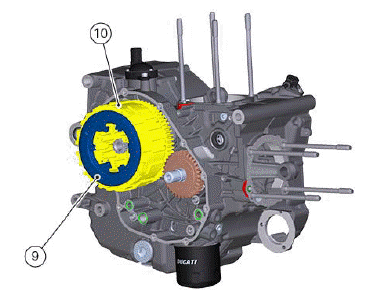
Remove the spacer (11) from the clutch housing (10).
Description of the clutch assembly
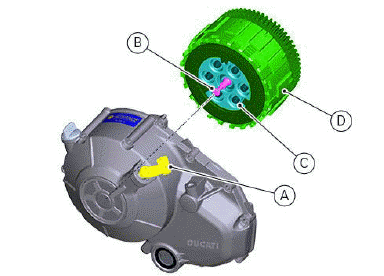
The clutch is disengaged by a drive unit (lever (A) and spring) positioned on clutch cover. The drive unit directly operates on clutch control pin (B) that, in its turn, operates the pressure plate (C) positioned at the top of plate pack (D).
Drive is transmitted from the crankshaft to the gearbox primary shaft by a gear integrated with the clutch housing/primary drive gear pair (A).
Accommodated in the clutch housing is a set of driving and driven plate pack (D). When the clutch is operated, the driven plates push away a drum (3) which is splined onto the gearbox primary shaft.
Before working on the internal clutch parts, check that the clutch operates correctly. Then deal with the problem in a systematic manner.
The following is a list of possible causes of clutch malfunction.
A clutch which does not disengage may be caused by:
- excessive play of the control lever;
- distorted clutch plates;
- incorrect spring tension;
- faulty clutch release mechanism;
- excessive wear of the hub or clutch housing.
A clutch which slips may be caused by:
- no backlash of the control lever;
- worn clutch plates;
- weakened springs;
- faulty clutch release mechanism;
- excessive wear of the hub or clutch housing.
A noisy clutch may be caused by:
- excessive backlash between the primary drive gears;
- damaged primary drive gear teeth;
- excessive housing between driving plate tabs and the clutch housing;
- worn gear/clutch housing bearings;
- the presence of metal particles (filings) on the gear teeth.
See also:
 Ducati Scrambler 800 - Service manual > Clutch assembly: clutch cover
Refitting the clutch cover Clean and degrease cover and casing mating surfaces. Check that the casing features the centring bushing (7).
 Ducati Scrambler
 Fantic Caballero 500
 Indian FTR 1200
 Moto Guzzi V85 TT
 Royal Enfield Bullet Trials Works Replica
 Triumph Scrambler 1200 XE
 Triumph Street Scrambler
 Yamaha XSR700
 Ducati Scrambler 800
 Moto Guzzi V85 TT
 Triumph Scrambler 1200 XC