 Indian FTR 1200 - Owner's Manual > Crankcase Breather Hoses
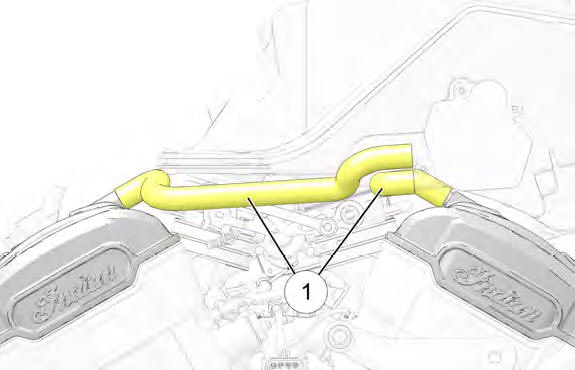
Inspect the crankcase breather (vent) hoses 1 each time the fuel tank is removed to perform air filter service or other maintenance.
Inspect both breather hoses along their length and at both ends.
Make sure hoses are not restricted, kinked, cracked or otherwise damaged. Replace any worn or damaged hoses.
THROTTLE CONTROL INSPECTION
1. With the engine OFF, rotate the throttle control grip fully open and then release it. It should rotate smoothly from the rest position to the completely open position. It should return to the rest position quickly when released.
2. Repeat the twist and release process with the handlebars turned fully right and fully left.
3. Service the throttle system if throttle operation is not smooth or if throttle grip does not return properly. See the INDIAN MOTORCYCLE Service Manual or an authorized INDIAN MOTORCYCLE dealer or other qualified dealer.
EVAPORATIVE EMISSION CONTROL SYSTEM
IMPORTANT The fuel tank vent line is routed to a vapor canister where the fuel vapor is stored until specific operating parameters are met and the ECM opens the purge valve. Fuel vapor is then routed out of the vapor canister, through the purge valve and into the throttle body for combustion. Inspect all EVAP lines for abrasion or wear.
Check that all connections for both vent and canister purge systems are securely attached.
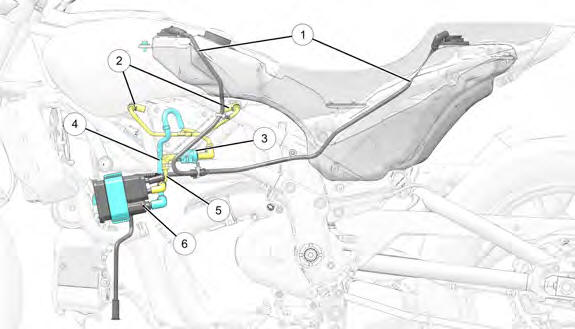
- Fuel Tank Vent Hose
- Purge Hose (Purge Valve to Throttle Body)
- Canister Purge Valve
- Evaporative Emissions Vapor Canister Vent Hose
- Purge Hose (Canister to Purge Valve)
- Evaporative Emissions Vapor Canister
MECHANICAL CLUTCH LEVER FREE PLAY
1. With handlebars pointing straight ahead, measure the clutch lever free play at point shown 1 between lever and perch.

MEASUREMENT
Clutch Lever Free Play: .019-.059" (0.5-1.5 mm)
2. Compare measurement to specification. If adjustment is required, proceed to Step 3.
3. Locate the jam nut 2 and barrel adjuster 3.
4. Hold cable and loosen the adjuster jam nut.
5. Turn cable adjuster in or out until clutch free play is correct.
6. Hand-tighten adjuster jam nut.
CLUTCH LEVER LUBRICATION
NOTICE The clutch cable is factory-lubricated. Additional lubrication could be detrimental to cable performance. Replace the clutch cable assembly if binding or sticking occurs. DO NOT lubricate between the cable and sheath.
1. Disconnect clutch cable at primary cover.
2. Pull cable housing out of lever perch and remove barrel from clutch lever. Verify proper routing and smooth movement.
Inspect for damage to the external casing, and inspect exposed cable wire for fraying, kinks or corrosion. Replace any damaged, sticky or sluggish cable.
3. Remove the pivot bolt cap 1, nut 3 and push pivot bolt 2 upward to remove.
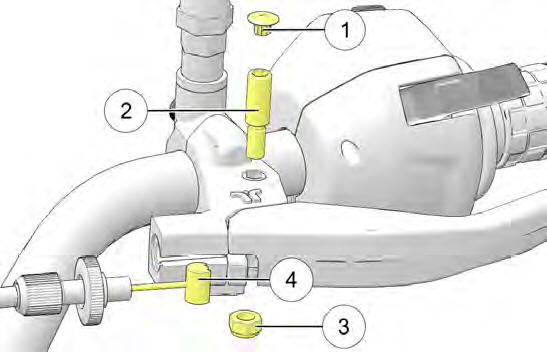
4. Inspect both ends of inner cable for frayed strands. Clean parts and apply all-purpose grease to pivot bolt.
5. Lubricate the barrel ends 4 with all-purpose grease.
NOTE Lubricate control cable barrel ends at the intervals recommended in the Periodic Maintenance Table.
6. Assemble lever.
7. Install cable to lever. Rotate cable back through slot in perch, and push outer casing back into perch recess.
8. Install the pivot bolt and torque the nut to specification.
TORQUE
Clutch Lever Pivot Nut: 49 in-lbs (5.5 Nm)
9. Lubricate and attach lower end of cable to clutch arm on primary cover.
10. Adjust clutch lever free play.
SIDE STAND LUBRICATION
Periodically lubricate the side stand bushing.
REAR BRAKE PEDAL
1. Lubricate the pivot bushing at the intervals recommended in the Periodic Maintenance Table. Also lubricate any time binding is evident. Use all-purpose grease.
2. Inspect brake pads as outlined in the Brake Disc Inspection / Cleaning section.
BRAKE HOSES/CONNECTIONS
Inspect all brake hoses and connections for dampness or stains from leaking or dried fluid. Tighten any leaking connections and replace components as necessary. See the INDIAN MOTORCYCLE Service Manual or an authorized INDIAN MOTORCYCLE dealer or other qualified dealer.
See also:
 Indian FTR 1200 - Owner's Manual > Front Fork/Suspension Inspection
1. Place the motorcycle on the sidestand and inspect the front forks. If fork oil is present on the outer tube 1, do not ride the motorcycle. See your dealer for service before operating. If fork oil is present around the fork seals 2 or inner tubes 3, replace the fork seals.
Indian FTR 1200 - Owner's Manual > Brake Fluid Precautions
WARNING Using the wrong fluid or allowing air or contaminants into the fluid system can damage the system seals or result in a malfunction that could lead to serious injury or death. Use only DOT 4 brake fluid from a sealed container.
 Ducati Scrambler
 Fantic Caballero 500
 Indian FTR 1200
 Moto Guzzi V85 TT
 Royal Enfield Bullet Trials Works Replica
 Triumph Scrambler 1200 XE
 Triumph Street Scrambler
 Yamaha XSR700
 Ducati Scrambler 800
 Moto Guzzi V85 TT
 Triumph Scrambler 1200 XC