 Indian FTR 1200 - Owner's Manual > Brake Fluid Precautions
WARNING Using the wrong fluid or allowing air or contaminants into the fluid system can damage the system seals or result in a malfunction that could lead to serious injury or death. Use only DOT 4 brake fluid from a sealed container.
Do not operate the front brake with the reservoir cover removed.
Fluid could overflow from the reservoir and allow air to enter the system. Air in the brake system could cause the brakes to malfunction.
An over-full reservoir may cause brake drag or brake lock-up, which could result in serious injury or death. Maintain brake fluid at the recommended level. Do not overfill.
NOTICE Brake fluid will damage painted surfaces and plastic parts.
Always clean spilled brake fluid immediately with water and a mild detergent.
REAR BRAKE FLUID
Change the brake fluid at the intervals recommended in the Periodic Maintenance Table. Always add brake fluid from a new, unopened container. Always use the recommended fluid.
1. Position the motorcycle on level ground in the fully upright position.
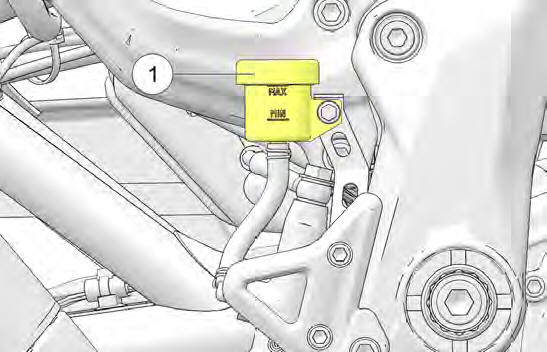
2. The rear brake fluid reservoir is located near the rear brake pedal. View the reservoir from the right side of the vehicle.
3. Wipe the fluid container and the area around the reservoir cover with a clean cloth.
4. If the fluid level is low, inspect brake pads as outlined. If pads are not worn beyond the service limit, inspect the brake system for leaks.
5. Remove the cover and diaphragm. The fluid level should be above the minimum indicator mark on the reservoir body 1.
Add brake fluid as needed. Do not overfill.
6. Reinstall the cover and diaphragm. Hand-tighten cover.
7. Wipe away any fluid spills. Check for signs of brake fluid leaks around hoses, fittings, reservoir, and brake calipers.
FRONT BRAKE LEVER
1. Remove the nut 1 and pivot fastener 2.
2. Clean pivot bolt, lever and lever perch.
3. Remove brake lever and apply grease to pivot fastener 2, lever bushing, and pushrod contact surface of lever 3 as shown.
4. Assemble brake lever.
5. Torque brake lever pivot fastener nut to specification.
TORQUE
Brake Lever Pivot Fastener: 52 (6 N*m)
FRONT BRAKE FLUID
Change the brake fluid at the intervals recommended in the Periodic Maintenance Table section.
Do not attempt to change the anti-lock brake system fluid. Please see your dealer for this service.
Always add brake fluid from a new, unopened container. Always use the recommended fluid.
1. Position the motorcycle on level ground in the fully upright position. Position the handlebars so that the fluid reservoir is level. Wipe the fluid container and the area around the reservoir cover with a clean cloth.
2. If the fluid level is low, inspect brake pads as outlined. If pads are not worn beyond the service limit, inspect the brake system for leaks.
3. To add fluid, remove the reservoir cover screws. Remove the cover and diaphragm.
4. The fluid level should be above the minimum indicator mark on the reservoir. Add brake fluid as needed. Do not overfill.
5. Reinstall the diaphragm, cover and screws.
TORQUE
13 in-lbs (1.4 Nm)
6. Wipe away any fluid spills. Check for signs of brake fluid leaks around hoses, fittings, reservoir and brake calipers. Check for deterioration of hoses.
FRONT BRAKE PAD INSPECTION
NOTICE Wear indicator grooves are provided on each front brake pad to allow for a visual inspection without pad removal. Inspect pads by viewing from rear of caliper. Replace pads if worn to bottom of grooves.
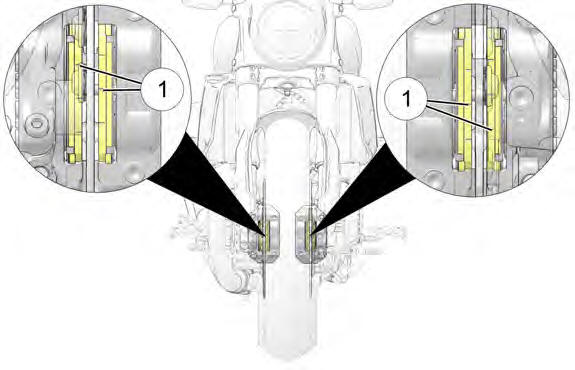
1. Viewing the front brake pads from the front of the calipers, locate the wear indicator grooves 1.
2. Wear indicator grooves should be visible on both inboard and outboard brake pads.
CAUTION Front brake pads should always be replaced as a complete set. If it is determined that an individual brake pad has worn past the wear indicator groove, the front caliper should receive a new pad set. Failure to replace both front brake pads together may cause reduced braking performance or brake failure, resulting in a vehicle crash.
REAR BRAKE PAD INSPECTION
NOTICE Wear indicator grooves are provided on each rear brake pad to allow for a visual inspection without pad removal. Inspect pads by viewing from the rear of the motorcycle, directly behind the muffler. Replace pads if worn to bottom of grooves.
1. Place the motorcycle in an upright position with the front wheel clamped in a wheel vise.
2. Viewing the rear brake pads from behind the motorcycle and below the lip of the rear fender, locate the wear indicator grooves 1.
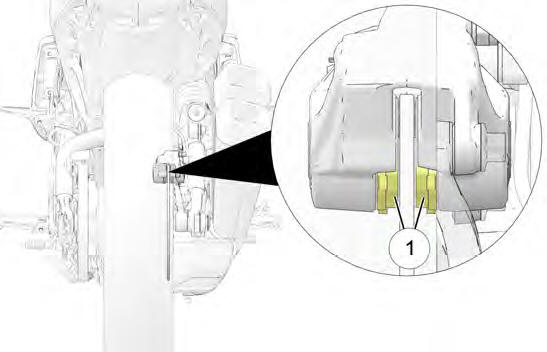
3. Wear indicator grooves should be visible on both inboard and outboard brake pads.
BRAKE DISC INSPECTION/CLEANING
1. Inspect brake discs 1 for nicks, scratches, cracks or other damage. Inspect the thickness of each brake disc at four or more locations around the disc. If any disc is worn to the minimum thickness of 4.5 mm at the thinnest point, or if a disc is damaged, see your dealer for replacement.
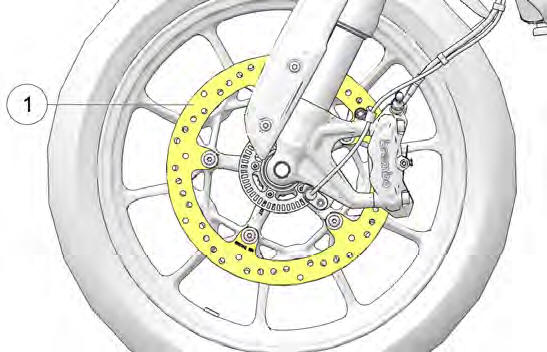
2. Clean discs if minor squeaks develop due to dirt or dust. Apply brake cleaner to a clean shop towel and wipe the discs. DO NOT allow brake cleaner to contact painted or plastic parts.
Read all precautions on the label.
ANTI-LOCK BRAKE SYSTEM (ABS) TONE RING/SENSOR INSPECTION
1. Visually inspect for damaged teeth on the front and rear ABS tone rings 2. Inspect for nicks and dents on the face of the teeth. The teeth edges should be consistent in appearance. If a tone ring is damaged, see your dealer for replacement as soon as possible.
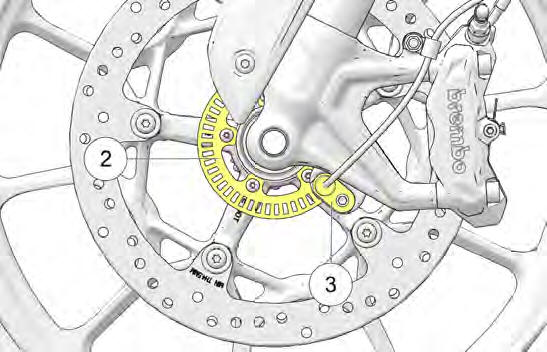
2. Inspect for debris adhering to the end of the wheel speed sensors 3. If contamination is observed, or if you are unable to visually inspect, slide a thin towel across the face of the sensor between the sensor and the tone ring to remove any potential debris.
WHEEL INSPECTION
Inspect both wheels for cracks or damage and replace damaged wheels promptly. Do not operate the motorcycle if wheels are damaged or cracked. See the INDIAN MOTORCYCLE Service Manual or an authorized INDIAN MOTORCYCLE dealer or other qualified dealer.
WHEEL ALIGNMENT
Inspect rear wheel alignment at regular service intervals, whenever the rear wheel is removed and when the rear drive chain is adjusted. Please see your dealer for this service.
See also:
 Indian FTR 1200 - Owner's Manual > Crankcase Breather Hoses
Inspect the crankcase breather (vent) hoses 1 each time the fuel tank is removed to perform air filter service or other maintenance. Inspect both breather hoses along their length and at both ends.
Indian FTR 1200 - Owner's Manual > Front Wheel Removal / Installation
WARNING This procedure requires raising and supporting the motorcycle so that the front wheel is off the ground. Precautions should be taken to ensure the motorcycle is properly stabilized at all times. Failure to properly support motorcycle may result in personal injury or damage to the motorcycle.
 Ducati Scrambler
 Fantic Caballero 500
 Indian FTR 1200
 Moto Guzzi V85 TT
 Royal Enfield Bullet Trials Works Replica
 Triumph Scrambler 1200 XE
 Triumph Street Scrambler
 Yamaha XSR700
 Ducati Scrambler 800
 Moto Guzzi V85 TT
 Triumph Scrambler 1200 XC