 Triumph Scrambler 1200 XC - Service manual > Drive Chain and Sprocket Wear Inspection
WARNING
Before starting work, ensure the motorcycle is stabilised and adequately supported. This will help prevent it from falling and causing injury to the operator or damage to the motorcycle.
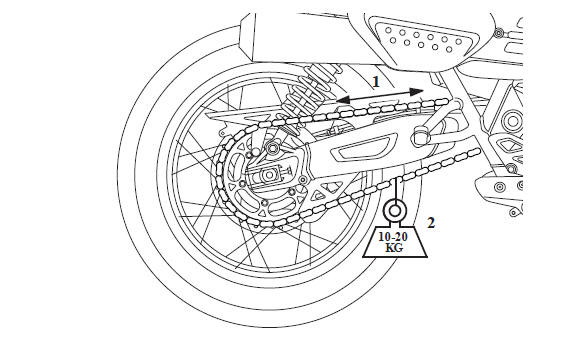
- Measurement across 20 links
- 10 - 20 kg Weight
1. Stretch the chain taut by hanging a 10 - 20 kg (20 - 40 lb) weight on the drive chain.
2. Measure a length of 20 links on the straight part of the drive chain from pin centre of the 1st pin to pin centre of the 21st pin. Repeat the test at various sections of the drive chain to establish an average reading. This is because the drive chain may wear unevenly.
3. If the length exceeds the service limit of 319 mm (12.56 in), the chain must be replaced.
WARNING
A drive chain that breaks or jumps off the sprockets could snag on the engine sprocket or lock the rear wheel, severely damaging the motorcycle and causing loss of motorcycle control and an accident.
4. Examine the whole length of the drive chain. If there are any excessively tight or loose sections, loose pins or damaged rollers, the drive chain should be replaced.
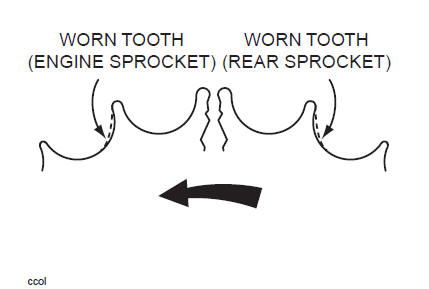
5. Inspect sprockets for unevenly or excessively worn teeth. Also examine the sprockets for damaged teeth.
Final Drive Chain Lubrication
Lubrication is necessary every 200 miles (300 km) and also after riding in wet weather, on wet roads, or any time that the chain appears dry.
Use the special drive chain lubricant as recommended in the specification section.
Correct application is critical for drive chain lubrication. Apply the lubricant for one full drive chain revolution only, then leave for eight hours before riding. This allows the lubricant's solvent (used to thin the oil) to evaporate and the oil to 'soak' into all parts of the drive chain. If the lubricant is applied and the motorcycle is ridden shortly afterwards, the lubricant is unlikely to reach all parts and the majority will be flung off and wasted. Applying excessive amounts is not helpful under any circumstances.
It should be noted that the lubricant is applied to the drive chain to lubricate its action across the sprockets. In an O-ring chain, external lubrication does not penetrate to the bushes and rollers as the O-ring seals prevents this from happening.
CAUTION
Do not use a power jet washer to clean the chain as this may cause damage to the chain components.
Drive Chain Rubbing Strip - Check
WARNING
Before starting work, ensure the motorcycle is stabilised and adequately supported. This will help prevent it from falling and causing injury to the operator or damage to the motorcycle.
Inspect the drive chain rubbing strip for cracks, damage or excessive wear. Replace if necessary.
Side Stand - Clean/Lubricate
Removal
WARNING
Before starting work, ensure the motorcycle is stabilised and adequately supported. This will help prevent it from falling and causing injury to the operator or damage to the motorcycle.
1. Raise and support the motorcycle.
WARNING
Wear hand, eye and face protection when unhooking the stand spring. Take great care to minimise the risk of personal injury and loss of components.
2. With the side stand in the up position, unhook the spring from the side stand and remove it from the motorcycle.
3. Remove and discard the E-clip securing the pivot pin.
4. Remove the pivot pin and remove the side stand.
- Spring
- E-clip
- Pivot pin
Inspection
Inspect the surfaces of the pivot pin, side stand carrier bracket and side stand for corrosion or damage and replace if required.
Installation
- Prior to fitting the side stand ensure the pivot pin and the bushes in the side stand are clean and free from grease.
- Fit the side stand to the motorcycle and insert the pivot pin.
- Fit a new E-clip to secure the pivot pin.
- Pivot pin
- Side stand
- E-clip
WARNING
Wear hand, eye and face protection when fitting the stand spring. Take great care to minimise the risk of personal injury and loss of components.
4. Hook the spring onto its frame lug then carefully hook it onto the side stand lug.
5. Check the operation of the side stand before riding the motorcycle. Ensure the spring holds the stand securely in the retracted position.
Rear Brake Pedal Grip - Lubricate
WARNING
Before starting work, ensure the motorcycle is stabilised and adequately supported. This will help prevent it from falling and causing injury to the operator or damage to the motorcycle.
1. Use Castrol Motorcycle Parts Cleaner, or an equivalent, to clean all dirt and contamination from the pivot joint on the pedal grip of the rear brake pedal.
2. Fully dry the cleaned area.
3. Apply Castrol Chain Spray O-R, or an equivalent lubricant, to the shaded area shown below.
- Lubrication area
4. Operate the pivoting action of the pedal grip to distribute the lubricant.
- Pedal grip
5. Clean all surplus lubricant off the rear brake pedal and grip assembly.
Bank Angle Indicators
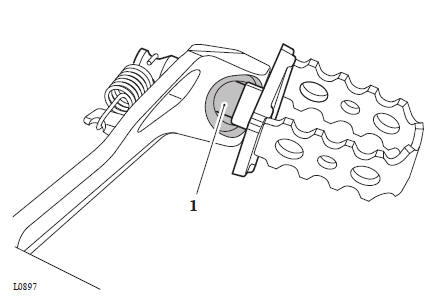
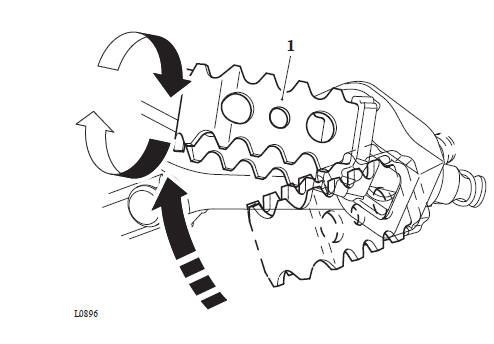
1. Inspect the bank angle indicators on the rider's footrests for wear.
2. The bank angle indicators have a wear indicator groove. Replace a bank angle indicator if it has worn down to the groove.
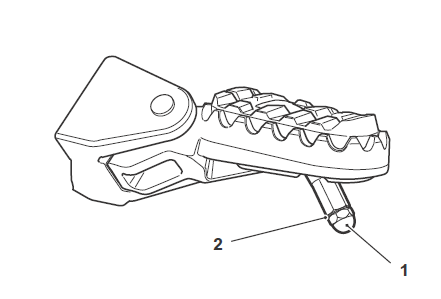
- Bank angle indicator
- Wear indicator groove
WARNING
Use of a motorcycle with bank angle indicators worn beyond the maximum limit will allow the motorcycle to be banked to an unsafe angle. Therefore, always replace the bank angle indicator pegs when they are worn down to the wear indicator groove.
Banking to an unsafe angle may cause instability, loss of motorcycle control and an accident.
WARNING
The bank angle pegs must not be used as a guide to how far the motorcycle may be safely banked. This depends on many various conditions including, but not limited to, road surface, tyre condition and weather. Banking to an unsafe angle will lead to loss of motorcycle control and an accident.
Latest Calibrations Check
WARNING
Before starting work, ensure the motorcycle is stabilised and adequately supported. This will help prevent it from falling and causing injury to the operator or damage to the motorcycle.
Check for the latest calibration download for the following using the Triumph Diagnostic Tool:
- Instruments (If applicable)
- Chassis ECM (if fitted)
- Keyless ECM (if fitted)
- Engine ECM
See the Triumph Diagnostic Tool User Guide for more information.
Fasteners - General Inspection
WARNING
Before starting work, ensure the motorcycle is stabilised and adequately supported. This will help prevent it from falling and causing injury to the operator or damage to the motorcycle.
Check all visible fasteners for security. Ensure any encapsulated fasteners that have been loosened or removed are replaced.
Road Test
WARNING
When riding the motorcycle the rider must always wear a safety helmet, eye protection, gloves, boots, trousers (close fitting around the knee and ankle) and a brightly coloured jacket. Brightly coloured clothing will considerably increase a rider's visibility to other operators of road vehicles. Although full protection is not possible, wearing correct protective clothing can reduce the risk of injury when riding
A safety helmet is one of the most important pieces of riding gear as it offers protection against head injuries. Your safety helmet should be carefully chosen and should fit your head comfortably and securely. A brightly coloured safety helmet will increase a rider's visibility to other operators of road vehicles. An open face helmet offers some protection in an accident though a full face helmet will offer more. Always wear a visor or approved goggles to help vision and to protect your eyes.
Note
- For the first 500 miles, the motorcycle should be ridden within the running in procedure (see Owner's Handbook), checking for abnormalities, unusual noises and for satisfactory operation.
- When checking the brakes on road test, a suitable safe place should be found to carry out the test.
WARNING
Do not attempt to test the ABS function of the motorcycle's braking system during road test. The ABS function is for use in emergency situations only. Any attempt to artificially create an emergency situation is extremely hazardous and could lead to a collision with a following vehicle or loss of motorcycle control and an accident.
Note
- Faults detected during road test or post road test inspection, must be rectified before the motorcycle is released to the customer.
- The distance covered on the road test should be long enough to allow a satisfactory check to be made in the following areas:
Engine Cold Start Performance
Standard required:
The engine must start quickly and idle smoothly.
Note
- This check is to be carried out when the engine is cold.
Action:
Turn the ignition switch to the ON position.
Start the engine and allow to idle.
ABS (anti-lock brake system) indicator light (models fitted with ABS only)
Standard required:
Refer to the Owner's Handbook for further information regarding the ABS indicator light illumination sequence for the relevant model.
The ABS indicator light should flash on and off and continue to flash after engine start up until the motorcycle first reaches a speed exceeding 6 mph (10 km/h).
Clutch
Standard required:
The clutch should engage smoothly, without judder, slipping or noise.
Gear Change
Standard required:
Changing between gears must be smooth and easily accomplished.
Throttle Response
Standard required:
The engine should be quick to respond to any movement of the throttle.
There should be no pronounced misfires.
The idle speed must not change when the handlebars are turned from lock to lock.
Brakes
Standard required:
The brakes should have a firm, responsive feel.
The brakes should act smoothly and silently without judder.
Upon activation of the brakes, the motorcycle should come to rest without deviating from a straight line.
Instrument Panel
Standard required:
All instruments must operate correctly.
Check:
Check that the warning lights on the instruments operate correctly.
Steering and Suspension
Standard required:
The motorcycle should be easy to steer and should not pull to one side.
Cornering should be precise with the motorcycle leaning naturally into the corner and returning to the upright position upon exiting the corner.
The front and rear suspension operation should be smooth with no excessive stiffness, roughness or tight spots.
Check:
Check the correct action of the front suspension, including the damper action.
Check the correct action of the rear suspension, including the damper action.
Cruise Control (if fitted)
Standard required:
All cruise control switches must operate correctly. All functions and displays must operate as described in the Owner's Handbook.
Check:
Once the relevant conditions have been met as described in the Owner's Handbook, turn the cruise control ON and OFF.
Check the functionality of all following actions:
- SET the speed
- Throttle cancel - twist the throttle fully forward to cancel the cruise control
- Brake cancel - ensure the cruise control is cancelled by use of the front brake, then the rear brake
- Clutch cancel - ensure the cruise control is cancelled by pulling the clutch lever in
- Gear change cancel - ensure the cruise control is cancelled when changing gear
- Sixty second overtake cancel - ensure the cruise control is cancelled after increasing the speed with the throttle for more than sixty seconds.
Service Indicator and Service Maintenance Book
Reset the service indicator using the Triumph Diagnostic Tool.
See the Triumph Diagnostic Tool User Guide for more information.
Stamp and date the relevant section of the Service Record.
Post Road Test
Note
- The following tests should be carried out immediately after the motorcycle returns from the road test.
- Faults detected during road test or post road test inspection, must be rectified before the motorcycle is released to the customer.
WARNING
Certain components of the motorcycle will be hot immediately after road test. Care must be taken to avoid burn injuries caused by contact with hot components.
Cooling Fan Operation (liquid cooled engines only)
Standard required:
The fan should operate when the coolant temperature rises above normal operating temperature. It will stop automatically.
The blades of the cooling fan must not come into contact with the radiator or the guard which surrounds the cooling fan blades.
There must be no abnormal noises when the cooling fan is operating.
WARNING
The cooling fan operates automatically, even with the ignition switched off. To prevent injury, keep hands and clothing away from the fan blades at all times.
Action:
With the engine idling, allow the engine temperature to rise to above normal operating temperature.
CAUTION
Do not allow the engine temperature to climb too high. Serious damage may result if the engine is allowed to overheat.
Check:
Check the cooling fan for correct operation.
Action:
Switch off the engine.
Hot Start
Note
This test should be carried out when the engine is at normal operating temperature.
Standard required:
The engine should start easily when at normal operating temperature and run smoothly at idle.
Action:
Switch off the engine (if running) and wait thirty seconds.
Start the engine and allow to idle.
Switch off the engine.
Engine
Standard required:
The engine must be free from fluid leaks.
Fuel System
Standard required:
The fuel system must be free from leaks.
Tyres
Standard required:
Front and rear tyres must be free from damage.
WARNING
Check the tyres for cuts, embedded nails or other sharp objects.
Check the wheel rims for dents or deformation. Operation with damaged or defective wheels or tyres is dangerous and loss of motorcycle control or an accident could result.
Bodywork
Standard required:
The motorcycle bodywork must be clean and free from damage.
Check:
Check the motorcycle bodywork for new damage.
Check the motorcycle bodywork for cleanliness.
See also:
 Triumph Scrambler 1200 XC - Service manual > Headstock Bearings
Headstock Bearings - Lubricate WARNING Before starting work, ensure the motorcycle is stabilised and adequately supported. This will help prevent it from falling and causing injury to the operator or damage to the motorcycle.
Triumph Scrambler 1200 XC - Service manual > Engine Covers
Exploded View - Sump Exploded View - Clutch Cover
 Ducati Scrambler
 Fantic Caballero 500
 Indian FTR 1200
 Moto Guzzi V85 TT
 Royal Enfield Bullet Trials Works Replica
 Triumph Scrambler 1200 XE
 Triumph Street Scrambler
 Yamaha XSR700
 Ducati Scrambler 800
 Moto Guzzi V85 TT
 Triumph Scrambler 1200 XC