 Yamaha XSR700 - Owner's Manual > Helmet holding cable
A helmet holding cable is located under the seat. Use this cable in conjunction with the screwdriver to secure a helmet to the vehicle.
- Helmet holding cable
- Screwdriver
To secure a helmet with the helmet holding cable
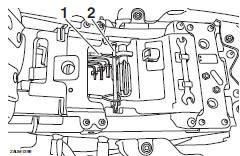
- Remove the seat.
- Remove the screwdriver from its holders by pulling it up from the left side, and then remove the helmet holding cable from the screwdriver.
- Helmet holding cable
- Screwdriver
- Holder
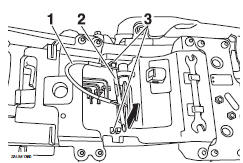
3. Pass the helmet holding cable through the buckle on the helmet strap.
4. Hook the cable loops over the screwdriver, and then install the screwdriver first into the right-side holder and then into the left-side holder.
TIP
Make sure that the screwdriver is securely positioned between its holders, and then position the cable loops to the right of the machine before installing the seat.
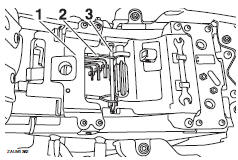
- Helmet strap buckle
- Helmet holding cable
- Screwdriver
5. Install the passenger seat.
WARNING! Never ride with a helmet attached to the helmet holder, since the helmet may hit objects, causing loss of control and possibly an accident.
To release a helmet from the helmet holding cable
1. Remove the seat.
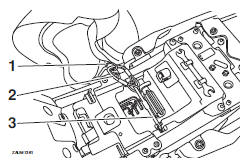
2. Remove the screwdriver, then remove the helmet holding cable from the helmet.
3. Store the cable under the seat by hooking the cable loops over the screwdriver, install the screwdriver in its original position, and then place the helmet holding cable under the seat holder.
- Seat holder
- Helmet holding cable
- Screwdriver
4. Install the seat.
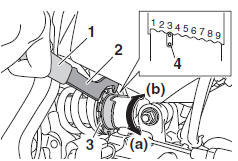
Adjusting the shock absorber assembly
This shock absorber assembly is equipped with a spring preload adjusting ring.
NOTICE
To avoid damaging the mechanism, do not attempt to turn beyond the maximum or minimum settings.
Adjust the spring preload as follows.
Turn the adjusting ring in direction (a) to increase the spring preload.
Turn the adjusting ring in direction (b) to decrease the spring preload.
- Align the appropriate notch in the adjusting ring with the position indicator on the shock absorber.
- Use the special wrench and extension bar included in the tool kit to make the adjustment.
- Extension bar
- Special wrench
- Spring preload adjusting ring
- Position indicator
Spring preload setting:
Minimum (soft): 1
Standard: 3
Maximum (hard): 9
WARNING
This shock absorber assembly contains highly pressurized nitrogen gas. Read and understand the following information before handling the shock absorber assembly.
- Do not tamper with or attempt to open the cylinder assembly.
- Do not subject the shock absorber
assembly to an open
flame or other high heat source.
This may cause the unit to explode due to excessive gas pressure.
- Do not deform or damage the cylinder in any way. Cylinder damage will result in poor damping performance.
- Do not dispose of a damaged or worn-out shock absorber assembly yourself. Take the shock absorber assembly to a Yamaha dealer for any service.
Auxiliary DC connector
This vehicle is equipped with an auxiliary DC connector. Consult your Yamaha dealer before installing any accessories.
See also:
 Yamaha XSR700 - Owner's Manual > Fuel tank cap
Fuel tank cap lock cover Unlock. To open the fuel tank cap
Yamaha XSR700 - Owner's Manual > Sidestand
The sidestand is located on the left side of the frame. Raise the sidestand or lower it with your foot while holding the vehicle upright. TIP The built-in sidestand switch is part of the ignition circuit cut-off system, which cuts the ignition in certain situations.
 Ducati Scrambler
 Fantic Caballero 500
 Indian FTR 1200
 Moto Guzzi V85 TT
 Royal Enfield Bullet Trials Works Replica
 Triumph Scrambler 1200 XE
 Triumph Street Scrambler
 Yamaha XSR700
 Ducati Scrambler 800
 Moto Guzzi V85 TT
 Triumph Scrambler 1200 XC