 Triumph Street Scrambler - Owner's Manual > Instruments
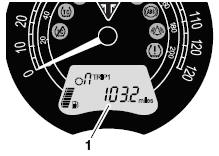
Speedometer and Odometer
The speedometer indicates the road speed of the motorcycle.
The odometer shows the total distance that the motorcycle has travelled.
Tachometer
Caution
Never allow engine speed to enter the red zone as severe engine damage may result.
The tachometer shows the engine speed in revolutions per minute - rpm (r/min). At the end of the tachometer range there is the red zone.
Engine speeds in the red zone are above maximum recommended engine speed and are also above the range for best performance.
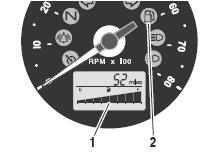
Gear Position Display
Street Twin and Street Scrambler Only
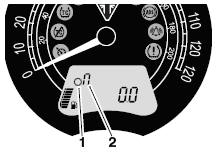
- Gear position symbol
- Gear position display (neutral position shown)
All Other Models
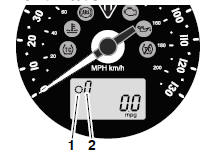
- Gear position symbol
- Gear position display (neutral position shown)
The gear position display indicates which gear (1-5 or 1-6) has been engaged. When the transmission is in neutral (no gear selected), the display screen will show n.
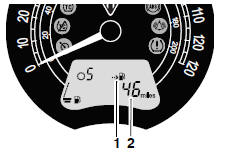
Fuel Gauge
Street Twin and Street Scrambler Only
- Low fuel indicator light
- Fuel gauge
All Other Models
- Fuel gauge
- Low fuel indicator light
The fuel gauge indicates the amount of fuel in the tank. With the ignition switched on, the number of bars shown in the display indicates the level of fuel.
When the fuel tank is full all eight bars are displayed and when empty, no bars are displayed. Other gauge markings indicate intermediate fuel levels between full and empty.
When there are approximately 3.0 litres of fuel remaining in the tank, the low fuel warning light will illuminate.
Note:
After refuelling, the fuel gauge and range to empty information will be updated only while riding the motorcycle. Depending on the riding style, updating could take up to five minutes
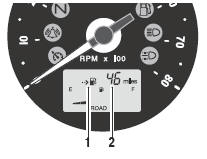
Range to Empty
Street Twin and Street Scrambler Only
- Range to empty indicator
- Estimated distance remaining
All Other Models
- Range to empty indicator
- Estimated distance remaining
This is an indication of the predicted distance that can be travelled on the remaining fuel in the tank.
Note:
After refuelling, the fuel gauge and range to empty information will be updated only while riding the motorcycle. Depending on the riding style, updating could take up to five minutes.
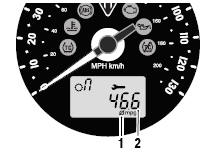
Average Fuel Consumption
Street Twin and Street Scrambler Only

- Average symbol
- Average fuel consumption
All Other Models
- Average symbol
- Average fuel consumption
This is an indication of the average fuel consumption. After being reset the display will show dashes until 0.1 miles/ km has been covered.
Note:
After refuelling, the average consumption information will be updated only while riding the motorcycle. Depending on the riding style, updating could take up to five minutes.
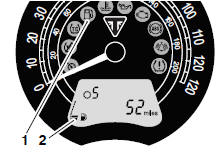
Trip Meter
Warning
Do not attempt to switch between the odometer and trip meter display modes or reset the trip meter with the motorcycle in motion as this may lead to loss of motorcycle control and an accident.
- Trip meter display (Trip 1 selected)
There are two trip meters. Either trip meter shows the distance that the motorcycle has travelled since the meter on display was last reset to zero.
To switch between trip meters, press and release the SCROLL button, located on the left hand handlebar switch housing, until the desired trip meter is shown.
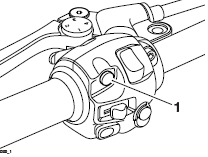
- SCROLL button
Trip Meter Reset
To reset either of the trip meters, select and display the trip meter to be zeroed.
Then press and hold the SCROLL button for one second. After more than one second, the trip meter on display will reset to zero.
Clock
To access the clock, press and release the SCROLL button, located on the left hand handlebar switch housing, until the clock is shown.

- Clock (Street Twin shown)
Clock Adjustment
Warning
Do not attempt to adjust the clock with the motorcycle in motion as this may lead to loss of motorcycle control and an accident.
To reset the clock: Select the clock display.
Press and hold the SCROLL button for one second, the clock's hour display will start to flash. Release the SCROLL button.
To reset the hour display: Make sure the hour display is still flashing then press and release the SCROLL button to change the setting.
Each individual button press will change the setting by one digit.
When the correct hour display is shown, press and hold the SCROLL button for one second. The hours display is set and the minutes display will begin to flash.
The minutes display is adjusted in the same way as for the hour display.
Once both hours and minutes are correctly set, press the SCROLL button for one second and the display will cease to flash.
See also:
 Triumph Street Scrambler - Owner's Manual > Instrument Panel Layout
Street Twin and Street Scrambler (Street Twin shown) Speedometer Traction Control (TC) disabled warning light Traction Control (TC) indicator light Low fuel level indicator light High coolant temperature warning light Low oil pressure warning light Engine management Malfunction Indicator Light (MIL) ABS (Anti-Lock Brake System) warning light Immobiliser/Alarm status indicator light (alarm is an accessory kit) Tyre pressure warning light (if Tyre Pressure Monitoring System (TPMS) is fitted) Right hand direction indicator light Neutral indicator light Information display screen Tyre pressure display (if TPMS is fitted) Service interval indicator Odometer/Trip meter/Clock Gear position indicator Fuel gauge High beam indicator light Left hand direction indicator light
Triumph Street Scrambler - Owner's Manual > Riding Modes
Note: Riding modes are available on the Thruxton, Thruxton R and Bonneville T120 models. The riding mode system allows adjustment of the throttle response.
 Ducati Scrambler
 Fantic Caballero 500
 Indian FTR 1200
 Moto Guzzi V85 TT
 Royal Enfield Bullet Trials Works Replica
 Triumph Scrambler 1200 XE
 Triumph Street Scrambler
 Yamaha XSR700
 Ducati Scrambler 800
 Moto Guzzi V85 TT
 Triumph Scrambler 1200 XC