 Triumph Scrambler 1200 XE - Owner's Manual > Main Menu
To access the Main Menu:
- The motorcycle must be stationary with the ignition switched on.
- Press the HOME button on the right handlebar switch housing.
- Scroll the Main Menu by pushing the joystick down/up until the required option is selected and then press the joystick centre to confirm.
The Main Menu allows access to the following options:
Riding Modes
This menu allows configuration of the riding modes.
Bike Setup
This menu allows configuration of the different features of the motorcycle.
Trip Setup
This menu allows configuration of Trip 1 and Trip 2 meters.
Display Setup
This menu allows configuration of the display options.
Reset to Defaults
This menu allows all instrument settings to be returned to the default setting.
Riding Modes
To change the riding modes settings:
- From the Riding Modes menu, push the joystick down/up to select a specific riding mode and press the joystick centre to confirm.
- Push the joystick down/up until the required setting option is selected and press the joystick centre to confirm.
Push the joystick down/up until the required option is selected and press the joystick centre to confirm.
Riding Mode Configuration
Riding modes are available depending on the motorcycle model's specification. Refer to the following table for the ABS, MAP and TC options available for each riding mode.
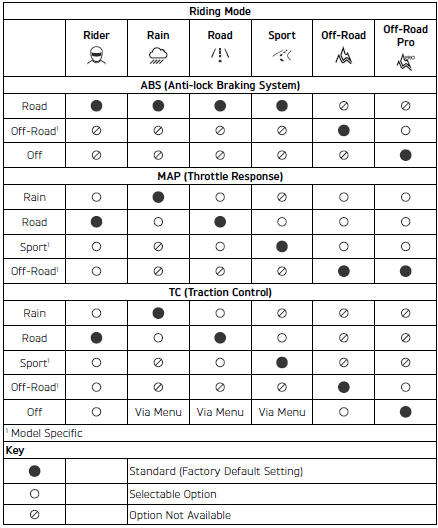
ABS Options
Warning
The Off-Road ABS option is not intended for use with normal, on-road riding.
Use of the rear brake pedal in this situation can cause the rear wheel to lock under heavy braking.
Riding on the road with the ABS set to Off-Road can lead to instability when braking which may result in loss of motorcycle control and an accident.
Warning
If the ABS is disabled, the brake system will function as a non-ABS braking system. In this situation braking too hard will cause the wheels to lock, and may result in loss of motorcycle control and an accident.
ABS Option Descriptions
Road and Sport - Optimal ABS setting for road use.
Rain - Optimal ABS setting for rain use.
Off-Road - Front ABS is less intrusive.
Rear ABS is disabled. Optimised cornering ABS is disabled.
Off-Road Pro - Front ABS is disabled.
Rear ABS is disabled. Optimised cornering ABS is disabled. The ABS warning light will be illuminated.
MAP Options
MAP Option Descriptions
Road - Standard throttle response.
Rain - Reduced throttle response when compared to the Road setting for wet or slippery conditions.
Sport - Increased throttle response when compared to the Road setting.
Off-Road - Optimal throttle response setting for off-road use.
Traction Control Options
Warning
The Off-Road traction control option is not intended for normal, on-road riding.
Riding on the road with traction control set to Off-Road can produce instability under acceleration due to the increased amount of rear wheel slip allowed.
Instability caused by rear wheel slip may result in loss of motorcycle control and an accident.
Warning
If the traction control is disabled, the motorcycle will handle as normal but without traction control.
In this situation accelerating too hard on wet/slippery road surfaces may cause the rear wheel to slip which may result in loss of motorcycle control and an accident.
Traction Control Option Descriptions
Road - Optimal traction control setting for road use. Allows a small amount of rear wheel slip.
Rain - Optimal traction control setting for wet or slippery conditions. Allows reduced rear wheel slip when compared with the Road setting.
Sport - Allows increased rear wheel slip when compared with the Road setting.
Off-Road - Traction control is set up for off-road use. Allows increased rear wheel slip when compared to the Rain, Road and Sport setting. The traction control indicator light will flash slowly.
Off-Road Pro - Traction control is turned OFF. The traction control disabled warning light will be illuminated.
Bike Setup Menu
From the Main menu, select Bike Setup and push the joystick button to confirm.
The Bike Setup menu allows access to the following options:
- Indicators
- Traction Control (TC)
- Service
Bike Setup - Direction Indicators
The direction indicators can be set to Auto Basic, Auto Advanced or Manual mode.
To select the required direction indicators mode:
From the Bike Setup menu, push the joystick down to select Indicators and press the joystick centre to confirm.
Push the joystick down/up to scroll between Auto Basic, Auto Advanced or Manual.
- Auto Basic - The self-cancelling function is on. The direction indicators will activate for eight seconds and an additional 65 metres.
- Auto Advanced - The selfcancelling function is on. A short press activates the direction indicators for three flashes.
A longer press activates the direction indicators for eight seconds and an additional 65 metres.
- Manual - The self-cancelling function is off. The direction indicators must be manually cancelled using the direction indicator switch.
Press the joystick centre to confirm the required selection.
The display will then return to the Bike Setup menu.
Bike Setup - Traction Control (TC)
It is possible to temporarily disable the traction control system. The traction control cannot be permanently disabled, it will be automatically enabled when the ignition is turned off and then on again, or if the default riding mode is activated by a long press of the MODE button.
To select the required option:
- From the Bike Setup menu, push the joystick down to select TC and press the joystick centre to confirm.
- Push the joystick down/up to scroll between Enabled and Disabled.
- Press the joystick centre to select the required option.
- The display will then return to the Bike Setup display.
Bike Setup - Service
The service interval is set to a distance and/or time period.

To review the service interval:
- From the Bike Setup menu, push the joystick down to select Service and press the joystick centre to confirm.
- The service time and distance information are then shown.
Trip Setup Menu
The Trip Setup menu allows configuration of the trip meters. Each trip meter can be configured to be reset either manually or automatically. The setup procedure is the same for both trip meters.
To access the Trip Setup menu:
- Press the HOME button to display the Main menu.
- Push the joystick down and then press the joystick centre to select Trip Setup.
The options available are:
- Trip 1 Reset
- Trip 2 Reset
- Trip 2 Display.
Trip Setup - Manual Reset
This menu allows the manual reset of each trip meter individually.
To set a trip meter manually:
- Push the HOME button to display the Main Menu.
- Push the joystick down and then press the joystick centre to select Trip Setup.
- Push the joystick down and then press the joystick centre to select either Trip 1 Reset or Trip 2 Reset.
- Push the joystick centre to select Manual.
There are two options available:
Reset Now and Continue - Resets all trip meter data in the relevant trip meter.
Continue without Reset - The trip meter will not be reset.
- Press the joystick centre to confirm the selection and return to the previous menu.
Trip Setup - Automatic Reset
This menu allows the automatic reset of a trip meter after the ignition has been switched off for a set time.
To set the trip meters to automatically reset:
- Push the HOME button to display the Main Menu.
- Push the joystick down and then press the joystick centre to select Trip Setup.
- Push the joystick down/up and then press the joystick centre to select Trip 1 Reset or Trip 2 Reset.
- Push the joystick down/up and select Automatic and then press the joystick centre.
- Push the joystick down/up to select the required timer setting and press the joystick centre to confirm the required time limit. The required time limit is then stored in the trip memory.
When the ignition is turned off, the trip meter is set to zero when the time period has elapsed.
The following table shows two examples of the automatic trip reset functionality. 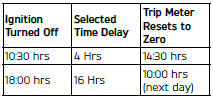
Trip 2 Enable/Disable
This menu allows Trip 2 meter to be enabled or disabled. If Trip 2 is disabled it will no longer be shown in the instrument display.
To enable or disable the Trip 2 meter:
- Push the MODE button to display the Main Menu.
- Push the joystick down to select Trip Setup.
- Push the joystick centre to display the Trip Setup menu.
- Push the joystick down/up to scroll to the Trip 2 Display and press the joystick centre.
- Push the joystick down/up to scroll between Enabled and Disabled and press the joystick centre.
Display Setup Menu
From the Main menu, select Display Setup and push the joystick button to confirm.
The Display Setup menu allows access to the following options:
- Theme
- Brightness (High Contrast)
- Brightness (Low Contrast)
- Visible Tray
- Shift Indicator
- Rider Name
- Language
- Units
- Clock
- Date.
Display Setup - Themes
To select a different theme the motorcycle must be stationary with the ignition turned to the ON position.
- Push the HOME button to display the Main Menu.
- Push the joystick down and then press joystick centre to select Display Setup.
- Push the joystick centre to display the Theme menu.
- Press the joystick centre to select the required theme.
The new theme will be shown and saved. Press the HOME button to exit.
Display Setup - Brightness
The brightness feature allows the screen's brightness contrast to be changed for day time and night time riding.
There are two brightness options to choose from; High Contrast and Low Contrast.
To change the brightness level:
- From the Display Setup menu, push the joystick down to select Brightness (High Contrast) or Brightness (Low Contrast).
- Push the joystick centre to confirm.
- Push the joystick down/up to adjust the brightness.
- Press the joystick centre to confirm the required level of brightness.
- Press the HOME button to return to the main display.
Note
In bright sunlight, the brightness settings will adapt to make sure that the instruments can be viewed at all times.
Display Setup - Visible Tray
The Visible Tray feature allows the selection of required information tray items to be shown in the instrument panel display.
To select the Visible Tray menu:
From the Display Setup menu, push the joystick down to select Visible Tray and press the joystick centre to confirm.
Push the joystick down/up until the required information tray item is selected.
Press the joystick centre to select/ deselect the information tray item.
The options include:
- Trip 1
- Trip 2
- Fuel Status
- Service Interval
- Theme
- Detail
- Contrast
- Coolant.
An information tray item with a tick next to it will be shown in the instrument panel display. An information tray item without a tick next to it will not be shown in the instrument panel display.
Display Setup - Shift Indicator
This menu allows the adjustment of the gear shift indicator.
The gear shift indicator changes the tachometer colour to orange when the specified engine speed threshold is reached, indicating to change gear.
The engine speed threshold can be defined and reset, and the gear shift indicator can be disabled. Once the engine has been run in (at 1,000 miles), the Running In option is replaced with a Default option.
From the Shift Indicator menu, push the joystick down to select User Defined and press the joystick centre to confirm.
To adjust the engine speed threshold (RPM) for the gear shift indicator:
- Push the joystick left/right to select each individual number.
- Push the joystick down/up to change the number.
- Press the joystick centre to confirm selection.
- Repeat this process with each individual number until the correct RPM number is shown.
To reset the gear shift indicator:
- Push the joystick down/up to select Reset and press the joystick centre to confirm. This resets the RPM to 07000.
Display Setup - Rider Name
This menu allows the rider name to be entered in to the instrument panel system and shown in the welcome/start up display screen.
To enter a rider's name:
- From the Display Setup menu, push the joystick down to select Rider Name and press the joystick centre to confirm.
- Using the joystick, navigate the keyboard and select the first letter of the rider's name. Press the joystick button to confirm. The letter appears at the top of the keyboard.
- Repeat the procedure until the whole rider name has been selected.
There is a character limit of 13 characters.
- Selecting ?123 shows a new keyboard of symbols and numbers to select from.
- Once the rider's name has been completed, select Enter and click on the joystick button to confirm.
- The rider's name will now appear on the welcome screen the next time the instruments are started.
Display Setup - Language
There are several different languages that can be selected to be shown in the instrument display screen.
To select a different language:
From the Display Setup menu, push the joystick down to select Language and press the joystick centre to confirm.
Push the joystick down/up until the required language is selected.
The following options are available:
- English
- French
- German
- Italian
- Dutch
- Portuguese
- Spanish
- Swedish.
Press the joystick centre to select/ deselect the required language.
Display Setup - Units
There are different units of measurement options that can be shown in the display screen.
To select the units of measurement required:
- From the Display Setup menu, push the joystick down to select Units and press the joystick centre to confirm.
- Push the joystick down/up to select the required unit; Distance/ Economy, Temperature or Pressure.
- Push the joystick down/up to select the required unit of measurement from the following options:
Distance/Economy:
Miles and MPG (UK)
Miles and MPG (US)
KM and L/100KM
KM and KM/L
Temperature:
ºC
ºF
Pressure:
PSI
Bar
KPa
- Press the joystick centre to confirm.
Display Setup - Clock
This function allows the adjustment of the clock.
To set the clock:
- From the Display Setup menu, push the joystick down to select Clock and press the joystick centre to confirm.
- Push the joystick down/up to select between either 12 Hr or 24 Hr clock and press the joystick centre to confirm selection. The clock will display in either 12 or 24 hour format. Once the clock format is set the display will return to the Clock menu.
To set the time, push the joystick down/ up to select Hours or Minutes.
To adjust the hour setting:
- Select Hours on the display and press the joystick centre, a tick will appear next to Hours and the hours display will flash as shown below.
- Push the joystick down/up to set the hour and press the joystick centre to confirm.
To adjust the minute setting:
- Select Minutes on the display and press the joystick centre, a tick will appear next to Minutes and the minutes display will flash as shown below.
- Push the joystick down/up to set the correct minute and press the joystick centre to confirm.
Display Setup - Date
This function allows the adjustment of the date and date format.
To set the date format:
- From the Display Setup menu, push the joystick down to select Date and press the joystick centre to confirm.
- Press the joystick centre to display Date Format.
- Push the joystick down/up to select the required date format.
The following options are available:
DD-MM-YYYY
MM-DD-YYYY
YYYY-MM-DD
Press the joystick centre to confirm the selection. Once the date format is set the display will return to the Date menu.
To set the date, push the joystick down/ up to select the Year, Month and Day.
- Select Year and then press the joystick centre, a tick will appear next to the Year and the Year display will flash.
- Push the joystick down/up to set the current year and then press the joystick centre to confirm.
- To set the Month and Day repeat the procedure used to set the year.
Once the date is set the display will return to the Date menu.
Reset to Defaults
This function allows the Main Menu items to be reset to the default setting.
To reset the Main Menu display:
- Press the HOME button to display the Main Menu.
- Push the joystick down and then press the joystick centre to select Reset To Defaults.
The options are:
- Confirm - The following main menu settings and data will be reset to the factory default values - Riding Modes, Indicator Setup, Trip Computers, Visible Trays, Language, Traction Control, Themes and Display Brightness.
- Cancel - The main menu settings and data will remain unchanged and the display will return to the previous level.
- Select the required option and press the joystick button to confirm.
See also:
 Triumph Scrambler 1200 XE - Owner's Manual > Information Tray
Warning When the motorcycle is in motion, only attempt to switch between the information tray modes or reset the fuel information under the following conditions: At low speed In traffic free areas On straight and level roads or surfaces In good road and weather conditions.
Triumph Scrambler 1200 XE - Owner's Manual > Instrument Panel Position Adjustment
Warning Operation of the motorcycle with an incorrectly adjusted instrument panel is dangerous. An incorrectly adjusted instrument panel will result in loss of instrument vision when riding and may cause a distraction leading to loss of control of the motorcycle and an accident.
 Ducati Scrambler
 Fantic Caballero 500
 Indian FTR 1200
 Moto Guzzi V85 TT
 Royal Enfield Bullet Trials Works Replica
 Triumph Scrambler 1200 XE
 Triumph Street Scrambler
 Yamaha XSR700
 Ducati Scrambler 800
 Moto Guzzi V85 TT
 Triumph Scrambler 1200 XC