 Ducati Scrambler 800 - Service manual > Overhauling the front wheel (URBAN ENDURO)
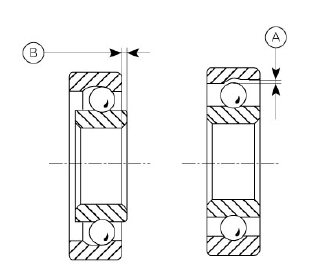
Wheel bearings
Before checking the dimensions, check for wear on wheel hub bearings. Check for wear by hand after cleaning and degreasing the bearings in their seats.
Turn the internal ring and check that the internal balls move freely: any irregularity indicates deformations like those indicated in values "A" and "B".
An excessive wear can cause vibrations and instability of the vehicle and therefore it is necessary to replace them.
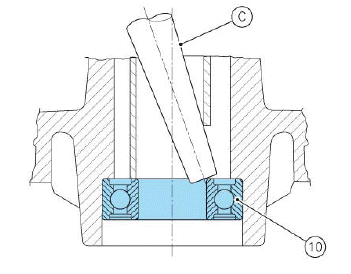
To remove the bearings and the sealing rings from the wheel hub follow the instructions below.
Position a drift (C) against the inner ring of the bearing (10).
Tap with a hammer until removing the bearing (10).
Apply the drift at different points to facilitate the removal.
Important Once removed, the used bearings and sealing rings must not be refitted.
Before fitting new bearings, check that the seat is clean and free from scoring and damage.
Grease the bearing seat and then push the new bearing into its seat.
Using a tubular drift (D) that only bears on the outer ring of the bearing (10) to drive the latter fully into its seat.
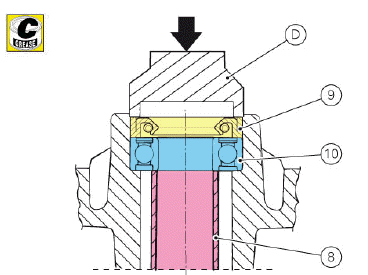
Use the same method to install the sealing rings (9).
Ensure that spacer (8) is fitted between the two wheel hub bearings.
Note Wheels must be rebalanced after repair, maintenance and overhaul operations.
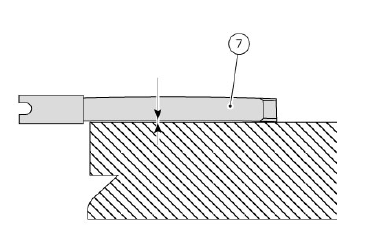
Inspecting the wheel shaft
For the check values refer to paragraph (Front Wheel).
Check the wheel shaft (7) for straightness. Turn the shaft on a reference surface and measure maximum distortion using a feeler gauge.
Overhauling the front wheel rim, spokes and nipples
Perform a visual check for damaged parts: if no components are damaged check the nipple tightening and axial and radial runout, as described below.
In case of runout, replace the rim.
In case of broken spokes replace them as described below: if three or more spokes broken at the same time, it is necessary to check all spokes since such a high number of broken spokes not due to critical events could mean that they were faulty and/or the installation/maintenance were not performed correctly.
Check for not spokes emitting a hollow sound when hit with a metallic object: this could mean that there are loosen spokes that have been used for a long time without preload: in this case, check the threaded coupling to the nipple and the seat in the spoke head hub.
Checking the nipple minimum tightening torque
This operation can be performed also with wheel fitted on the motorcycle, by lifting it from the ground and ensuring it can rotate freely.
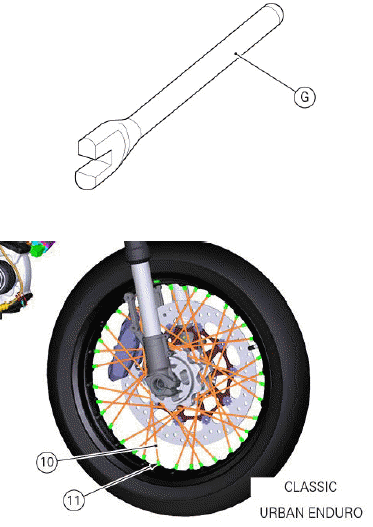
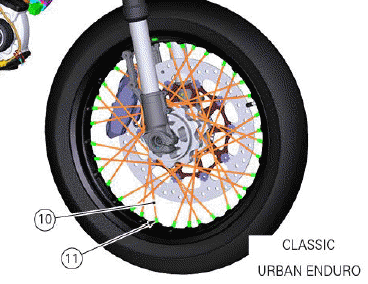
Starting from the valve hole as reference point, no matter if clockwise or counter clockwise, check the minimum tightening torque of all nipples (11) once and one after the other and stop at the valve hole: the minimum torque must be 4 Nm. The wrench to be used is tool (A) no. 88713.2776.
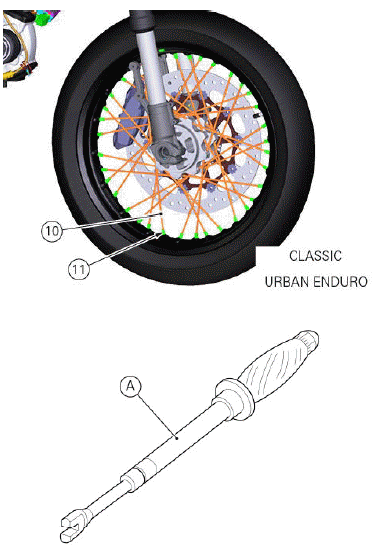
Check that none of spokes (10) emits a hollow sound when hit with a metallic object: this to avoid that seizure or oxidation of spoke and nipple coupling cancels the action of the applied torque; if necessary, restore the correct coupling ensuring not to use products that are aggressive for the wall and the tube.
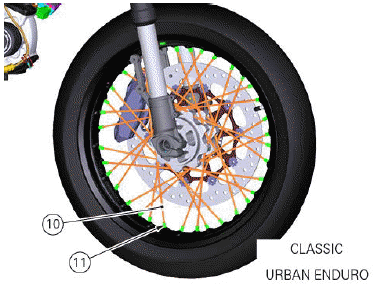
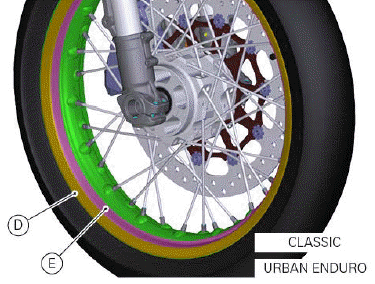
Checking for radial or axial runout
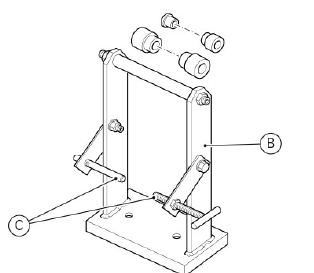
This operation can be performed by positioning the wheel on the centring tool (B) no. 88713.2775 or leaving it fitted on the vehicle, by lifting it from the ground and using a support with dial gauges.
Check that the reference elements (C) of centring tool (B) no. 88713.2775 or the dial gauges are at right angle to the surface to check: for the axial runout, use the outer side of rim (D), and for the radial runout use the internal surfaced of the rim without nipples (E).
While the wheel is rotating, measure the runout values: reset the gauge on the rim and check the movement by inserting a feeler gauge in the gap between reference point and rim.
The axial and radial runout values must be equal to or lower than 0.8 mm and with a max. use limit of 2 mm: once this limit is reached, it is necessary to perform another regulation.
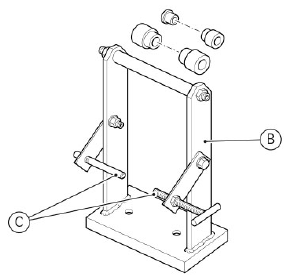
Changing the spokes
Remove the tyre, the tube and the nipple protection cover from the rim and position the wheel on the centring tool (B) no. 88713.2775.
Note To perform these operations easily it may be necessary to remove the brake disc and loosen the other spokes.
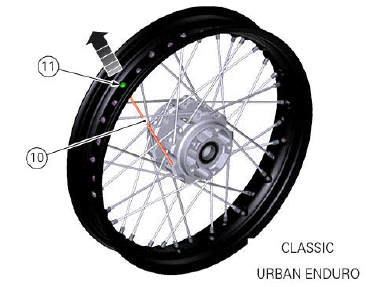
Unscrew nipple (11) and remove the damaged spoke (10) by sliding it off the seat in the hub.
Insert the new spoke in the seat of the hub and screw a new nipple (11) and tightening it to a minimum torque of 4 Nm with a wrench (A) no. 88713.2776.
Then check the lateral and axial runout as already described before.
Tensioning and centring operation
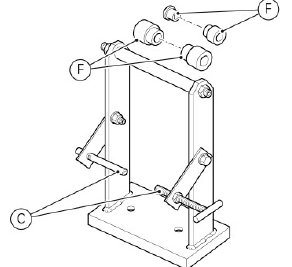
Remove the tyre and the tube from the rim and position the wheel on the centring tool (B) no. 88713.2775 using suitable spacers (F).
Block the wheel pack checking for no end float.
Check the rim axial and radial runout, as described before.
Rotate
Rotate the rim: if the detected values do not fall within the specified ranges, tension or loosen the spokes using the centring tool (G) no. 88713.2777 on the polygonal side of nipples (11).
In case of axial runout, tension the spokes on the side featuring a value increase and loosen those on the opposite side. Always work on several spokes, at least on two spokes per side, by letting them perform small rotations between one check and the following one.
In case of radial runout, loosen the rim spokes featuring a value increase and tension those on the opposite side. Check the axial runout again as described above.
Loosen the wheel pack, invert its installation sense and tighten it to check the axial and radial runout and camber on the other side:
- fix the axial runout reference to check the correct camber: symmetric for the front wheel and ensured by the suitable spacers for the rear wheel;
- fix the radial runout reference to check the rim shoulder that has not been checked before.
Repeat the checks and operate until reaching the specified value of 0.8 mm.
Tighten nipples (11) to a minimum torque of 4 Nm.
See also:
 Ducati Scrambler 800 - Service manual > Overhauling the front wheel (CLASSIC)
Wheel bearings Before checking the dimensions, check for wear on wheel hub bearings. Check for wear by hand after cleaning and degreasing the bearings in their seats.
 Ducati Scrambler
 Fantic Caballero 500
 Indian FTR 1200
 Moto Guzzi V85 TT
 Royal Enfield Bullet Trials Works Replica
 Triumph Scrambler 1200 XE
 Triumph Street Scrambler
 Yamaha XSR700
 Ducati Scrambler 800
 Moto Guzzi V85 TT
 Triumph Scrambler 1200 XC