 Ducati Scrambler - Owner's Manual > Position of motorcycle controls
Attention This section shows the position and function of the controls used to ride the motorcycle. Be sure to read this information carefully before you use the controls.
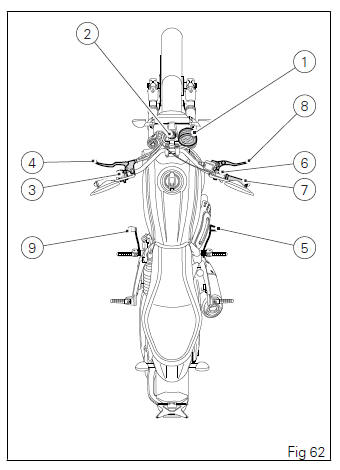
- Instrument panel.
- Key-operated ignition switch and steering lock.
- LH switch.
- Clutch lever.
- Rear brake pedal.
- RH switch.
- Throttle twistgrip.
- Front brake lever.
- Gear change pedal.
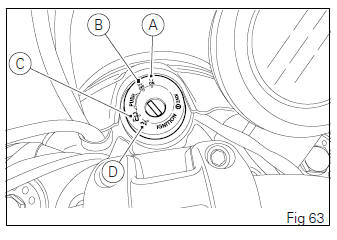
Key-operated ignition switch and steering lock
It is located in front of the fuel tank and has four positions:
-
 : enables lights and engine operation;
 -
 : disables lights and engine operation;
 -
 : the steering is locked;
 -
 : parking light and steering lock.
Note To move the key to the last two positions, press it down before turning it. The key can be removed in positions (B), (C) and (D).
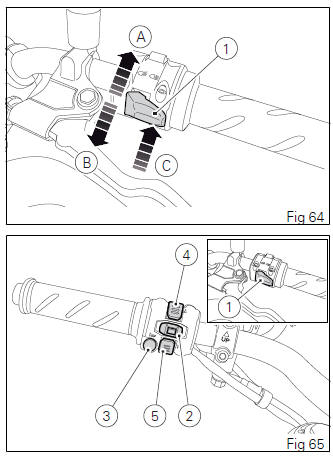
Left-hand switch
- Dip switch, light dip switch, two positions:
position = low beam on (A);
position = high beam on (B);
Button= high-beam flasher (FLASH) and instrument panel control (C). - Switch
 = 3-position turn indicator control:
central position = off;
position = left turn;
position = right turn.
To disable the turn indicator, press the control once it returns to center position.
- Button
 = warning horn.
 - Instrument panel control switch, position "
 ".
". - Instrument panel control switch, position "
 ".
".
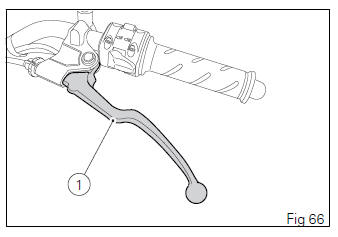
Clutch lever
Lever (1) disengages the clutch. When the clutch lever (1) is operated, drive from the engine to the gearbox and the drive wheel is disengaged. Using the clutch properly is essential to smooth riding, especially when moving off.
Important Using the clutch properly will avoid damage to transmission parts and spare the engine.
Note The engine can be started with the side stand down and the gearbox in neutral. If starting with a gear engaged, pull in the clutch lever (in this case the side stand must be up).
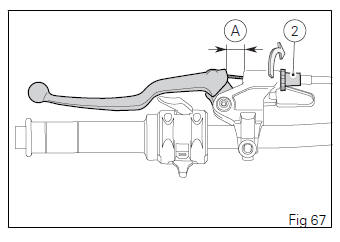
Clutch control free play adjustment
Attention A wrong adjustment can seriously affect the clutch operation and duration.
A worn clutch makes the clutch cable tension increase.
Always check the free play, with cold engine, before using the vehicle.
When operating the clutch lever, you must clearly feel the passage from a very low resistance to a very high resistance (operating force).
The free play corresponds to the clutch lever travel where resistance is very low.
Pull the lever through its free play and check that distance "A" is between 0.12 - 0.16 in (3-4 mm).
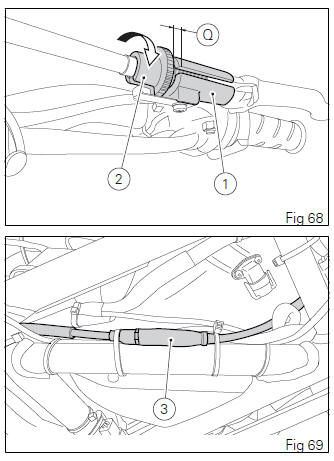
To adjust the free play make sure that it is not equal to zero. Work on the primary adjuster (2) on the clutch control.
Adjuster (2), located on the lever, allows a maximum value (Q) of 0.43 in (11 mm), whereas the (factory) standard setting is 0.20 in (5 mm). If working on such adjuster proves insufficient, work on the secondary adjuster (3).
Attention In case of a slipping clutch due to clutch wear, adjuster (2) on the lever must NEVER be loosened, but screwed, as described above.
If the clutch is still slipping, go to a Dealer or a Ducati Authorized Service Center.
See also:
 Ducati Scrambler - Owner's Manual > Right-hand switch
Red ON/OFF switch. Black ENGINE START button. The switch (1) has three positions: center: RUN OFF. In this position, the engine cannot be started and all electronic devices are off. pushed down: ON/OFF. In this position, the system can be turned on (Key-On) and off (Key-Off). pushed up: RUN ON. The engine can only be started in this position, pushing the black button (2).
 Ducati Scrambler
 Fantic Caballero 500
 Indian FTR 1200
 Moto Guzzi V85 TT
 Royal Enfield Bullet Trials Works Replica
 Triumph Scrambler 1200 XE
 Triumph Street Scrambler
 Yamaha XSR700
 Ducati Scrambler 800
 Moto Guzzi V85 TT
 Triumph Scrambler 1200 XC