 Yamaha XSR700 - Owner's Manual > Replacing the headlight bulb
This model is equipped with a halogen bulb headlight. If the headlight bulb burns out, replace it as follows.
NOTICE
- Do not touch the glass part of the headlight bulb. Otherwise the luminosity and the life of the bulb may be adversely affected.
- Thoroughly clean off any dirt, oil, or fingerprints from the bulb using a cloth moistened with alcohol or thinner.
- Do not use a headlight bulb of a wattage higher than specified.
- Do not affix any type of tinted film or stickers to the headlight lens.
- Do not touch the glass part of the bulb.
1. Remove the headlight unit by removing the bolts on each side.
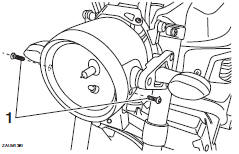
- Bolt
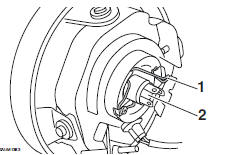
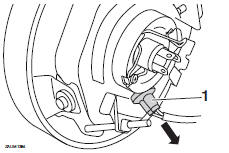
2. Disconnect the headlight coupler, and then remove the headlight bulb cover.
- Headlight bulb cover
- Headlight coupler
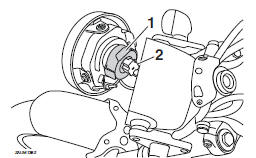
3. Unhook the headlight bulb holder, and then remove the burnt-out bulb.
1. Headlight bulb holder
2. Headlight bulb
4. Place a new headlight bulb into position, and then secure it with the bulb holder.
5. Install the headlight bulb cover, and then connect the coupler.
6. Install the headlight unit by installing the bolts.
7. Have a Yamaha dealer adjust the headlight beam if necessary.
Replacing the auxiliary light bulb
If the auxiliary light bulb burns out, replace it as follows.
1. Remove the headlight unit.
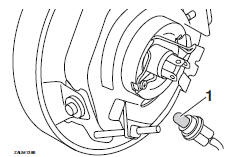
2. Remove the auxiliary light bulb socket (together with the bulb) by pulling it out.
- Auxiliary light bulb socket
3. Remove the burnt-out bulb by pulling it out.
- Auxiliary light bulb
4. Insert a new bulb into the socket.
5. Install the socket (together with the bulb) by pushing it in.
6. Install the headlight unit.
Tail/brake light
This model is equipped with an LEDtype tail/brake light.
If the tail/brake light does not come on, have a Yamaha dealer check it.
Replacing a turn signal light bulb
1. Remove the turn signal light lens by removing the screw.
- Turn signal light lens
- Screw
2. Remove the burnt-out bulb by pushing it in and turning it counterclockwise.
- Turn signal light bulb
3. Insert a new bulb into the socket, push it in, and then turn it clockwise until it stops.
4. Install the lens by installing the screw.
NOTICE: Do not overtighten the screw, otherwise the lens may break.
License plate light
If the license plate light does not come on, have a Yamaha dealer check the electrical circuit or replace the bulb.
Supporting the motorcycle
- Maintenance stand (example)
Since this model is not equipped with a centerstand, use maintenance stands when removing the front or rear wheel or when performing other maintenance that requires the motorcycle to stand up right.
Check that the motorcycle is in a stable and level position before starting any maintenance.
Troubleshooting
Although Yamaha motorcycles receive a thorough inspection before shipment from the factory, trouble may occur during operation. Any problem in the fuel, compression, or ignition systems, for example, can cause poor starting and loss of power.
The following troubleshooting charts represent quick and easy procedures for checking these vital systems yourself.
However, should your motorcycle require any repair, take it to a Yamaha dealer, whose skilled technicians have the necessary tools, experience, and know-how to service the motorcycle properly.
Use only genuine Yamaha replacement parts. Imitation parts may look like Yamaha parts, but they are often inferior, have a shorter service life and can lead to expensive repair bills.
WARNING
When checking the fuel system, do not smoke, and make sure there are no open flames or sparks in the area, including pilot lights from water heaters or furnaces. Gasoline or gasoline vapors can ignite or explode, causing severe injury or property damage.
Troubleshooting chart

Engine overheating
WARNING
- Do not remove the radiator cap when the engine and radiator are hot. Scalding hot fluid and steam may be blown out under pressure, which could cause serious injury. Be sure to wait until the engine has cooled.
- Place a thick rag, like a towel, over the radiator cap, and then slowly rotate the cap counterclockwise to the detent to allow any residual pressure to escape. When the hissing sound has stopped, press down on the cap while turning it counterclockwise, and then remove the cap.
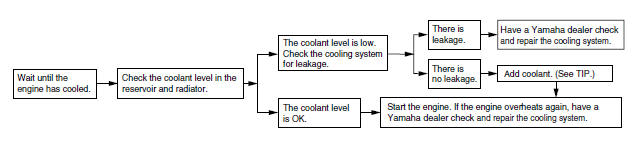
TIP
If coolant is not available, tap water can be temporarily used instead, provided that it is changed to the recommended coolant as soon as possible.
See also:
 Yamaha XSR700 - Owner's Manual > Battery
This model is equipped with a VRLA (Valve Regulated Lead Acid) battery. There is no need to check the electrolyte or to add distilled water. However, the battery lead connections need to be checked and, if necessary, tightened.
 Ducati Scrambler
 Fantic Caballero 500
 Indian FTR 1200
 Moto Guzzi V85 TT
 Royal Enfield Bullet Trials Works Replica
 Triumph Scrambler 1200 XE
 Triumph Street Scrambler
 Yamaha XSR700
 Ducati Scrambler 800
 Moto Guzzi V85 TT
 Triumph Scrambler 1200 XC