 Ducati Scrambler 800 - Service manual > Setting the units of measurement
This function allows changing the units of measurement of the displayed values. To manually set the units of measurement, you must enter the SETTING MENU.
Select UNITS option, by pressing button (1) or (2). Once function is highlighted, press CONFIRM MENU button (4).
When entering this function, use buttons (1) and (2) to select the parameter for which you want to set a new unit of measurement or to restore the default settings:
- SPEED;
- temperature (TEMP.);
- restore the default settings for units of measurement (UNIT:DF).
To exit the menu and go back to the previous page, select "EXIT" and press button (4).
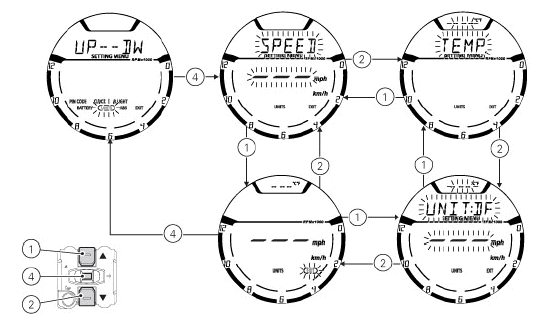
Setting the units of measurement: Speed
This function allows changing the unit of measurement of Vehicle speed, Odometer, Trip 1, Trip 2 and Trip Fuel (when active). To gain access to this function enter the SETTING MENU, use buttons (1) and (2) to select UNITS and press button (4). Select SPEED option, by pressing button (1) or (2).
Once SPEED function is highlighted, press CONFIRM MENU button (4). When entering the function, units of measurement (mph, km/h) are indicated: current unit of measurement is flashing while the other available unit is not flashing. Press buttons (1) and (2) to highlight the units of measurement one by one: in particular, use button (1) to highlight the following item and button (2) to highlight the previous item.
Select the required unit of measurement and then press the CONFIRM MENU button (4) to confirm the selected unit; then the selected unit of measurement is saved in the instrument panel and the SPEED indication starts flashing again.
Press button (2) to make the EXIT box flash; press button (4) to quit and go back to the previous window.
- Km/h: if this unit is set, the following values will have the same units
of measurement:
- TOT, TRIP 1, TRIP 2, TRIP FUEL: Km
- Motorcycle speed: Km/h
- mph: if this unit is set, the following values will have the same units
of measurement:
- TOT, TRIP 1, TRIP 2, TRIP FUEL: miles
- Motorcycle speed: mph
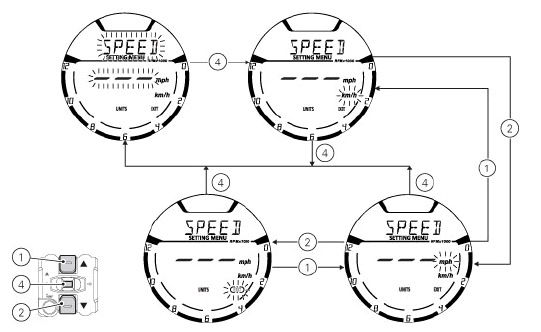
Setting the units of measurement: Temperature
This function allows you to change the units of measurement of the Air Temperature indications.
To gain access to this function enter the SETTING MENU, use buttons (1) and (2) to select UNITS and press button (4).
Select TEMP option, by pressing button (1) or (2).
Once TEMP. function is highlighted, press CONFIRM MENU button (4).
When entering the function, units of measurement (ÂşC, ÂşF) are indicated: current unit of measurement is flashing while the other available unit is not flashing.
Press buttons (1) and (2) to highlight the units of measurement one by one: in particular, use button (1) to highlight the following item and button (2) to highlight the previous item. Select the required unit of measurement and then press the CONFIRM MENU button (4) to confirm the selected unit; then the selected unit of measurement is saved in the instrument panel and the "TEMP." indication starts flashing again.
Press button (2) to make the EXIT box flash; press button (4) to quit and go back to the previous window.
- ÂşC: if this unit is set, the following values will have the same units
of measurement:
- T - AIR: ÂşC
- ÂşF: if this unit is set, the following values will have the same units
of measurement:
- T - AIR: ÂşF
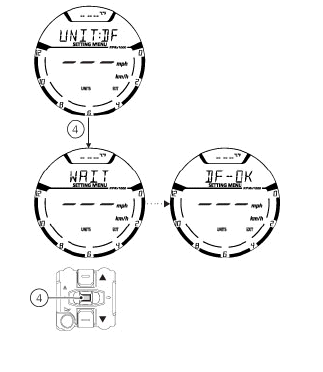
DEFAULT setting
This function allows setting the DEFAULT units of measurement according to the vehicle version.
To gain access to this function enter the SETTING MENU, use buttons (1) and (2) to select UNITS and press button (4). Press button (1) or (2) to make the "UNIT:DF" option start flashing and then press button (4) for 3 seconds.
After 3 seconds the instrument panel shows "WAIT" for 2 seconds; then the "DF-OK" message indicates that the units of measurement have been restored.
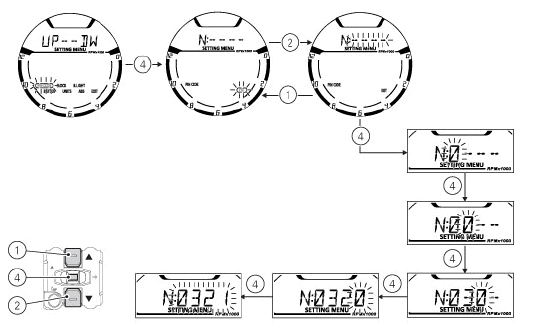
Changing the PIN CODE
To change the existing PIN CODE and activate a new one, you must open the SETTING MENU.
Select PIN CODE option, by pressing button (1) or (2). Once function is highlighted, press CONFIRM MENU button (4).
Note If upon accessing this function, the "N : " (New) and four flashing dashes "- - - -" are shown, it means that the PIN CODE has never been activated and it is necessary to do it.
When accessing the function, the display will show "O: " (old) followed by four flashing dashes "- - - -".
Note To change the PIN CODE, you must know the already stored PIN.
To go back to the previous indication without modifying the PIN CODE, press button (2); as soon as the "EXIT" box starts flashing, press button (4) again.
Entering the "old" code:
- Press button (4), only one digit indicating "0" starts flashing;
- Each time you press button (2) the displayed number increases by one (+ 1) up to "9" and then starts back from "0";
- Each time you press the button (1) the displayed number decreases by one (- 1) up to "1" and then starts back from "0";
- To confirm the number, press the button (4);
Repeat the procedures until you confirm all the digits of the PIN CODE.
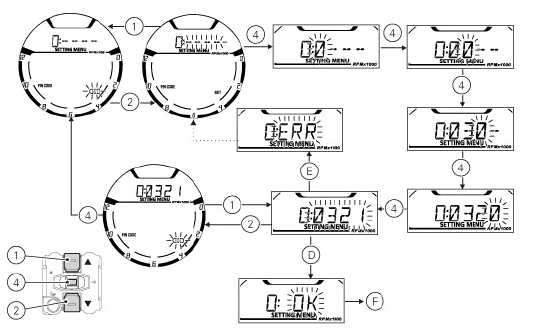
After pressing button (4) to confirm the fourth and last figure, the 4-digit code starts flashing.
Press button (4) to check the entered PIN CODE. After you press the button:
- if the PIN CODE is correct (D), the instrument panel shows "OK" flashing for 3 seconds, followed by "N: " (new) and four flashing dashes "- - - -" relevant to the new PIN CODE (F);
- if the PIN CODE is not correct (E), the instrument panel shows ERR. flashing for 3 seconds, followed by "O: " (old) and four flashing dashes "- - - -" to enter the PIN again. .
Repeat the procedures until you confirm all the digits of the PIN CODE.
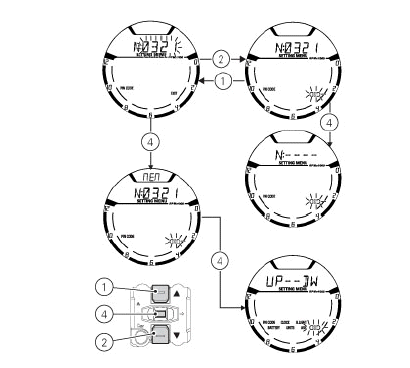
Entering the "new" code:
- Press button (4), only one digit indicating "0" starts flashing;
- Each time you press button (2) the displayed number increases by one (+ 1) up to "9" and then starts back from "0";
- Each time you press the button (1) the displayed number decreases by one (- 1) up to "1" and then starts back from "0";
- To confirm the number, press the button (4);
Repeat the procedures until you confirm all the digits of the PIN CODE.
Press button (4) to confirm the fourth and last figure: the 4-digit code starts flashing.
To memorise the new setting, keep button (4) pressed for 3 seconds.
If new settings have been saved (D), "MEM" will be shown, the "EXIT" option will be highlighted and its box will be flashing.
To quit, press button (4).
If settings have not been saved, the instrument panel will highlight again the string of four dashes "- - - -" of the new PIN to allow the rider to try again and enter a new code.
Note You can change your PIN CODE an unlimited number of times.
Activations through diagnosis instrument
The DUCATI diagnosis instrument allows performing a series of activations to check some instrument panel functions and resetting parameters or warning lights.
After each activation, the instrument panel will restore its standard functions.
Note The activations must be performed only with key turned to ON, engine off and battery voltage ≥ 11.0 V.
PIN CODE reset
This activation allows "erasing" the previously stored PIN CODE to enter a new one.
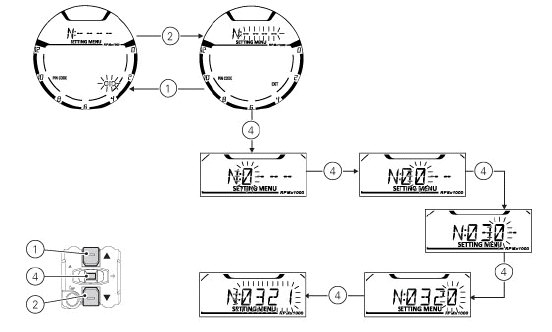
Pin Code
This function allows enabling and then modifying a 4-digit PIN code to "temporarily" start the vehicle in case of Immobilizer system malfunction.
The PIN CODE is initially not present in the motorcycle, it must be activated by the user by entering his/her 4-digit PIN in the instrument panel, otherwise the motorcycle cannot be started temporarily in the case of a malfunction. To activate this function, refer to "Entering the PIN CODE" procedure.
To change the PIN refer to "Changing the PIN CODE" procedure.
In order to temporarily start the motorcycle in case of malfunction of the Immobilizer system, please refer to the "Vehicle Release" procedure.
Warning The motorcycle owner must activate (store) the PIN code; if there is already a stored PIN, contact an Authorised Ducati Dealer to have the function "reset". To perform this procedure, the Authorised Ducati Dealer may ask you to demonstrate that you are the owner of the motorcycle.
Entering the PIN CODE
To activate the PIN CODE function and enter your own PIN CODE you must open the SETTING MENU.
Select PIN CODE option, by pressing button (1) or (2). Once function is highlighted, press CONFIRM MENU button (4).
Note If upon accessing this function, the "O : " (Old) indication is displayed together with four flashing dashes "- - - -", a PIN code is already stored and the Function is already active.
When accessing the function, the display will show "N:" (new) followed by four flashing dashes "- - - -".
To go back to the previous indication without activating a PIN CODE, press button (2); as soon as the "EXIT" box starts flashing, press button (4) again.
Entering the code:
- Press button (4), only one digit indicating "0" starts flashing;
- Each time you press button (2) the displayed number increases by one (+ 1) up to "9" and then starts back from "0";
- Each time you press the button (1) the displayed number decreases by one (- 1) up to "1" and then starts back from "0";
- To confirm the number, press the button (4);
Repeat the procedures until you confirm all the digits of the PIN CODE.
Press button (4) to confirm the fourth and last figure: the 4-digit code starts flashing.
To memorise the entered PIN, keep button (4) pressed for 3 seconds.
If new settings have been saved, "MEM" will be shown and the "EXIT" box will be flashing.
To quit, press button (4).
Once the first PIN CODE is stored, this menu page is no longer available and is replaced by the page for changing the PIN CODE.
Activations through diagnosis instrument
The DUCATI diagnosis instrument allows performing a series of activations to check some instrument panel functions and resetting parameters or warning lights.
After each activation, the instrument panel will restore its standard functions.
Note The activations must be performed only with key turned to ON, engine off and battery voltage ≥ 11.0 V.
PIN CODE reset
This activation allows "erasing" the previously stored PIN CODE to enter a new one.
VIN CODE
The VIN code is an alphanumerical code with 17 characters that clearly identifies a vehicle (family, model, country, serial number, ...). This code can be stored in the instrument panel and read through the DUCATI diagnosis instrument with suitable KWP2000 inputs.
Clock setting function (CLOCK)
This function allows setting the clock.
To view this function, enter the Setting Menu, use button (1) or (2) to select CLOCK and press button (4).
To access the setting function, keep button (2) pressed for 3 seconds.
After 3 seconds it is possible to set the clock as follows:
- the "AM" indication starts flashing;
- if you press button (2) the "PM" indication starts flashing;
- if you press button (1) you will return to the previous step (if it is 00:00, when switching between "AM" to "PM", 12:00 will be displayed);
- press button (4) to shift to hour setting, hours will start flashing;
- each time you press button (2), the digit will increase by one hour. If you hold button (2) down, the number increases cyclically in steps of one hour every second (when the button is held depressed, the hours do not flash);
- pressing button (4) gives access to the minute setting mode; minutes
start to flash;
- each time you press button (2), the digit will increase by 1 minute. If you hold button (2) pressed, the count increases cyclically in steps of 1 minute every second;
- if button (2) is kept pressed for more than 5 seconds, steps increase in steps of 1 every 100 ms (seconds will not flash while button (2) is pressed).
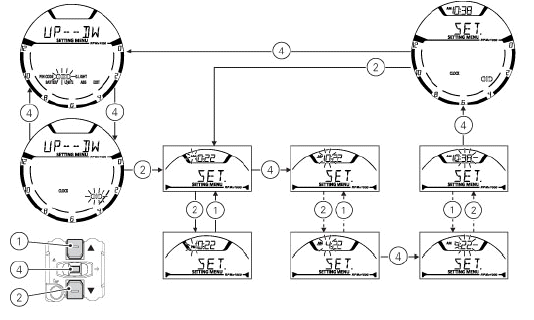
To confirm (store) the new set time press button (4).
The EXIT box starts flashing, press button (4) to go back to the setting menu.
Note In case of battery off, when the Voltage is restored and upon next Key-On, clock will have to be set again, i.e. it will automatically start counting from 00:00.
To quit, press button (4).
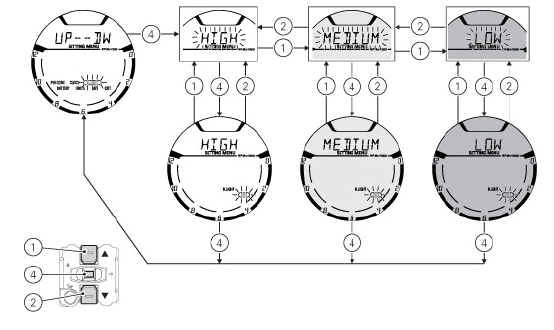
Instrument panel back-lighting setting (B.LIGHT)
This function allows adjusting the backlighting intensity.
To set the backlighting, enter the SETTING MENU, use buttons (1) and (2) to select "B.LIGHT" and press button (4) to confirm.
When accessing the function, the active mode flashes whereas the MENU and EXIT messages will be steady on.
Use buttons (1) and (2) to select the desired brightness level (HIGH, MED, LOW) and press button (4) to confirm.
Select HIGH to set the display backlighting maximum brightness - recommended in conditions of strong ambient light.
Select MED to set the display backlighting medium brightness (70%) - recommended in conditions of medium/low ambient light.
Select LOW to set the display backlighting minimum brightness (50%) - recommended in conditions of low ambient light and/or during the night.
After confirming, the "EXIT" box will start flashing.
To exit the menu and go back to the previous page, select "EXIT" and press button (4).
Note In the event of an interruption of the power supply from the Battery, when power is restored, at the next Key-On, the backlighting will always be set by default to maximum brightness.
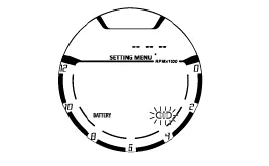
Battery voltage
This function allows you to check the motorcycle battery voltage. Enter the SETTING MENU. Select BATTERY option, by pressing button (1) or (2). Once function is highlighted, press CONFIRM MENU button (4). You open the BATTERY Menu.
The information will be displayed as follows:
- if battery voltage is between 11.8 V and 14.9 V the reading will be displayed steady;
- if battery voltage is between 0.0 and 11.7 Volt the reading will be displayed with "LOW" message flashing;
- if battery voltage is between 15.0 and 25.5 Volt the reading will be displayed with "HIGH" message flashing.
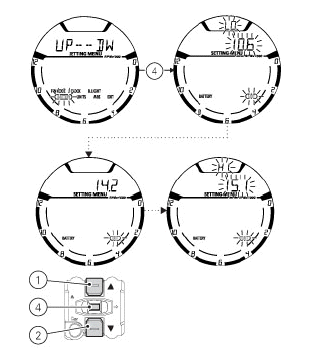
If the instrument panel is not receiving battery voltage value, a string of three dashes "- - -" is displayed.
To quit the menu and go back to Setting Menu main page, select EXIT and press button (4).
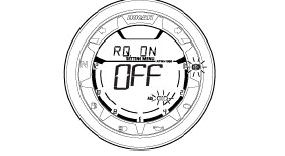
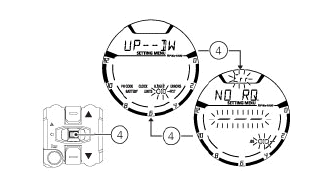
ABS control unit enabling/disabling
This function allows enabling or disabling the ABS system. Enter the SETTING MENU.
Select the parameter to be customised (ABS), by pressing button (1) or (2). Once the desired parameter is highlighted, press CONFIRM MENU button (4).
When entering the function, the currently set ABS status will be displayed: On = enabled, Off = disabled.
Menu indicates the available alternative option (RQ): RQ OFF when current status is "On", RQ ON when current status is "Off".
To quit the function without changing set status, select EXIT using button (2); when its box is flashing, press button (4).
To select a different status than the one set, press button (1); alternative option (RQ) starts flashing in the Menu.
Press button (4) for 3 seconds to confirm. WAIT is displayed in the Menu for approx. 5 seconds. New status will then become steady on and "EXIT" box will be flashing.
Press button (4) to quit the function.
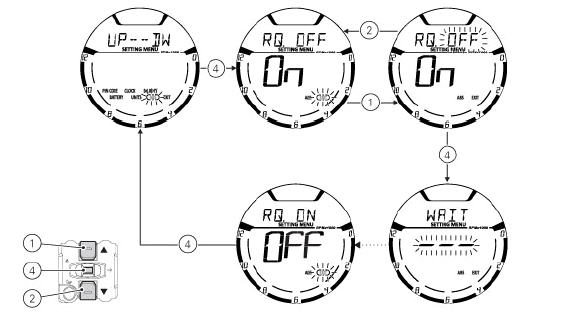
Note By setting "-" (Off), the ABS will be disabled and the relevant warning light will start flashing.
Important When setting the ABS OFF, Ducati recommends paying particular attention to the braking and riding style.
If the ABS is in fault, "Err" is displayed when entering the function and Menu will indicate "NO RQ", since no selection is actually possible. "EXIT" box is flashing. Press button (4) for 3 seconds to quit the function.
See also:
 Ducati Scrambler 800 - Service manual > Entering PIN CODE function for overriding purposes
In case of key acknowledgement system or key malfunction, the instrument panel allows the user to enter his/her own PIN CODE to temporarily restore motorcycle operation. If upon key-on an Immobilizer ERROR occurs, the instrument panel automatically activates in MENU 1 the possibility to enter the four-digit PIN CODE previously memorised with the relevant function in the Setting Menu, PIN page.
Ducati Scrambler 800 - Service manual > Setting menu
This menu allows enabling, disabling and setting some motorcycle functions. To enter the SETTING MENU it is necessary to hold button (3) for 2 seconds, with Key-ON and motorcycle actual speed ≤ (lower than or equal to) 20 km/h: within this menu, it is no longer possible to view any other function.
 Ducati Scrambler
 Fantic Caballero 500
 Indian FTR 1200
 Moto Guzzi V85 TT
 Royal Enfield Bullet Trials Works Replica
 Triumph Scrambler 1200 XE
 Triumph Street Scrambler
 Yamaha XSR700
 Ducati Scrambler 800
 Moto Guzzi V85 TT
 Triumph Scrambler 1200 XC