 Yamaha XSR700 - Owner's Manual > Transmission gear display
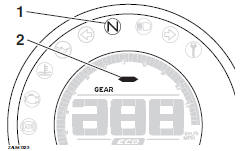
1. Neutral indicator light " "
"
2. Transmission gear display
This display shows the selected gear.
The neutral position is indicated by "-" and by the neutral indicator light.
Multi-function display
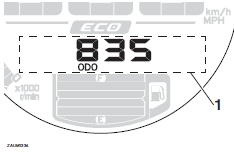
1. Multi-function display
The multi-function display is equipped with the following:
- an odometer
- two tripmeters
- a fuel reserve tripmeter
- an instantaneous fuel consumption display
- an average fuel consumption display
- a coolant temperature display
- an air temperature display
- a clock
- a brightness control mode
The odometer shows the total distance the vehicle has traveled.
The tripmeters show the distance traveled since they were last reset.
TIP
- The odometer will lock at 999999 and cannot be reset.
- The tripmeter will reset to 0 and continue counting after 9999.9 is reached.
Push the bottom set button to switch the display between odometer "ODO", tripmeters "TRIP 1" and "TRIP 2", instantaneous fuel consumption "km/L" or "L/100 km", average fuel consumption "AVE_ _._ km/L" or "AVE_ _._ L/100 km", coolant temperature "_ _ ºC", ambient temperature "Air_ _ ºC", and clock "_ _:_ _" in the following order:
ODO → TRIP 1 → TRIP 2 → km/L or L/100 km → AVE_ _._ km/L or AVE_ _._ L/100 km → _ _ ºC → Air_ _ ºC → Clock _ _ :_ _ → ODO
For the UK: Push the bottom set button to switch the display between odometer "ODO", tripmeters "TRIP 1" and "TRIP 2", instantaneous fuel consumption "km/L", "L/100 km" or "MPG", average fuel consumption "AVE_ _._ km/L", "AVE_ _._ L/100 km" or "AVE_ _._ MPG", coolant temperature "_ _ ºC", and ambient temperature, and "Air_ _ ºC", and clock "_ _:_ _" in the following order: ODO → TRIP 1 → TRIP 2 → km/L, L/100 km or MPG → AVE_ _._ km/L, AVE_ _._ L/100 km or AVE_ _._ MPG → _ _ ºC → Air_ _ ºC → Clock _ _ :_ _ → ODO
TIP
- Push the top set button to switch the display in the reverse order.
- The fuel reserve tripmeter and error code displays come on automatically, while the brightness control mode is accessed separately.
If the lower segment and frame of the fuel meter start flashing, the display automatically changes to fuel reserve tripmeter "TRIP F" and starts counting the distance traveled from that point. In this case, push the bottom set button to switch the display between the various tripmeter, odometer, and fuel consumption modes in the following order:
TRIP F → km/L or L/100 km → AVE_ _._ km/L or AVE_ _._ L/100 km → _ _ ºC → Air_ _ ºC → Clock _ _ :_ _ → ODO → TRIP 1 → TRIP 2 → TRIP F
For the UK : TRIP F → km/L, L/100 km or MPG → AVE_ _._ km/L, AVE_ _._ L/100 km or AVE_ _._ MPG → _ _ ºC → Air_ _ ºC → Clock _ _ :_ _ → ODO → TRIP 1 → TRIP 2 → TRIP F
To reset a tripmeter, select it by pushing the bottom set button, and then push the top set button for one second.
If you do not reset the fuel reserve tripmeter manually, after refueling and traveling 5km (3mi) it resets automatically and disappears from the display.
Instantaneous fuel consumption
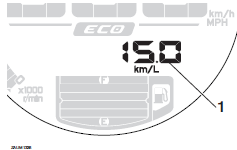
- Instantaneous fuel consumption display
The instantaneous fuel consumption display can be set to either "km/L" or "L/100 km"; or for the UK, "MPG" or "km/L" or "L/100 km".
- "km/L": The distance that can be traveled on 1.0 L of fuel under current riding conditions.
- "L/100 km": The amount of fuel necessary to travel 100 km under current riding.
- "MPG" : The distance that can be traveled on 1.0 Imp.gal of fuel under current riding conditions.
To switch the instantaneous fuel consumption display settings, push the bottom set button for two second.
TIP
If traveling at speeds under 20 km/h (12 mi/h), "_ _._" is displayed.
Average fuel consumption

- Average fuel consumption display
This display shows the average fuel consumption since it was last reset.
The average fuel consumption display can be set to either "AVE_ _._ km/L", "AVE_ _._ L/100 km" or "AVE_ _._ MPG" (for the UK).
- "AVE_ _._ km/L": The average distance that can be traveled on 1.0 L of fuel.
- "AVE_ _._ L/100 km": The average amount of fuel necessary to travel 100 km.
- "AVE_ _._ MPG" : The average distance that can be traveled on 1.0 Imp.gal of fuel.
To switch the average fuel consumption display settings, push the bottom set button for two seconds.
To reset the average fuel consumption, push the top set button for one second.
TIP
After resetting the average fuel consumption, "_ _._" will be shown until the vehicle has traveled 1 km (0.6 mi).
Coolant temperature
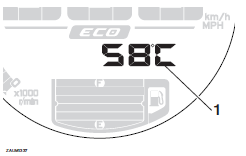
1. Coolant temperature display
This display shows the coolant temperature from 40 ºC to 116 ºC in 1 ºC increments.
If the message "HI" flashes, stop the vehicle, then stop the engine and let the it cool.
TIP
- When the coolant temperature is below 40 ºC, "Lo" will be displayed.
- The coolant temperature varies with changes in the weather and engine load.
Air temperature
- Air temperature display
This display shows the air temperature from -9 ºC to 99 ºC in 1 ºC increments.
The temperature displayed may vary from the actual ambient temperature.
TIP
- When the air temperature is below -9 ºC, "Lo" will be displayed.
- The accuracy of the temperature reading may be affected when riding slowly (under 20 km/h [12.5 mi/h]) or when stopped at traffic signals, railroad crossings, etc.
Clock
- Clock
The clock displays time in 12-hour format.
Even when the key is not in the "ON" position, the clock can be viewed for 10 seconds by pushing the bottom set button.
To set the clock
1. Turn the key to "ON".
2. Push the bottom set button and top set button together for two seconds and the hour digits will start flashing.
3. Push the top set button to set the hours.
4. Push the bottom set button and the minute digits will start flashing.
5. Push the top set button to set the minutes.
6. Push the bottom set button to confirm settings and start the clock.
TIP
- When setting the hours and minutes, push the top set button briefly to increase the increment value one by one, or push and hold the button to increase the increment value continuously.
Brightness control
- Brightness level display
The brightness level of the multi-function meter unit panel can be adjusted to suit the rider's preference.
To adjust the brightness
1. Turn the key to "OFF".
2. Push and hold the bottom set button.
3. Turn the key to "ON" and continue pushing the bottom set button until the display switches to the brightness control mode.
4. Push the top set button to set the brightness level.
5. Push the bottom set button to confirm the selected brightness level and exit the brightness control mode.
TIP
There are 6 brightness level settings.
See also:
 Yamaha XSR700 - Owner's Manual > Multi-function meter unit
Transmission gear display Tachometer Eco indicator "ECO" Speedometer Multi-function display 6. Fuel meter Top set button Bottom set button
Yamaha XSR700 - Owner's Manual > Handlebar switches
Left Pass switch " " Dimmer switch " "
 Ducati Scrambler
 Fantic Caballero 500
 Indian FTR 1200
 Moto Guzzi V85 TT
 Royal Enfield Bullet Trials Works Replica
 Triumph Scrambler 1200 XE
 Triumph Street Scrambler
 Yamaha XSR700
 Ducati Scrambler 800
 Moto Guzzi V85 TT
 Triumph Scrambler 1200 XC