 Indian FTR 1200 - Owner's Manual > Brake fluid level inspection
IMPORTANT The brake fluid level in the reservoir will go down as brake pads wear. If you notice a sudden lowering of the brake fluid level, inspect brake pads for wear and brake system for leaks.
NOTE When installing new brake pads, fill the reservoir to the MAX mark. This reservoir can be used as a wear indicator, as the pads wear out, the level will decrease. When it is close to or at the MIN mark, inspect brake pads and replace if necessary. While this can be used as a indicator, the BEST way to inspect brake wear is to inspect the pads themselves.
FRONT BRAKE FLUID INSPECTION
1. Turn handlebars or adjust the motorcycle until top of reservoir is level.

2. View front brake fluid level through the fluid reservoir. The fluid should be clear and between the MIN 1 and MAX 2 markings.
3. Wipe area around reservoir cover with a clean cloth.
4. Wipe brake fluid container with a clean cloth.
5. Remove 3 crewse, reservoir cover 4.
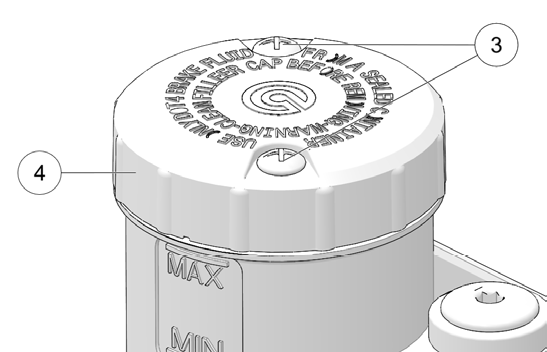
6. Carefully add enough DOT 4 brake fluid to bring level to between the MIN 1 and MAX 2 markings.
7. Reinstall reservoir cover and torque screws to specification.
TORQUE
Front Master Cylinder Cap Screws: 10 (1 N*m)
REAR BRAKE FLUID INSPECTION
1. Fluid level is checked at the rear brake master cylinder reservoir.
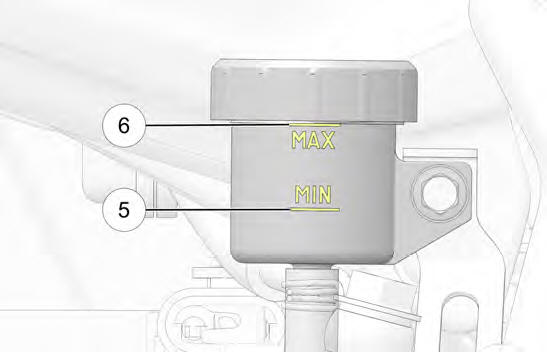
2. Ensure vehicle is upright, then view fluid level through the fluid reservoir. The fluid should be clear and between the MIN 5 and MAX 6 markings.
3. Wipe area around reservoir cover with a clean cloth.
4. Wipe brake fluid container with a clean cloth.
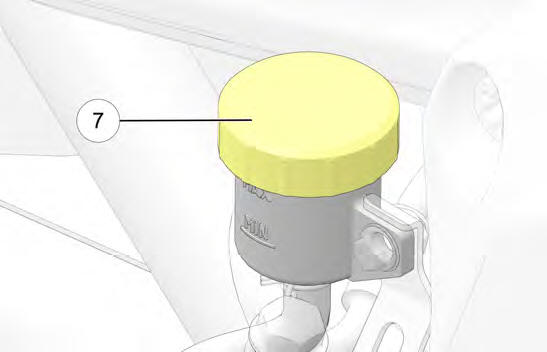
5. Remove reservoir cover 7.
6. Carefully add enough DOT 4 brake fluid to bring level to between the MIN 5 and MAX 6 markings.
7. Install diaphragm and cover.
FRONT BRAKE LEVER
1. Pull the front brake lever toward the handlebar and hold it. The lever should move freely and smoothly. The lever should feel firm and continue to feel firm until released.
2. Release the lever. It should return to its rest position quickly when released.
3. If the front brake lever fails to perform as stated, service the brake lever before riding.
REAR BRAKE PEDAL
1. Press downward on the rear brake pedal. It should move freely and smoothly. The pedal should feel firm and continue to feel firm until released.
2. Release the pedal. It should return to its rest position quickly when released.
3. If the rear brake pedal fails to perform as stated or travels too far before beginning to engage the brake, service the brakes before riding.
BRAKE LINES
Inspect all brake hoses and connections for dampness or stains from leaking or dried fluid. Tighten any leaking connections to the proper torque values and replace components as necessary. See the INDIAN MOTORCYCLE Service Manual or an authorized INDIAN MOTORCYCLE dealer or other qualified dealer.
WARNING Brake fluid leaks or low brake fluid levels could cause brake system failure, which could result in serious injury or death. Do not operate the vehicle with low brake fluid levels or when leaks are evident (dampness or stains from dried fluid). See your authorized INDIAN MOTORCYCLE dealer or other qualified dealer.
See also:
 Indian FTR 1200 - Owner's Manual > Engine oil level check
Due to the semi-dry sump lubrication system, the engine oil level shown in the sight glass will fluctuate with movement of the motorcycle from a vertical position and with the temperature of the oil. To get an accurate oil level reading follow all inspection procedures closely.
Indian FTR 1200 - Owner's Manual > Mechanical clutch
1. Squeeze the clutch lever 1 toward the handlebar and release it. It should move freely and smoothly, and it should return to the rest position quickly when released. If the lever fails to perform as stated, service the clutch lever before riding.
 Ducati Scrambler
 Fantic Caballero 500
 Indian FTR 1200
 Moto Guzzi V85 TT
 Royal Enfield Bullet Trials Works Replica
 Triumph Scrambler 1200 XE
 Triumph Street Scrambler
 Yamaha XSR700
 Ducati Scrambler 800
 Moto Guzzi V85 TT
 Triumph Scrambler 1200 XC