 Yamaha XSR700 - Owner's Manual > Drive chain slack
The drive chain slack should be checked before each ride and adjusted if necessary.
To check the drive chain slack
1. Place the motorcycle on the sidestand.
TIP
When checking and adjusting the drive chain slack, there should be no weight on the motorcycle.
2. Shift the transmission into the neutral position.
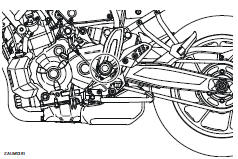
3. Push down on the drive chain under the end of the drive chain guard.
4. Measure distance A between the drive chain guard and the center of the chain as shown.
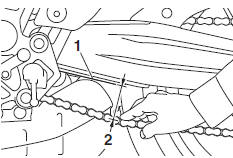
- Drive chain guide
- Drive chain slack
Distance A:
51.0-56.0 mm (2.01-2.20 in)
5. If distance A is incorrect, adjust it as follows.
NOTICE: Improper drive chain slack will overload the engine as well as other vital parts of the motorcycle and can lead to chain slippage or breakage.
If distance A is more than 58.0 mm (2.28 in), the chain can damage the frame, swingarm, and other parts. To prevent this from occurring, keep the drive chain slack within the specified limits.
To adjust the drive chain slack
Consult a Yamaha dealer before adjusting the drive chain slack.
1. Loosen the locknut at each end of the swingarm, and then loosen the axle nut.
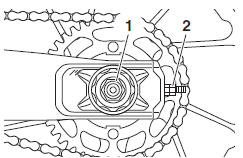
- Axle nut
- Locknut
2. To tighten the drive chain, turn the drive chain slack adjusting nut at each end of the swingarm in direction (a). To loosen the drive chain, turn the adjusting nut at each end of the swingarm in direction (b), and then push the rear wheel forward.
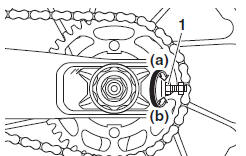
- Drive chain slack adjusting nut
TIP
Using the alignment marks on each side of the swingarm, make sure that both drive chain slack adjusting plates are in the same position for proper wheel alignment.

- Alignment marks
- Drive chain slack adjusting plate
3. Tighten the axle nut, and then tighten the locknuts to the specified torques.
Tightening torques:
Axle nut: 105 N*m (10.5 kgf*m, 77 lb*ft)
Locknut: 16 N*m (1.6 kgf*m, 12 lb*ft)
4. Make sure that the drive chain slack adjusting plates are in the same position, the drive chain slack is correct, and the drive chain moves smoothly.
Cleaning and lubricating the drive chain
The drive chain must be cleaned and lubricated at the intervals specified in the periodic maintenance and lubrication chart, otherwise it will quickly wear out, especially when riding in dusty or wet areas. Service the drive chain as follows.
NOTICE
The drive chain must be lubricated after washing the motorcycle, riding in the rain or riding in wet areas.
1. Clean the drive chain with kerosene and a small soft brush.
NOTICE: To prevent damaging the O-rings, do not clean the drive chain with steam cleaners, high-pressure washers or inappropriate solvents.
2. Wipe the drive chain dry.
3. Thoroughly lubricate the drive chain with a special O-ring chain lubricant.
NOTICE: Do not use engine oil or any other lubricants for the drive chain, as they may contain substances that could damage the O-rings.
Checking and lubricating the cables
The operation of all control cables and the condition of the cables should be checked before each ride, and the cables and cable ends should be lubricated if necessary. If a cable is damaged or does not move smoothly, have a Yamaha dealer check or replace it.
WARNING! Damage to the outer housing of cables may result in internal rusting and cause interference with cable movement. Replace damaged cables as soon as possible to prevent unsafe conditions.
Recommended lubricant:
Yamaha cable lubricant or other suitable cable lubricant
Checking and lubricating the throttle grip and cable
The operation of the throttle grip should be checked before each ride. In addition, the cable should be lubricated by a Yamaha dealer at the intervals specified in the periodic maintenance chart.
The throttle cable is equipped with a rubber cover. Make sure that the cover is securely installed. Even though the cover is installed correctly, it does not completely protect the cable from water entry. Therefore, use care not to pour water directly onto the cover or cable when washing the vehicle. If the cable or cover becomes dirty, wipe clean with a moist cloth.
Checking and lubricating the brake and shift pedals
The operation of the brake and shift pedals should be checked before each ride, and the pedal pivots should be lubricated if necessary.
Brake pedal
Shift pedal
Recommended lubricant: Lithium-soap-based grease
Checking and lubricating the brake and clutch levers
The operation of the brake and clutch levers should be checked before each ride, and the lever pivots should be lubricated if necessary.
Brake lever
Clutch lever
Recommended lubricants:
Brake lever: Silicone grease
Clutch lever: Lithium-soap-based grease
Checking and lubricating the sidestand
The operation of the sidestand should be checked before each ride, and the sidestand pivot and metal-to-metal contact surfaces should be lubricated if necessary.
WARNING
If the sidestand does not move up and down smoothly, have a Yamaha dealer check or repair it. Otherwise, the sidestand could contact the ground and distract the operator, resulting in a possible loss of control.
Recommended lubricant:
Lithium-soap-based grease
Lubricating the rear suspension
The pivoting points of the rear suspension must be lubricated by a Yamaha dealer at the intervals specified in the periodic maintenance and lubrication chart.
Recommended lubricant:
Lithium-soap-based grease
Lubricating the swingarm pivots
The swingarm pivots must be lubricated by a Yamaha dealer at the intervals specified in the periodic maintenance and lubrication chart.
Recommended lubricant:
Lithium-soap-based grease
Checking the front fork
The condition and operation of the front fork must be checked as follows at the intervals specified in the periodic maintenance and lubrication chart.
To check the condition
Check the inner tubes for scratches, damage and excessive oil leakage.
To check the operation
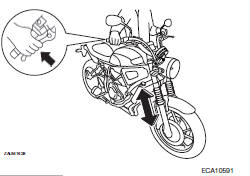
1. Place the vehicle on a level surface and hold it in an upright position.
WARNING! To avoid injury, securely support the vehicle so there is no danger of it falling over.
2. While applying the front brake, push down hard on the handlebars several times to check if the front fork compresses and rebounds smoothly.
NOTICE
If any damage is found or the front fork does not operate smoothly, have a Yamaha dealer check or repair it.
Checking the steering
Worn or loose steering bearings may cause danger. Therefore, the operation of the steering must be checked as follows at the intervals specified in the periodic maintenance and lubrication chart.
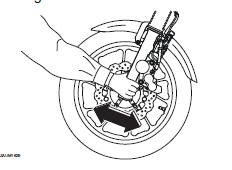
1. Raise the front wheel off the ground.
WARNING! To avoid injury, securely support the vehicle so there is no danger of it falling over. [
2. Hold the lower ends of the front fork legs and try to move them forward and backward. If any free play can be felt, have a Yamaha dealer check or repair the steering.
Checking the wheel bearings

The front and rear wheel bearings must be checked at the intervals specified in the periodic maintenance and lubrication chart. If there is play in the wheel hub or if the wheel does not turn smoothly, have a Yamaha dealer check the wheel bearings.
See also:
 Yamaha XSR700 - Owner's Manual > Checking the brake fluid level
Before riding, check that the brake fluid is above the minimum level mark. Check the brake fluid level with the top of the reservoir level. Replenish the brake fluid if necessary. Front brake
Yamaha XSR700 - Owner's Manual > Battery
This model is equipped with a VRLA (Valve Regulated Lead Acid) battery. There is no need to check the electrolyte or to add distilled water. However, the battery lead connections need to be checked and, if necessary, tightened.
 Ducati Scrambler
 Fantic Caballero 500
 Indian FTR 1200
 Moto Guzzi V85 TT
 Royal Enfield Bullet Trials Works Replica
 Triumph Scrambler 1200 XE
 Triumph Street Scrambler
 Yamaha XSR700
 Ducati Scrambler 800
 Moto Guzzi V85 TT
 Triumph Scrambler 1200 XC