 Triumph Scrambler 1200 XC - Service manual > Engine Check For Fluid Leaks
WARNING
Before starting work, ensure the motorcycle is stabilised and adequately supported. This will help prevent it from falling and causing injury to the operator or damage to the motorcycle.
Standard required:
All engine components must be free from fluid leaks.
Check:
Check the visible areas of the crankcase, cylinder head and transmission for fluid leaks.
Visually inspect the oil hoses for fluid leaks and signs of damage or chafing (where accessible).
Rectification if required:
A leaking or damaged component must be replaced.
Engine Oil - Level Inspection
WARNING
Before starting work, ensure the motorcycle is stabilised and adequately supported. This will help prevent it from falling and causing injury to the operator or damage to the motorcycle.
In order for the engine, transmission, and clutch to function correctly, maintain the engine oil at the correct level, and change the oil and oil filter in accordance with scheduled maintenance requirements.
WARNING
Never start the engine or run the engine in a confined area. Exhaust fumes are poisonous and can cause loss of consciousness and death within a short period of time. Always operate your motorcycle in the open-air or in an area with adequate ventilation.
WARNING
Motorcycle operation with insufficient, deteriorated, or contaminated engine oil will cause accelerated engine wear and may result in engine or transmission seizure.
Seizure of the engine or transmission may lead to loss of motorcycle control and an accident.
CAUTION
Running the engine with insufficient oil will cause engine damage. If the low oil pressure indicator remains on, stop the engine immediately and investigate the cause.
- Start the engine and run at idle for approximately five minutes.
- Stop the engine, then wait for at least three minutes to allow the oil to settle.
- Note the oil level visible in the sight glass.
- When correct, oil should be visible at a point between the upper level and the lower level on the sight glass.
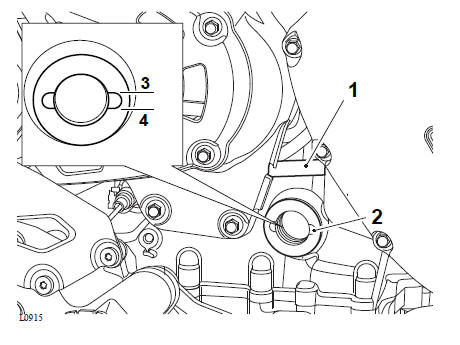
- Oil filler plug
- Sight glass
- Upper level (maximum)
- Lower level (minimum)
Note
An accurate indication of the level of oil in the engine is only shown when the engine is at normal operating temperature and the motorcycle is upright (not on the side stand).
- If it is necessary to top up the oil level, remove the oil filler plug and using a suitable funnel, add oil, a little at a time, until the level registered in the sight glass is correct.
- Once the correct level is reached, fit and tighten the oil filler plug to 3 Nm.
Engine Oil and Filter Renew
WARNING
Before starting work, ensure the motorcycle is stabilised and adequately supported. This will help prevent it from falling and causing injury to the operator or damage to the motorcycle.
WARNING
Prolonged or repeated contact with engine oil can lead to skin dryness, irritation and dermatitis. In addition, used engine oil contains potentially harmful contamination which can cause cancer. Wear suitable clothing and avoid skin contact.
The engine oil and filter must be replaced in accordance with scheduled maintenance requirements.
CAUTION
Do not pour engine oil on the ground, down sewers or drains, or into watercourses. To prevent pollution of watercourses etc., dispose of used oil sensibly. If in doubt contact your local authority.
- Warm up the engine thoroughly, and then stop the engine.
- Place a waste oil catch tray beneath the engine.
WARNING
The oil may be hot to the touch. Contact with hot oil may cause the skin to be scalded or burned.
3. Remove the oil drain plug and discard the sealing washer.
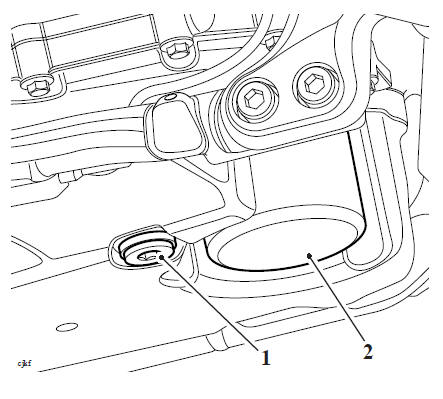
- Oil drain plug
- Oil filter
4. Remove the oil filler plug and discard the sealing washer.
5.With the motorcycle on level ground, and on its side stand, allow the oil to completely drain.
6. Unscrew and remove the oil filter using T3880313 - Oil Filter Wrench.
7. Dispose of the old filter in an environmentally friendly way.
8. Apply a smear of clean engine oil to the sealing ring of the new oil filter.
9. Using T3880313 - Oil Filter Wrench, fit the new oil filter and tighten to 10 Nm.
10. Fit a new sealing washer to the drain plug.
11. Fit and tighten the drain plug to 25 Nm.
12.Using a suitable funnel, fill the engine with new semi or fully synthetic 10W/40 or 10W/50 motorcycle engine oil which meets specification API SH (or higher) and JASO MA, such as Castrol Power 1 Racing 4T, sold as Castrol Power RS Racing 4T in some countries.
13. Fit a new sealing washer to the oil filler cap.
14. Fit and tighten the oil filler plug to 3 Nm.
15. Start the engine and allow it to idle for a minimum of 30 seconds.
CAUTION
Raising the engine speed above idle before the oil reaches all parts of the engine can cause engine damage or seizure. Only raise engine speed after running the engine for 30 seconds to allow the oil to circulate fully.
CAUTION
If the engine oil pressure is too low, the low oil pressure warning light will illuminate. If this light stays on when the engine is running, stop the engine immediately and investigate the cause. Running the engine with low oil pressure will cause engine damage.
16. Ensure that the oil pressure warning light extinguishes shortly after starting.
17. Stop the engine and check the oil level. Adjust if necessary.
See also:
 Triumph Scrambler 1200 XC - Service manual > Scheduled Maintenance
WARNING Triumph Motorcycles cannot accept any responsibility for damage or injury resulting from incorrect maintenance or improper adjustment carried out by the owner.
Triumph Scrambler 1200 XC - Service manual > Air Filter Element - Renew
WARNING Before starting work, ensure the motorcycle is stabilised and adequately supported. This will help prevent it from falling and causing injury to the operator or damage to the motorcycle.
 Ducati Scrambler
 Fantic Caballero 500
 Indian FTR 1200
 Moto Guzzi V85 TT
 Royal Enfield Bullet Trials Works Replica
 Triumph Scrambler 1200 XE
 Triumph Street Scrambler
 Yamaha XSR700
 Ducati Scrambler 800
 Moto Guzzi V85 TT
 Triumph Scrambler 1200 XC