 Triumph Scrambler 1200 XC - Service manual > Tyres - Check For Wear/Damage
WARNING
Before starting work, ensure the motorcycle is stabilised and adequately supported. This will help prevent it from falling and causing injury to the operator or damage to the motorcycle.
WARNING
Operation with excessively worn tyres is hazardous and will adversely affect traction, stability and handling which may lead to loss of control and an accident.
When tubeless tyres, used without a tube, become punctured, leakage is often very slow. Always inspect tyres very closely for punctures. Check the tyres for cuts, embedded nails or other sharp objects. Operation with punctured or damaged tyres will adversely affect motorcycle stability and handling which may lead to loss of control or an accident.
WARNING
Check the rims for dents or deformation. Operation with damaged or defective wheels or tyres is dangerous and loss of motorcycle control or an accident could result.
Always consult your authorised Triumph dealer for tyre replacement, or for a safety inspection of the tyres.
As the tyre tread wears down, the tyre becomes more susceptible to puncture and failure. It is estimated that 90% of all tyre failures occur during the last 10% of tread life (90% worn). It is false economy and unsafe to use tyres until they are worn to their minimum.
All tyres are fitted with tread wear indicators. When the tyre becomes worn down as far as the top of a tread wear indicator, the tyre is worn beyond its service life and must be replaced.
- Tread wear indicator
Attention must also be paid to the legal limits for tread wear, which differ from country to country. Tyres that have worn to the legal limit in the country or region in which the motorcycle is operated must be replaced, even if tread wear has not yet reached the level of the tread wear indicators.
Measure the depth of the tread with a depth gauge, and replace any tyre that has worn to, or beyond the minimum allowable tread depth.
Inspect tyres for cracks, splits and kerb damage. Always replace tyres that are suspected of having become damaged.
Damaged tyres must be replaced.
Wheels - Check For Damage
WARNING
Before starting work, ensure the motorcycle is stabilised and adequately supported. This will help prevent it from falling and causing injury to the operator or damage to the motorcycle.
WARNING
Check the wheel rims for dents or deformation.
Operation with damaged or defective wheels is dangerous and loss of motorcycle control or an accident could result.
Always consult your authorised Triumph dealer for a safety inspection of the wheels, or for wheel replacement.
1. Check for broken or damaged spokes and check spoke tightness.
2. Check the wheel rims for any visible signs of cracks, damage or deformation.
3. Check the wheel hubs for any visible signs of cracks, damage or deformation.
Tyre Pressures - Check/Adjust
WARNING
Before starting work, ensure the motorcycle is stabilised and adequately supported. This will help prevent it from falling and causing injury to the operator or damage to the motorcycle.
Note
- Always check the tyre pressures when they are cold.
- Checking tyre pressures when they are cold will achieve a more accurate reading on the tyre pressure gauge.
1. Remove the caps from the tyre valves.
2. Position the tyre pressure gauge onto the end of the valve body making sure the tyre valve is in contact with the tyre inflator.
3. Momentarily deflate the tyre to equalise the pressure in the tyre and the gauge.
4. Check that the correct pressure is displayed on the gauge.
5. If the air pressure is below the recommended setting, inflate the tyre until the correct pressure is achieved.
If it is greater than the recommended setting, slowly deflate the tyre checking the gauge regularly until the correct reading is achieved.
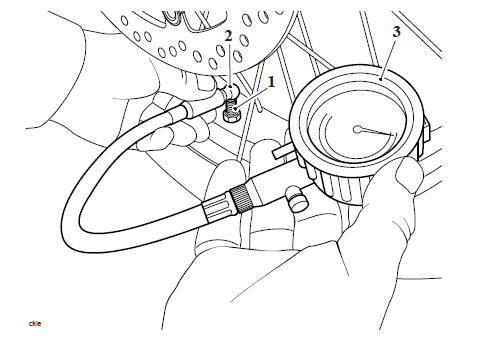
- Tyre Valve
- Tyre gauge (valve connector)
- Tyre gauge
7. Repeat the process for the remaining tyre.
8. Refit the caps to the tyre valves.
Wheel Bearings - Inspection
WARNING
Before starting work, ensure the motorcycle is stabilised and adequately supported. This will help prevent it from falling and causing injury to the operator or damage to the motorcycle.
Perform the following operations:
- Position the motorcycle on level ground and place on a paddock stand.
1. Hold the wheel at the top and bottom and rock the wheel checking for movement when a force is applied.
2. Check the wheel bearings spin smoothly with no signs of play.
If the bearings do not spin smoothly or there is excessive play in the wheel bearings, replace all bearings in that wheel.
Bearing check
Check Lights, Instruments and Electrical Systems
WARNING
Before starting work, ensure the motorcycle is stabilised and adequately supported. This will help prevent it from falling and causing injury to the operator or damage to the motorcycle.
Check the instruments, lights and electrical systems for functionality. Rectify if necessary.
Steering Check
WARNING
Before starting work, ensure the motorcycle is stabilised and adequately supported. This will help prevent it from falling and causing injury to the operator or damage to the motorcycle.
1. Move the handlebars to left and right full lock while checking that the brake hose, clutch cable and electrical harnesses do not bind or that the steering feels tight or difficult to turn. Rectify as necessary.
Fork Inspection
WARNING
Before starting work, ensure the motorcycle is stabilised and adequately supported. This will help prevent it from falling and causing injury to the operator or damage to the motorcycle.
Examine each fork for any sign of damage or scratching of the slider surface or for oil leaks.
If any damage or oil leakage is found, strip and repair as described in this section or consult an authorised Triumph dealer.
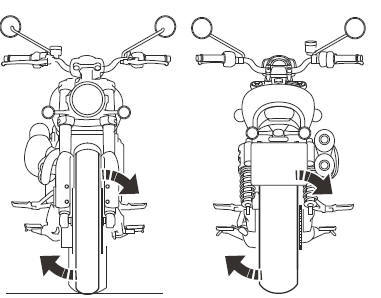
Check for smooth operation of the forks as follows:
- Place the motorcycle on level ground
- While holding the handlebars and applying the front brake, pump the forks up and down several times.
If roughness or excessive stiffness is detected, repair as described in the Front suspension section of this service manual or consult an authorised Triumph dealer.
WARNING
Riding the motorcycle with defective or damaged suspension can cause loss of motorcycle control and an accident. Never ride with damaged or defective suspension.
Headstock Bearings - Check/Adjust
WARNING
Before starting work, ensure the motorcycle is stabilised and adequately supported. This will help prevent it from falling and causing injury to the operator or damage to the motorcycle.
Perform the following operations:
1. Adjust the bearing free play as follows:
- Remove the adjuster nut.
- Thoroughly clean the threads on the steering stem.
- Refit the adjuster nut and tighten to 40 Nm.
- Loosen the adjuster nut, then retighten to 15 Nm.
- Fit the tab washer and lock nut.
WARNING
It is essential that the adjuster nut is not overtightened. If the adjuster is overtightened it will cause a preload on the headstock bearings. This will introduce tight steering, which could cause loss of motorcycle control and an accident.
Note
- Ensure the adjuster nut does not move as the lock nut is tightened.
With the bearing free play correctly set, hold the adjuster nut stationary then tighten the lock nut to 40 Nm.
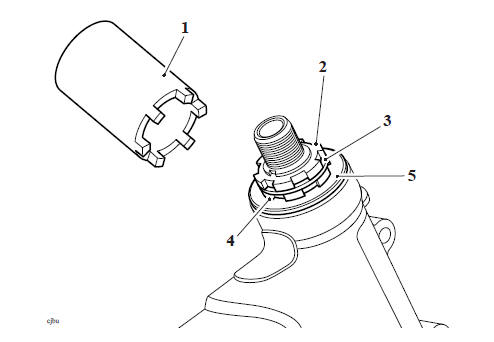
- T3880023 1. - 50 mm Socket
- Lock nut
- Tab washer
- Adjuster nut
- Dust seal
Perform the following operations:
- Refit the upper yoke (see Upper Yoke - Installation).
See also:
 Triumph Scrambler 1200 XC - Service manual > Valve Clearance Adjustment
WARNING Before starting work, ensure the motorcycle is stabilised and adequately supported. This will help prevent it from falling and causing injury to the operator or damage to the motorcycle.
Triumph Scrambler 1200 XC - Service manual > Headstock Bearings
Headstock Bearings - Lubricate WARNING Before starting work, ensure the motorcycle is stabilised and adequately supported. This will help prevent it from falling and causing injury to the operator or damage to the motorcycle.
 Ducati Scrambler
 Fantic Caballero 500
 Indian FTR 1200
 Moto Guzzi V85 TT
 Royal Enfield Bullet Trials Works Replica
 Triumph Scrambler 1200 XE
 Triumph Street Scrambler
 Yamaha XSR700
 Ducati Scrambler 800
 Moto Guzzi V85 TT
 Triumph Scrambler 1200 XC