 Triumph Scrambler 1200 XC - Service manual > Valve Clearance Adjustment
WARNING
Before starting work, ensure the motorcycle is stabilised and adequately supported. This will help prevent it from falling and causing injury to the operator or damage to the motorcycle.
Note
- Valve clearance checking and adjustment must be carried out with the engine cold.
Camshaft Cover - Removal
Note
Removing the spark plugs reduces compression therefore allowing the engine to be rotated freely.
1. Remove the spark plugs.
2. Select a high gear and, using the rear wheel, rotate the engine until a camshaft lobe is positioned pointing directly away from the roller on the rocker shaft.
3. Using feeler gauges, measure and record the clearances for this pair of valves only.
- Feeler gauges
4. Measure and record all valve clearances as described previously.
5. Release the two rocker shaft retaining bolts and remove the rocker shaft and rocker arm of a valve that requires adjustment.
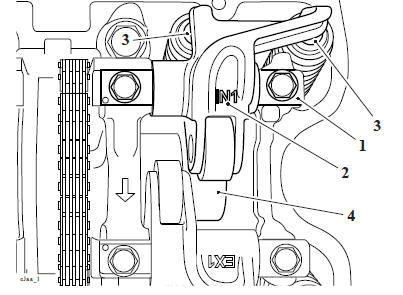
- Rocker shaft
- Rocker arm
- Shims (cylinder 1 inlet shown)
- Camshaft
Note
- The underside of the shim displays the shim size.
- Always place the shim with the shim size facing towards the valve.
6. Remove the shim from the valve(s) that requires adjustment.
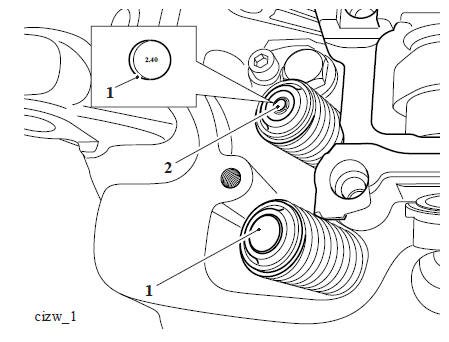
- Shim
- Valve
7. Measure the original shim, using a micrometer.
Calculate the shim thickness required to give the correct clearance, for specifications refer toService Specifications.
8. Clearance too small - Fit a thinner shim.
Clearance too large - Fit a thicker shim.
Note
Shims are available ranging from 2.00 mm to 3.20 mm in increments of 0.025 mm.
9. Fit the selected shim to the valve.
10. Refit the rocker arm and shaft, tighten the bolts in the sequence shown below to 10 Nm.
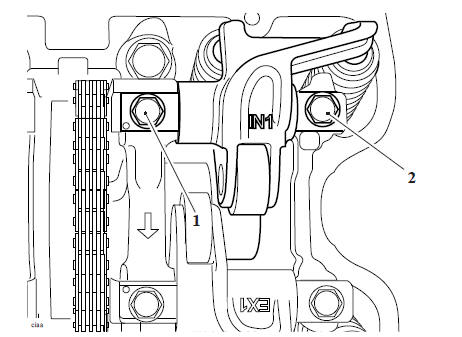
Rocker Shaft Tightening Sequence
11. Repeat the procedure until all valves requiring adjustment have been correctly set.
12. Rotate the engine several times to fully seat the shims.
13. Repeat the clearance checks on all valves, adjust as necessary.
Perform the following operations:
- Camshaft Cover - Installation
- Fuel Tank - Installation
- Battery - Installation
- Seat - Installation
Clutch Cable - Check/adjust
WARNING
Before starting work, ensure the motorcycle is stabilised and adequately supported. This will help prevent it from falling and causing injury to the operator or damage to the motorcycle.
Standard required:
It should be possible to pull the clutch lever easily and smoothly towards the handlebar grip.
The clutch cable must be routed such that it does not chafe against moving parts of the motorcycle.
When the clutch lever is released, check for correct clutch free play at the lever is as described in the Service Specifications.
Check:
Check the action of the clutch by pulling the clutch lever towards the handlebar grip in order to disengage the clutch.
Check that the clutch cable is correctly routed and free from sharp bends or twists along its length.
Check that the clutch lever returns to the fully forward position when released (allowing for the specified free-play).
Check the operation of the clutch lever span adjuster.
Rectification if required:
If necessary, adjust the clutch cable as described in the Owner's Handbook.
If undue resistance is felt when pulling the clutch lever towards the handlebar grip, check that the clutch cable is correctly routed. Twists or sharp bends in the cable will result in increased friction between the inner and outer cables.
See also:
 Triumph Scrambler 1200 XC - Service manual > Air Filter Element - Renew
WARNING Before starting work, ensure the motorcycle is stabilised and adequately supported. This will help prevent it from falling and causing injury to the operator or damage to the motorcycle.
Triumph Scrambler 1200 XC - Service manual > Tyres - Check For Wear/Damage
WARNING Before starting work, ensure the motorcycle is stabilised and adequately supported. This will help prevent it from falling and causing injury to the operator or damage to the motorcycle.
 Ducati Scrambler
 Fantic Caballero 500
 Indian FTR 1200
 Moto Guzzi V85 TT
 Royal Enfield Bullet Trials Works Replica
 Triumph Scrambler 1200 XE
 Triumph Street Scrambler
 Yamaha XSR700
 Ducati Scrambler 800
 Moto Guzzi V85 TT
 Triumph Scrambler 1200 XC